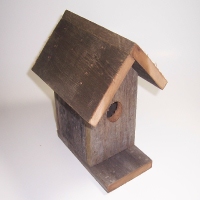
Classic Birdhouse
The classic birdhouse, the name of this birdhouse project, is called this because it is the basic style of birdhouses you see most often. It is easy to build and costs nothing if you have an old fence board* lying around.

There are many styles and shapes of birdhouses, but the classic style has always survived over the years. This birdhouse is a terrific project for young students and scouts interested in woodworking. By building this project, they can get a feel for what woodworking is like, and when they finish the project, they have a birdhouse for their backyard.

Building the Classic Birdhouse
You can build this birdhouse with a single 1" x 4" x 6' fence board (or other similar material). Using your miter or circular saw, cut the following lengths:
- Three 7" x 4" pieces (the bottom and both ends)
- Two 8" x 4" pieces (the roof)
- Two 4 3/4" x 4" pieces (the sides)
Before assembling the pieces, take out two of the 7" x 4" pieces. On one of the pieces, cut a 45-degree angle on both sides of one end to form a point (see diagrams below). The two pieces form the shape of the roof. Repeat this process on the other 7" x 4" piece. All of the parts should now be cut and ready for assembly.
Step 1 - Place the end piece on the top end of the base piece and attach it through the bottom of the base (the remaining rectangular 7" x 4" piece).
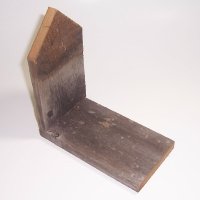
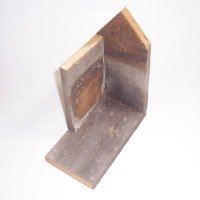
Step 2 - now that one end piece is attached, position one of the side pieces as shown (with the taller end pointed upwards)and attach it securely against the bottom and the end piece. Repeat this process to attach the remaining side piece.
Step 3 - attach the front end piece as shown in the diagram.
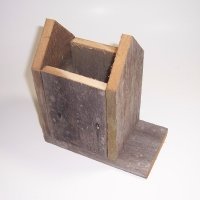
Step 4 - attach one side of the roof as shown. You don't have to split the difference evenly from front to back. I have mine positioned more towards the front (to give the bird more shade on his porch).
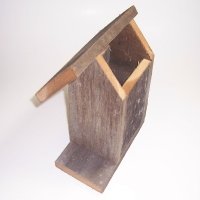
Step 5 - attach the remaining roof section as shown in the diagram. Drill a 1 1/4" hole in the front with a paddle bit.
Visit The Cornell Lab of Ornithology and eBird to learn more about birds and birding.
Birdhouse Plans - See more birdhouse plans on mycarpentry.com.
Woodworking Projects - See more woodworking projects on mycarpentry.com.
DIY Projects - Check out the DIY projects on mycarpentry.com.
Outdoor Benches - Enjoy your new birdhouse from a wooden bench you built from plans on mycarpentry.com.
What next?
Return to How to Build a Birdhouse.
Leave Classic Birdhouse and return Home.