Patio Cover Plans
These patio cover plans describe how I built my own patio cover. There are many ways to construct a patio cover; every situation is different. The purpose of these plans is to provide you with information and personal experience to help you design and build your own patio cover.
Patio Cover Plans - Getting Started
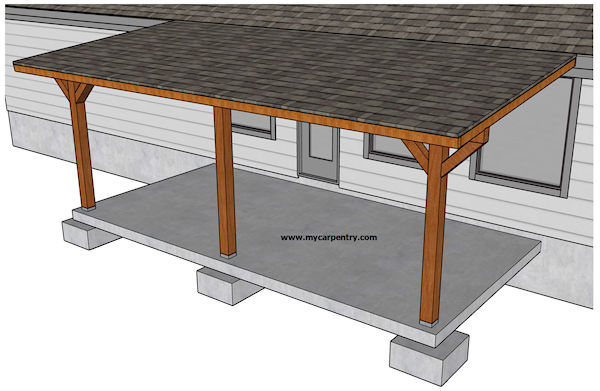
Before I began designing the structure of my new patio cover, I expanded the existing 10' x 10' patio slab by pouring another 10' x 10' slab next to it, making it roughly 10' x 20'.
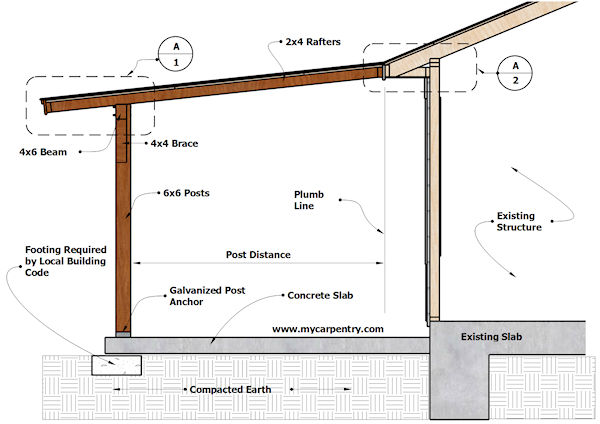
Since I was planning to attach my patio cover to the existing roof overhang of my home, I ensured that it was structurally capable of carrying half the weight of the new patio cover roof. If you plan to do something similar and are unsure of the existing framing, you can remove a section of fascia or soffit to examine the underlying structure. With the rafter tail framing exposed, you might even contact a local carpenter or structural engineer for their advice. The other half of the weight of the patio cover roof rests on an outer 4x6 beam supported vertically by three 6x6 posts. (see the Side View diagram)
If you determine that attaching your patio cover to your roof overhang is not an option, you might consider these new almost-free-standing patio cover plans (available on mycarpentry.com).
Special note: The purpose of these patio cover plans is not to replace engineered working drawings. Local building codes can vary significantly among the regions. Your local building code should determine the actual sizes of concrete footings, slabs, wood structural members, and fasteners used. A structural engineer should determine if your existing structure can support the additional load factors of a patio cover. Before beginning construction, contact your building permitting authorities to obtain a building permit and have your design reviewed so it will comply with local building codes and guidelines.
Patio Cover Plans - Design Factors
- Roof Design Load - The Design Load is a combination of the dead load (the weight of the framing material) and the live load (additional weight, like snow, etc., for your area). You can get this information from the International Building Code and your local building code authorities.
- Roof Slope - The roof should have sufficient pitch required by the type of roofing used. You can obtain this information from the roofing manufacturer.
- Rafter Size, Length, and Spacing - Once you know the Roof Load and Pitch, you can determine the Sizes, Lengths, and Spacing of the rafters based on the Species and Grade of the lumber used. You can use the Span Calculator on the American Wood Council's website to make the calculations. Try selecting the different options for Species and Spacing, etc., and compare the results.
- Beams and Posts - Once you know the Design load, you can multiply the lbs/ft² by the length and width of the roof to determine the total weight of the roof structure (live and dead load).
- Footings - Soil conditions vary in different locations. Areas in the far northern (and far southern) hemispheres require deeper footings due to the depth of the frost line. These can be determined based on the International Building Code and local building codes.
Patio Cover Plans - Structural Design
I didn't have to worry about snow when drawing my patio cover plans, but my two-layer plywood decking added some "dead load" to my design. I had to add that to my overall load. If continuous snow load had been a factor, I would have had to use 2x6 or larger rafters.
After calculating my rafter span, I would have exceeded the capacity of my 2x4 rafters if I had spaced them 24" O.C., but spacing them 16" O.C., I was within the range of my design load.
There were a few features that I wanted to include in my patio cover design. Writing these down before I started sketching the design, and drawing my patio cover plans, helped ensure that I would accomplish all of my goals.
- Western Red Cedar - this material is widely available in my region and has superior resistance to decay.
- Fiberglass shingles to match the existing residence.
- Outside beam height to have a minimum of 6' 8" clearance (my preference).
- Roofing nails should not show through the bottom of the roof decking.
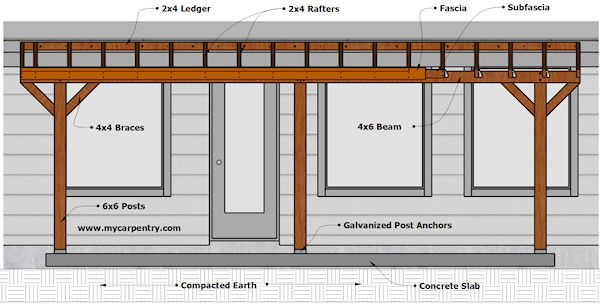
- 6x6 posts (notched at the top for the 4x6 beam).
- 4x6 beam.
- 2x4 rafters - based on my given span, spacing, and design load requirements.
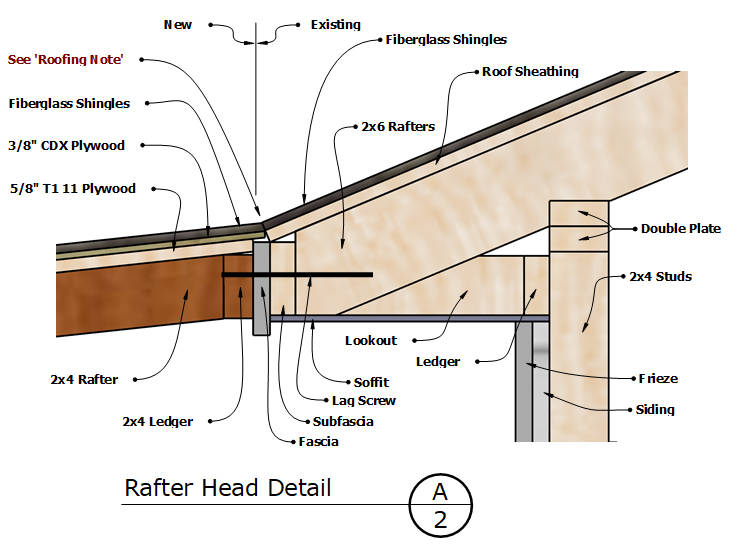
A clearance of 6'-8" between the finished slab and the bottom of the 4x6 beam made the pitch of my roof a little less than 2/12 (2 inches of rise for every 12 inches of run). The pitch was slightly below the manufacturer's minimum recommendations. I had no issues with my roof, but I recommend meeting or exceeding the manufacturer's specifications.
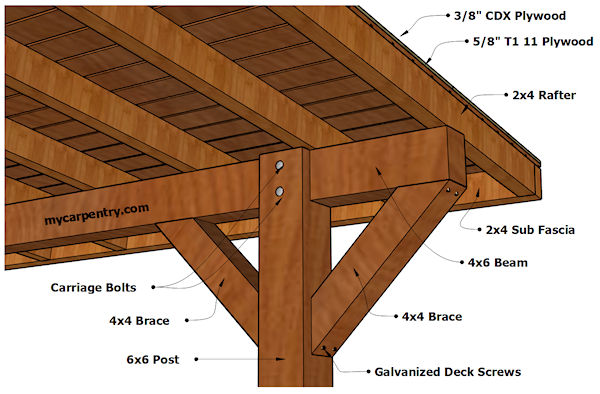
To prevent the roofing nails from showing through the underside of the decking, I used two layers of 4' x 8' plywood when decking the roof. For the bottom layer of roof decking, I chose 5/8" thick T1 11 4" O.C. (for a plank-like visual appearance from the underside), and for the top layer, I used 3/8" construction grade (CDX) plywood. This made the roof decking thickness 1".
Patio Cover Plans - Building
When you build a patio cover off of an existing roof or wall, you must take all of your measurements from the point at which the patio roof will attach to the existing structure, not the outside of the slab. The existing slab can vary considerably, throwing off crucial measurements.
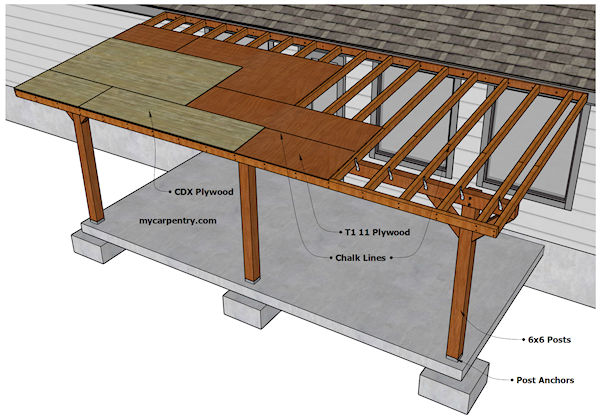
Since my patio roof was going to be attached to the existing rafter tails, I plumbed straight down from the outside surface of the fascia and made a mark on the patio slab. I did this on both ends of where the roof ledger would attach.
Afterward, I popped a chalk line across the patio slab between the two marks. I used this line to establish the placement of the bottom of the 6x6 posts - they all needed to be the same distance from this line.
I planned to place the 6x6 posts about 4" from the outside edges of the concrete (to prevent cracking) while keeping them the same distance from the chalk line.
I used galvanized post anchors to secure the posts to the slab. Before fastening the posts to the anchors, I cut just enough off the bottom of each post to make them square and let the other ends run long (to be cut to size in a later step). I used temporary 2x4 braces to keep the posts plumb while I determined the finished post heights.
With the posts plumbed, braced, and secured to the galvanized anchors, I measured up 6' 8" from the top of the slab and made a mark on the front of the center 6x6 post.
I used a level to transfer that mark from the center post to the two outer posts. This mark would be the height of the bottom of the 4x6 beam when installed.
Next, to determine the finished height of the posts, I measured up about 6" (use the actual height of the 4x6 beam) from the 6' 8" mark and cut the excess material off each post.

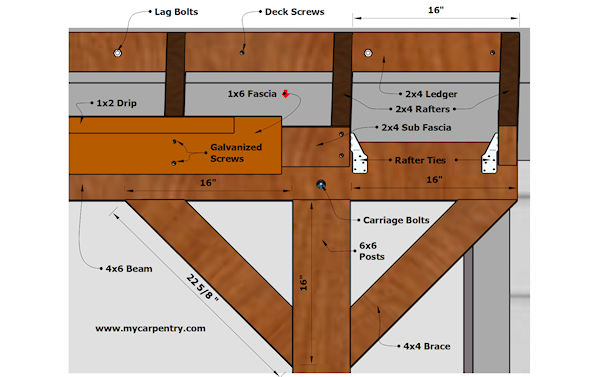
I notched the 6x6 posts on the outside face so that the 4x6 beam would sit on the posts furthest from the existing structure (see diagrams). I cut the 4x6 beams so that they extend past the two outer posts 16" on each side. Once they were cut, I temporarily secured the beams to the 6x6 posts with deck screws, being careful not to place them in the same location as carriage bolts. Once the beams were temporarily secured in place, I drilled two 3/8" holes on each end of the two 4x6 beams for the 8" x 3/8" carriage bolts and installed each one (see drawings).
If you have done everything perfectly, the measurement from the outer beam to the existing structure should be the same on each end. If not, check the posts to make sure they are still plumb.
With the beam in place, I determined the location of the 2x4 ledger (that would be attached to the house) using the Pythagorean Theorem. I secured the 2x4 ledger with 3.5-inch deck screws into the house's fascia and used 8" x 3/8" lag screws to further secure the 2x4 ledger beyond the fascia and sub-fascia into each existing rafter tails.
Once everything was secured and verified, I began the 16" O.C. layout for the 2x4 rafters. I cut one end of each 10' rafter with a 2/12 pitch cut (9.46 degrees) and attached it to the 2x4 ledger with 2" galvanized wood screws.
Once the rafters were in place and secured to the 2x4 ledger and the 4x6 beam, I measured from the house along the top of one of the end rafters and made a mark at 9'-9". I did the same on the other end rafter and popped a chalk line across the top of all the patio cover rafter tails.
Using my Speed Square, I marked a 90° line from the chalk line mark on each rafter and cut the end off each one with a circular saw. Once the rafter tails were all the same length, I cut the 2x4 sub fascia and fastened it to the rafter tails with two 3 1/2" galvanized deck screws per rafter.
Next, I installed the T1 11 plywood decking; From the sub fascia at the end of one of the end-rafters, I measured up along the rafter 48" and made a mark on the topside of the rafter. I did the same on the other end-rafter.
Using my Chalk Line tool, I pulled the line very tight and popped a chalk line across the tops of all the rafters. This line established a guide for the 48" x 96" T1 11 plywood decking. I attached the T1 11 decking to the rafters using 1 1/2 galvanized wood screws.
It is good practice not to completely nail off each sheet of plywood until all the sheets are attached to the rafters. Nail them at the corners and at places where there is a bow (if necessary) to keep the sheets flat until they can be nailed/screwed in place.
There was no requirement in the building code for two layers of roof decking. That was my idea (to prevent the roofing nails from poking through the underside).
To install the second layer of decking, the 3/8" CDX plywood, I measured up from the ends of the roof 24" on each side and popped a line across (to stagger the plywood joints). I ripped two pieces of the 3/8" plywood into two equal pieces measuring 24" x 96", and secured the first course of the second layer of plywood, keeping the factory edge along the 24" chalk line.
Next, I installed 1x6 cedar fascia and 1x2 drip edge on both sides and front of the roof. I fastened the fascia and drip-edge to the structure with 2" galvanized wood screws.
The final step of the roof frame was to install the four diagonal braces at each end of the 4x6 beam and the two 6x6 posts (see the Diagonal Brace Detail). Since each end of the 4x6 beam overhangs 16 inches, you can determine the length of the diagonal braces using the Pythagorean Theorem. The result is four 4x6's @ 22 5/8" long from long point to long point with a 45° bevel on each end. Secure them with 3 1/2" galvanized deck screws.
Finally, I installed 15# felt on top of the two layers of plywood and installed the fiberglass roofing, following the manufacturer's specifications.
A continuous flow of roofing or flashing is required at the intersection between the existing roof and the new patio cover roof (to prevent leaking). Follow the guidelines provided by the roofing manufacturer or your roofing contractor.
After completing these patio cover plans, I sealed all the wood surfaces with a cedar-colored wood sealer. Each sealant application turned the wood slightly darker, but after about three coats (stretched over five years), I have not needed to re-seal the wood.
Before building a patio cover, please refer to the 2018 International Building Code for building codes related to patio covers.
Patio Cover Plans - FAQ
If you have questions about my patio cover plans, have a look at some of the frequently asked questions and my answers to each of them:
Question: If I use 2x6" rafters, could I increase spacing to 24" O.C.?
Answer: That depends on the design load of your roof and the span of your rafters. To determine the design load of your roof, consult your local building code. These are specific to the area where you live. You can determine the allowable spans of different rafter sizes and spacing using the Rafter Span Tables on mycarpentry.com.
Question: If I increase the span of the patio cover to 24' instead of 20', would I need another column?
Answer: This depends on the size of the beam you are using. Is it capable of carrying the extra weight? In my design, if I were to extend the width of my patio to 24', I would have needed to add one additional post.
Question: The fascia on my house is a 2x6". Would I still need a ledger or would that work?
Answer: The most important thing is to determine if your rafter tails can support half of the total weight of your patio cover. Adding the 2x ledger to the outside of the fascia is very important - it is the part of your patio cover framing that is screwed to your home's structure. I wouldn't recommend simply nailing rafters into the existing fascia - you don't know what is behind it. If you determine that attaching your patio cover to your roof overhang is not an option, you might consider these new almost-free-standing patio cover plans (available on mycarpentry.com).
Rafter Span Tables - Determine maximum rafter spans for different species of lumber.
Roof Pitch Calculator - Calculate roof pitch, angle, rise, run and rafter length.
Roof Framing - How to design and frame a roof.
What next?
Leave patio cover plans and visit our home page.