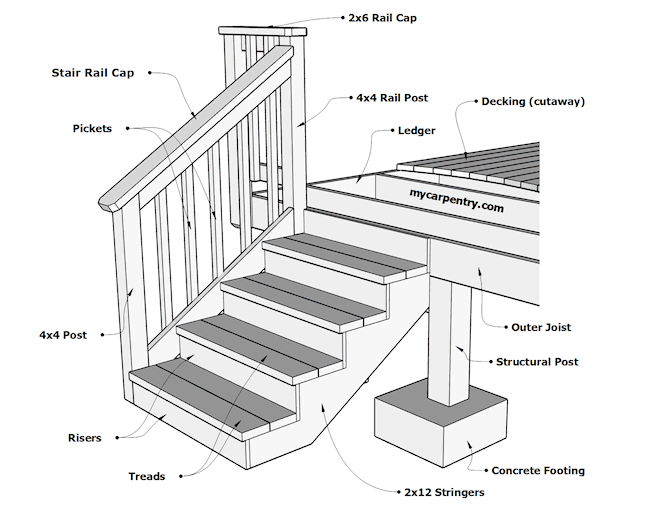
Building Stairs
Building stairs is a valuable carpentry skill. On this page, you will learn how to calculate stair stringer rise and run and how to use those calculations to layout and cut stair stringers.
Check out Building Deck Stairs on the 10x10 deck tutorial for information about building stairs for decks.
How to Calculate Step Rise and Run
This section describes how to calculate stair rise and run while discussing building codes related to stair construction. Some of these are listed below:
- The minimum width of a stairway is 36 inches (914 mm)
- The minimum number of stringers for a 36-inch wide stairway is 3.
- The maximum Riser Height (step rise) should not be more than 7 3/4" (196 mm)
- The minimum Tread Depth (step run) should not be less than 10" (254 mm)
A Tread Depth (or step run) of 10 1/2" is ideal (I think) when using a single 2x12 or two 2x6s for tread material. I always try to design my stair rises as close to 7" as possible.
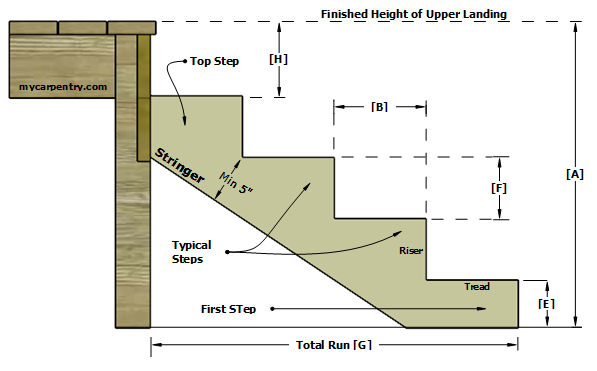
How to Determine Step Rise
To calculate the number of risers for a typical set of stairs, divide the Total Rise [A] by 7". You can use any number you want, but I will use 7" for this example because that is my usual Target Step Height.
If the total rise [A] of a deck or landing is 36.25", divide that number by 7. The result will be 5.17. Since the number of steps must be a whole number (partial steps are not allowed), pick the whole number that is closest to 5.17 (5 in this case) and divide it into the Total Rise:
How to Determine Step Run and Total Run
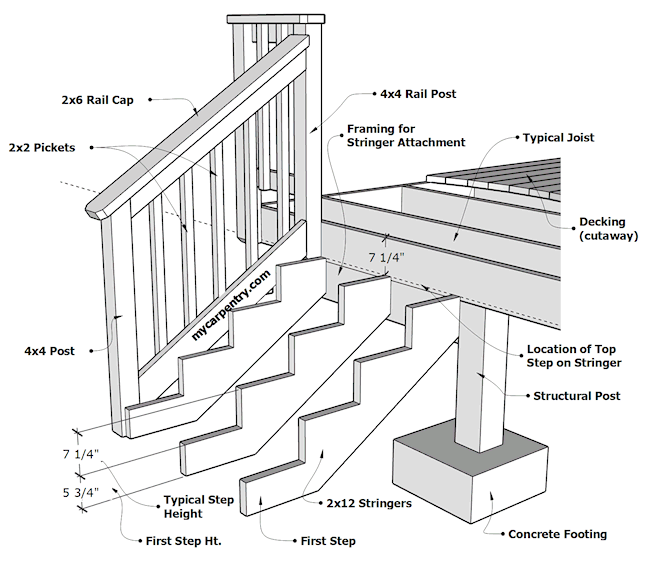
If you mount your stringers as shown in the diagrams (where the top step on the stringer is one step below the top landing), the number of treads will always be one less than the number of rises. In this example, the number of Treads is 4. If we use 10 1/2" (267 mm) for the Tread Depth (or step run)[B], then we can use the following formula to determine the Total Run of the stairs:
The above stair run will have five rises at 7.25 inches and four treads at 10.5", resulting in a total run of 42".
With this stair design, the last (top) riser is the landing or upper floor.
Now that the number of treads (4), the tread depth (10.5 inches), and the riser height (7.25 inches) are known, we have the information that we need to lay out the stair stringers.
Note: I recommend using the Stair Calculator to calculate your stair Rise and Run (as well as stair angle, stringer length, etc.), but you can always do it the manual way if you prefer.
Building Stairs - Laying Out Stair Stringers
The tools that you will need for laying out and cutting stair stringers are:
- Framing Square
- Carpenter's Pencil
- Circular Saw
- Jigsaw or Handsaw
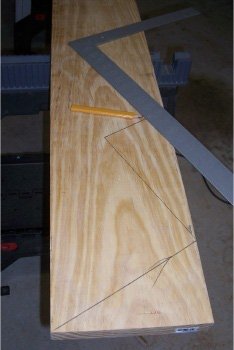
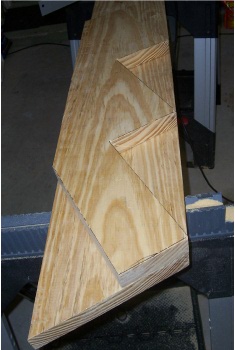
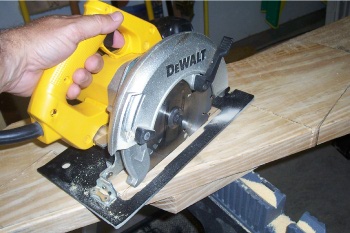
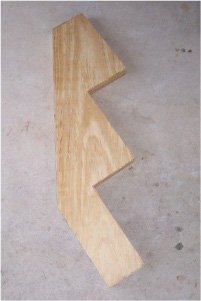
A crucial part of building stairs is the layout of the stringers. The stair stringers should be 2x12 framing lumber, #1 grade, free of knots. The images below show how to use a framing square to lay out the first stringer [C] and use the first stringer as a pattern for the remaining stringers [D]. It is important not to lay out each stringer separately. Laying out the stringers one by one takes more time, and the second or third stringers may not match up to the first if there are any variances in shape between the 2x12s. Using the first stringer as the pattern for all the remaining stringers will eliminate this potential stair-building problem.
To lay out the first stair stringer, lay a 2x12 on top of two saw horses. Using the inside of a framing square, line up 10 1/2" on one edge of the 2x12 (about 6" from the end of the board) while also lining up 7 1/4" on the other inside edge of the square - this is the Step Rise and Step Run. Mark the 2x12 with a pencil along the inside edges of the framing square to mark the first step (see diagrams below).
The height of the first step on the stringer will be the Step Height minus the thickness of the tread material (so that when you add the treads later, all of the steps will be the same height). The first step height will be 5 3/4 inches (Typical Step Height minus Tread Thickness or 7 1/4 inches minus 1 1/2 inches). Align the square along the 10 1/2" line with the 90-degree point intersecting the 10 1/2" pencil mark, and draw a line to the opposite edge of the 2x12 (see Stringer Material diagram below). Make a pencil mark along this line, 5 3/4" from the 10 1/2" point. Draw a line from the 5 3/4" mark, parallel to the 10 1/2" line until you reach the edge of the stringer. (see the Stringer Pattern in the diagram below) The first step on the stringer is now complete.
To create the second step on the stringer, return to the first 7 1/4" mark on the 2x12. Align the inside of the framing square where 10 1/2" meets up with the first 7 1/4" mark, and align the other inside edge of the square at 7 1/4". Repeat this process until you have four steps on the stringer.
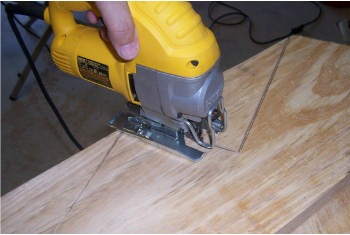
How to Cut Stringers
Now that you have the 1st stringer laid out, you can make the primary cuts using a circular saw. Do not cut past the layout marks with the circular saw. Cut the remaining wood out with a jig saw or a hand saw. Cutting past the layout marks on the stringer can compromise the stair structure. Building Code requires at least 5" of uncut wood left on the stringer.
The stringers shown in the diagrams above and below only have three steps, but the concept is the same regardless of how many steps you have.
You should now have the information necessary to design and cut stringers for your stair-building project. Of course, these are just the basics of building stairs. Building stairs with multiple landings or spiral stairs will require more thought.
** Note: For building code information related to stair construction, visit 2024 International Residential Code for One- and Two-Family Dwellings - Section 318 - MEANS OF EGRESS.
For building code information related to deck building, check out the Prescriptive Residential Wood Deck Construction Guide by the American Wood Council.
Stair Calculator - Calculate step Rise and Run, stringer length, and rail angle.
Stairs and Landings - Learn how to build stairs with landings.
Building Deck Stairs - How to build stairs on a deck.
Stair Railing - Learn how to build stair railing.
What next?
Visit Stairs with Landings to learn how to build stairs with landings.
Leave Building Stairs and return Home.