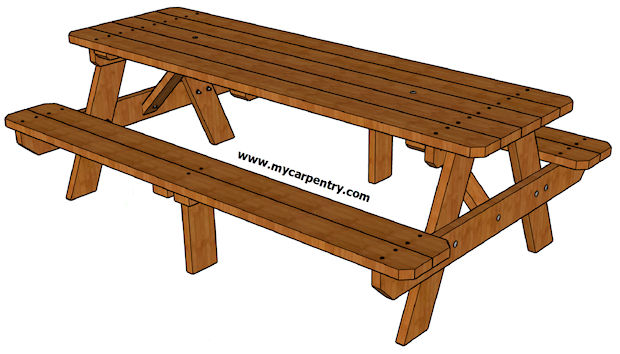
8 Foot Picnic Table Plans
These 8-foot picnic table plans are ideal for large families or groups. It can seat up to eight people (10, if you count a person sitting at each end).
Note: Before cutting any wood or building any part of this picnic table, read through to the end of these instructions so that you can verify the materials list.
Also, note that these picnic table plans show the table being 7' 10" long (rather than 8 feet), so you can purchase 8-foot 2x6s (for the top and benches) and have room to cut off damaged or cracked ends (if necessary). If the material you purchase isn't damaged, you can use the whole 8' length. The decision is yours.
Power tools required:
- Circular Saw
- Power Drill
Rough material list:
| Material | Qty | Usage |
| 2" x 6" @ 12' | 1 | Legs (4) |
| 2" x 6" @ 10' | 1 | Two Horizontal Bench Supports |
| 2" x 6" @ 10' | 2 | One Bench (two 8-Foot Planks), Both Vertical Ctr. Bench Supports |
| 2" x 6" @ 8' | 7 | One Bench (two 8-Foot Planks), Table Top (five 8-Foot Planks) |
| 2" x 4" @ 12' | 1 | Table Top Braces (3), Table Top Supports (2) |
| 2" x 4" @ 8' | 1 | Diagonal Braces (2), Center Bench Braces (4) |
| 3/8" x 3.5" Galvanized Carriage Bolts | 16 | Bench Supports, Legs, and Diagonal Braces |
| 2.5" Galvanized Deck Screws | 46 | Table Top, Bench Seat, Misc. usage |
| 3" Galvanized Deck Screws | 48 | Table Top, Bench Seat, Misc. usage |
The material list for the 8-foot picnic table becomes:
| Material | Qty |
| 2" x 6" @ 12' | 1 |
| 2" x 6" @ 10' | 3 |
| 2" x 6" @ 8' | 7 |
| 2" x 4" @ 12' | 1 |
| 2" x 4" @ 8' | 1 |
| 3/8" x 3.5" Galvanized Carriage Bolts, Washers and Nuts | 16 |
| 2.5" Galvanized Deck Screws | 70+/- |
| 3" Galvanized Deck Screws | 50+/- |
You can use any species of lumber that you want to build this picnic table. I use Western Red Cedar.
Assembling the 8 Foot Picnic Table
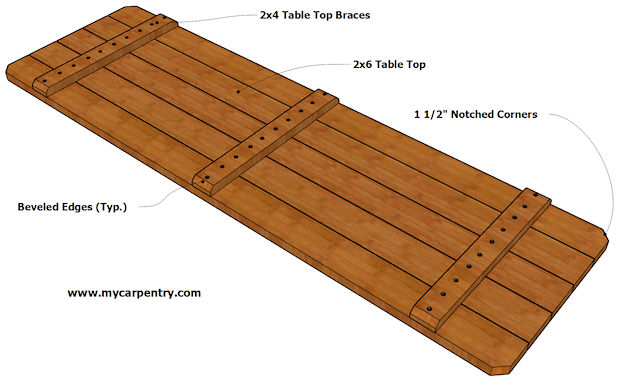
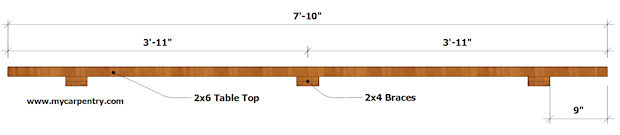
- Cut five 2x6s 7'10" long from five of the 8-foot 2x6s.
- Cut three 2x4s 28" long out of the 12' 2x4. Cut a 45° bevel angle on each end of the three 2x4s (as shown in the drawings).
- On a flat surface, lay out the five 2x6s side by side, with the best side facing down. Add about a 1/8" spacing between each 2x6.
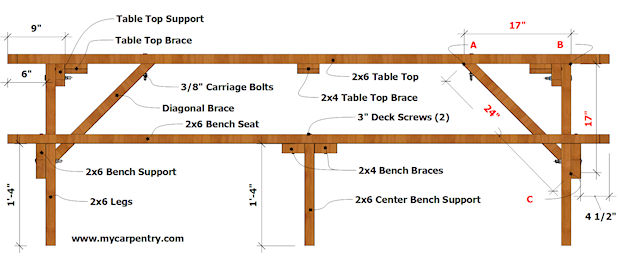
- Position two pre-beveled 2x4s on each end of the tabletop (as shown in the diagram) 9 inches from each end and the third one in the center.
- Attach the three 2x4s to the tabletop boards using two 2.5" galvanized deck screws per plank. Note: The 2x4 braces do not have to be flush with the table edges (as shown in the diagrams). Center them so that the 2x6 planks will hang over the 2x4s equally on both sides. Ensure that all the 2x6s line up and squared at the ends before putting in all the screws. See the diagrams below.
Cut and Assemble the Legs and Bench Supports
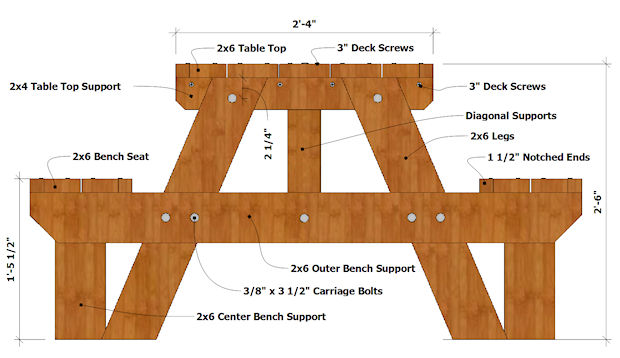
- Mark an angle (with a speed square) 23 degrees on one end of the 12' 2x6 and cut it (this will leave a 67-degree angle on the leg).
- Measure 31" from the long point of the previous angle and cut and mark another 23-degree angle (parallel to the first angle) and cut it. (see diagram below) Using the first leg as a template, mark and cut the remaining three legs from the same 12' 2x6.
- From the remaining 12' 2x4, cut two pieces 28" (2'-4") long (these are the tabletop supports). Notch the ends as shown in the drawings.
- On the top edge of one of the 2x4s, make a crow's-foot mark 4" from each end - this will be the position of the top of the legs. (see diagram)
- Place the legs on the 2x4 (as shown in the diagram) and secure them on the edges with two 2.5" galvanized deck screws, making sure that the deck screws won't interfere with future carriage bolts.
- From the 10' 2x6, cut two pieces 60" (5'-0") long. These are the bench supports.
- Measure up 16" (1'-4") from the bottom end of each leg and make a mark - the height of the bench support.
- Line up the top of the 60" bench support with the crow's foot marks created from the previous step.
- Center it between the legs so that an equal amount of 2x6 extends past each leg. (see the diagram below).
- Temporarily secure the bench support to the legs with two 2.5" galvanized deck screws.
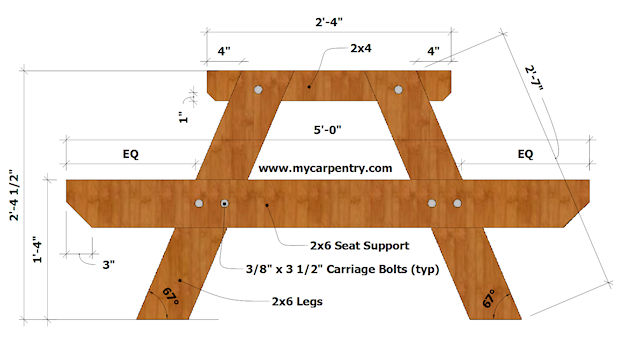
- Drill 3/8" holes through both boards where each piece connects (as shown in the drawings), and secure the pieces together with four 3/8" x 3.5" galvanized carriage bolts, washers, and nuts. Note that the holes that secure the legs to the upper support should be drilled 2 1/4" from the top of the upper support (see Diagram F) so that when you attach the leg assembly to the tabletop braces, the carriage bolts won't be in the way.
- Repeat the steps above to assemble the remaining leg assembly.
Attach the Leg Sections to the Table Top
- Flip the table top upside down and attach the legs to each side of the tabletop braces using four 3" galvanized deck screws on each end. (see Diagram D)

Attach the Diagonal Supports to the 8 Foot Picnic Table
- From the remaining 8' 2x4, cut two 24" pieces with a 45° bevel angle on each end. These are the diagonal braces. (shown above)
- From the bottom of the tabletop (point B) to the inside-middle of the bench support, make a mark at 17" (point C). (see Diagram F)
- Make another 17" mark on the underside of the table from the inside plane of the bench support (point B) to the center board on the underside of the table (point A). The long points of the 24" brace, when attached, should line up with these two marks. If they don't line up, adjust the leg assembly until the marks align to ensure the legs and tabletop are 90 degrees.
- Temporarily secure the braces with 2.5" galvanized deck screws and finally with carriage bolts.
Adding the Bench Seats to the 8 Foot Picnic Table
- With the diagonal braces in place and secured, flip the table upright. Cut four 7'-10" bench seat boards from the two 10' 2x6s and the two 8' 2x6s.
- On each side of the table, center two of the bench seat boards between the two 2x6 bench supports.
- The seat boards on the bench should overhang the same on each end of the picnic table and be spaced approximately 1/8" apart.
- Once you are satisfied with the placement of the 2x6 bench seat boards, secure them to the bench supports using two 3" deck screws on each end.
- From the two remaining pieces of 2x6, cut two pieces 16" (1'-4") long. These are the center bench supports.
- Locate the center of the bench seat and place one of the 16" bench supports upright under the bench. Attach the bench seat support to the bench seat boards using two 3" deck screws (one per bench seat board - see diagrams).
- From the remaining 2x4 material, cut four seat braces about an inch less than the width of the double 2x6 bench seat (roughly 10").
- Sandwich the 2x6 center bench supports with the 10" seat braces (as shown in the drawings) and secure them to the bench seat from the bottom with four 2.5" deck screws per brace.
- Add the remaining carriage bolts and missing deck screws.
Complete!
I hope you find these 8-foot picnic table plans helpful when you build your picnic table. Check out the other picnic table designs on our free picnic table plans page.
If you are wondering what wood to use for your picnic table, this link will take you to a site that shares some good information.
Picnic Table Plans - Check out our picnic table plans.
Outdoor Furniture Plans - View our outdoor furniture plans.
Woodworking Projects - Visit our woodworking projects page.
What next?
Leave picnic table designs and visit our home page.