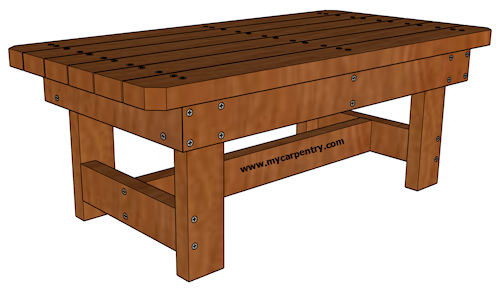
Coffee Table Plans
These coffee table plans provide the instructions for building a simple outdoor coffee table for your patio or deck. This wood coffee table complements the patio end table project in the outdoor furniture plans section on mycarpentry.com.
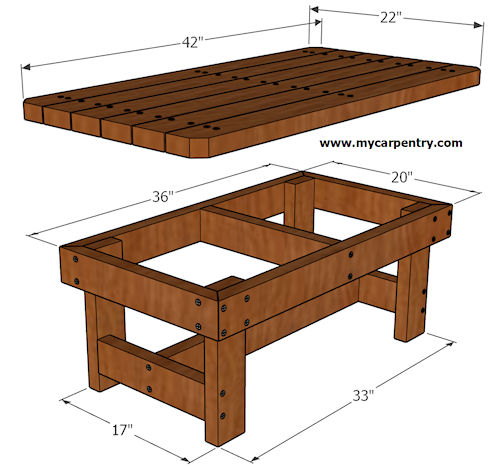
I used western red cedar to construct my table, but you can use any species of lumber you desire. I recommend a material naturally resistant to decay (like cedar, redwood, or pressure-treated pine). Here is a list of the parts and sizes that you will need:
| Usage | Material | Length | Quantity |
| Frame Length | 2x4 | 36" | 2 |
| Frame Width | 2x4 | 20" | 2 |
| Legs | 2x4 | 14.5" | 4 |
| Center brace* | 2x4 | 30" (+/-) | 1 |
| Lower brace* | 2x4 | 14" (+/-) | 2 |
| Top | 2x4 | 42" | 6 |
| Fasteners | Deck Screws | 3" | 80 (+/-) |
*Lumber varies in thickness, depending on the mill. These sizes are estimated. Wait until you have the coffee table's frame and legs installed so that you can measure the exact size of these pieces.
Coffee Table Plans
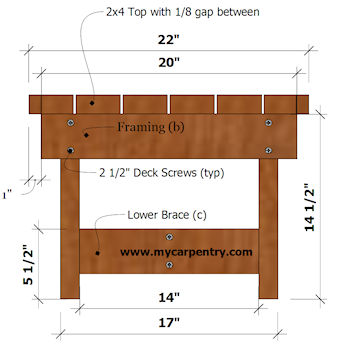
First, cut the four framing pieces (b) to the lengths indicated in the specifications and drawings. The lengths assume you plan to miter the framing joints; cut them at 45-degree angles. The measurements are from long-point to long-point.
Cut the four legs and position them inside the coffee table frame, as shown in the diagram(s). Use a square to align them perpendicularly, then secure the legs with 3" galvanized deck screws.
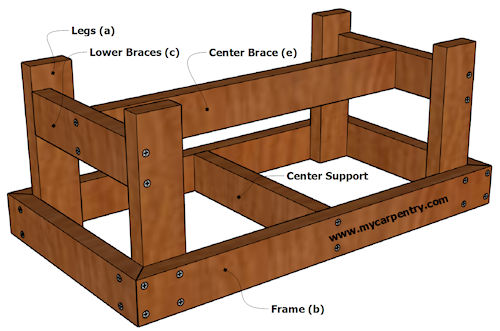
Before you cut the lower braces (c):
- Measure the actual distance between the legs where they will attach to the frame.
- Cut the lower braces (c) this length.
- Attach them where indicated in the diagrams and secure them with 3" galvanized deck screws.
Before cutting the center brace (e):
- Ensure the legs are square with the lower braces (c) attached.
- Measure the distance between the two lower braces (c).
- Cut the center brace (e) this length.
- Attach it with 3" galvanized deck screws. The frame for the coffee table should now be complete.
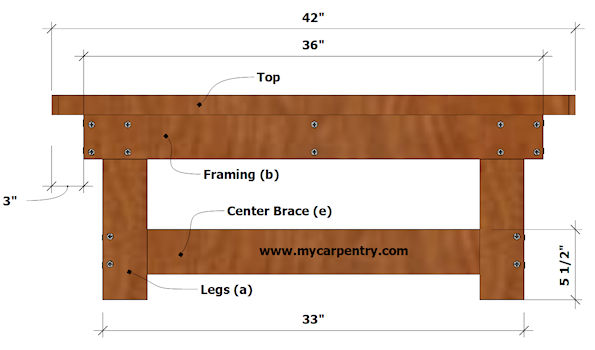
Cut the six tabletop boards 42" long and lay them out on top of the finished frame so that you can see how they will fit together (given that their widths may vary somewhat). Let the outside 2x4s overhang the front and back by 1 inch on each side and 3 inches at each end. Center them on the assembled frame (b). Leave a space between the planks approximately 1/8". When you are satisfied with the coffee table top layout, secure them with 3" galvanized deck screws. Use the diagrams above and below for reference.
If you plan to use wood with natural decay resistance, I recommend you protect it with a suitable stain/sealer made for the species of wood that you are using.
You can also paint your coffee table project. If you use pressure-treated material, give it plenty of time to dry before you paint.
What next?
Visit outdoor furniture plans for more outdoor furniture projects on mycarpentry.com.
Leave coffee table plans and visit the mycarpentry.com home page.