Custom Stairs
Free-standing Stairs
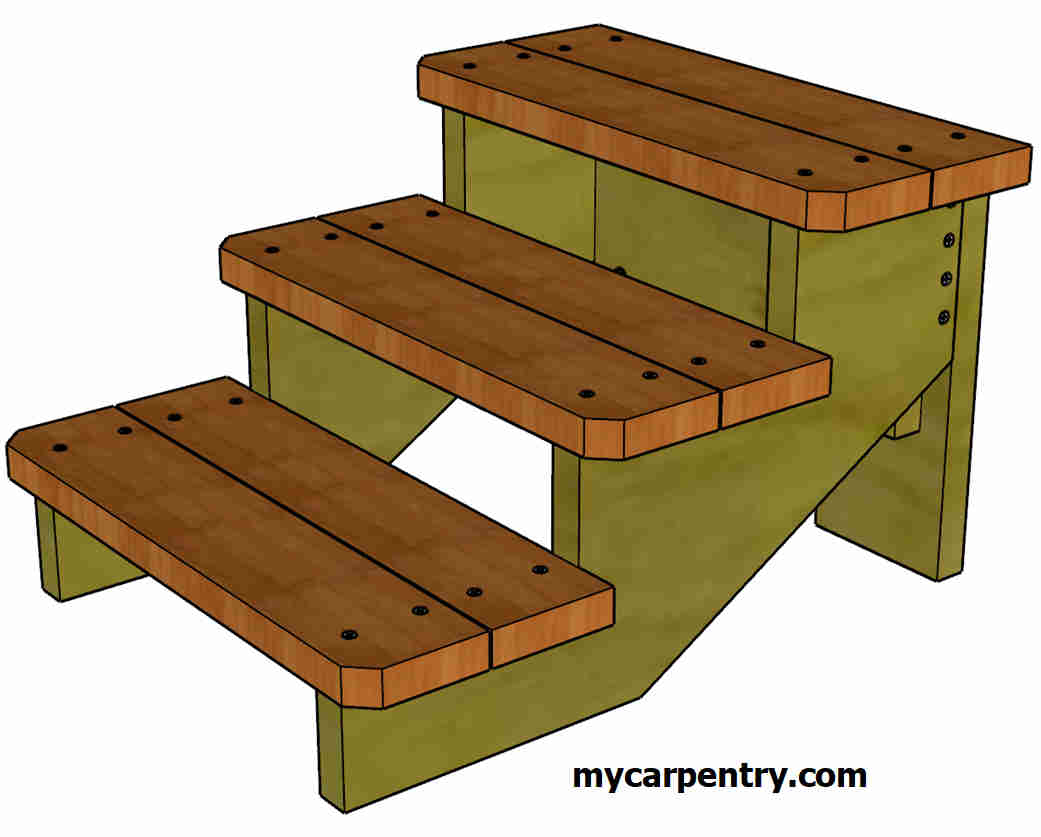
I built these custom stairs for my RV because I needed some free-standing stairs for my travel trailer, and I wanted to demonstrate stringer calculation using mycarpentry.com's Stair Calculator and how I used SketchUp Pro to create 3D drawings of my stairs before starting construction.
The built-in two-step folding stairs attached to our travel trailer provide access to the RV via three steps (9.5, 6.5, and 9.5 inches), totaling 25.5 inches. The built-in steps work fine when we are RV camping in a state park for a weekend, but when we are at our lake property on level ground, I wanted some custom stairs that were a little easier to climb.
Calculating Stair Stringers
I used the Stair Calculator on myCarpentry.com to determine the rise and run and the number of steps I needed to design my stairs. I entered 25.5 inches (the height from the ground to the trailer's threshold) as the Total Rise on the Automatic Stair Calculator, and left all other input fields at their default values, then clicked the Calculate Stairs button.
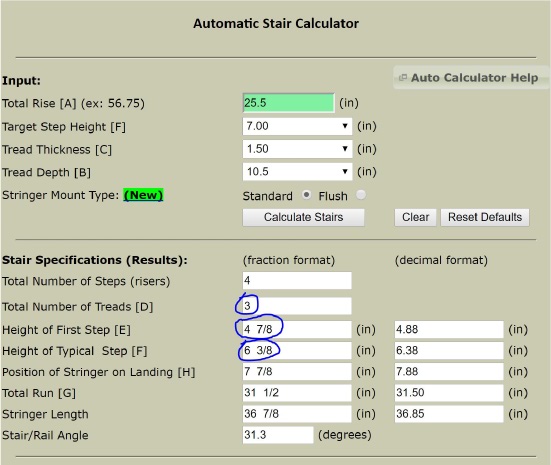
The result was four equal steps at 6 3/8 inches each. Since the stairs would not be attached to my travel trailer, my stair design became a free-standing wooden step unit with three 6 3/8-inch high steps (totaling 19 1/8 inches). Note: The last 6 3/8-inch step up into the doorway of the travel trailer completes the 25 1/2-inch Total Rise calculation.
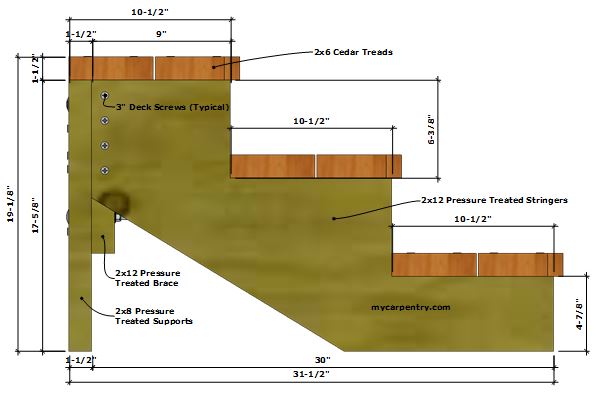
When laying out the stringer (above), the height of the first step is always the Typical Step Height minus the Tread Thickness (6 3/8 - 1 1/2 = 4 7/8) so that when treads are attached, the first step equals the height of the other steps.
On this particular stair stringer design, I also subtracted 1 1/2 inches from the back of the top step's Tread Depth so that when I added the 1 1/2-inch thick back supports to the stringers, the total Tread Depth would equal the designed Tread Depth (10 1/2 inches).
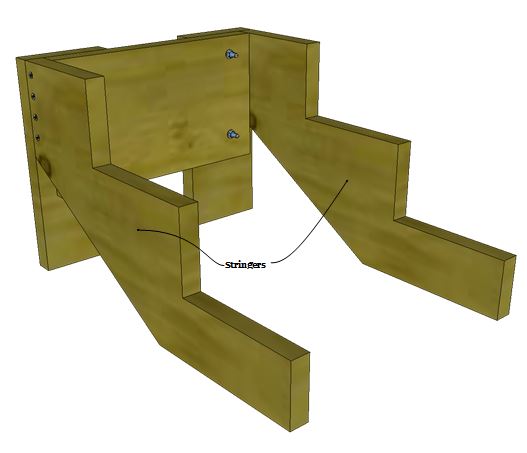
Once I determined the specifics of my stair design, I used Sketchup Pro to draw the stringers, back supports, and treads. Then, I assembled the components into a 3D image that I could twist, turn, and flip to see every angle. It helps to visualize the finished product, make any changes that might be necessary, and create a detailed materials list.
Custom Stairs Materials List
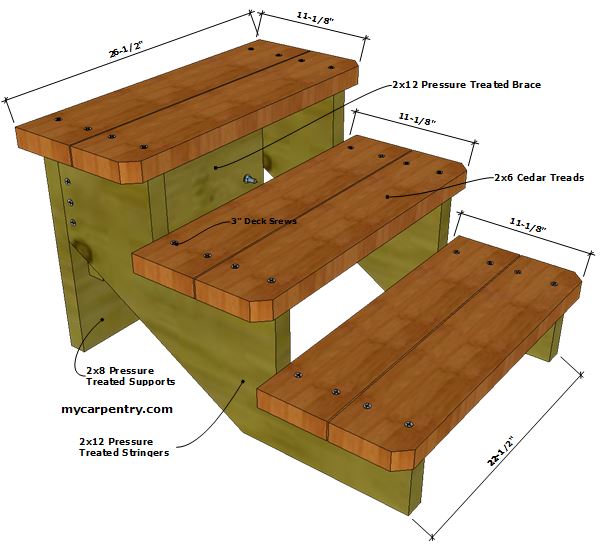
The material list (below) shows the actual sizes of lumber I needed to build my custom stairs. I used this list to determine the nominal lengths I needed to purchase from the lumber yard.
- Stringers - 2x12 pressure-treated pine - two @ approximately 37 inches tip to tip
- Brace - 2x12 pressure-treated pine - one @ 19 1/2 inches
- Supports - 2x8 pressure-treated pine - two @ 17 5/8 inches
- Treads - 2x6 western red cedar - six @ 26 1/2 inches
- Deck Screws - 46 @ 3 inches
- Carriage Bolts - 4 @ 1/4-inch x 3 1/2-inches
I determined that, if I was extra careful not to waste any wood, I could cut both stringers and the brace out of one 8-foot pressure-treated 2x12 (I ended up with one inch of 2x12 left over). I bought the shortest pressure-treated 2x8 I could find (8 feet) for the back supports (this was the most waste - it makes me think about all of the 17 5/8 inch scraps I have thrown away over the years). I purchased two 8-foot cedar 2x6s for the treads. After cutting the six of them, there was very little waste. The lumber yard list became:
- 2x12 pressure-treated pine - one @ 8 feet
- 2x8 pressure-treated pine - one @ 8 feet
- 2x6 western red cedar - 2 @ 8 feet
- 3-inch Deck Screws - one small box (containing at least 46)
- Carriage Bolts - 4 @ 1/4-inch x 3 1/2-inches
Custom Stairs - Assembly
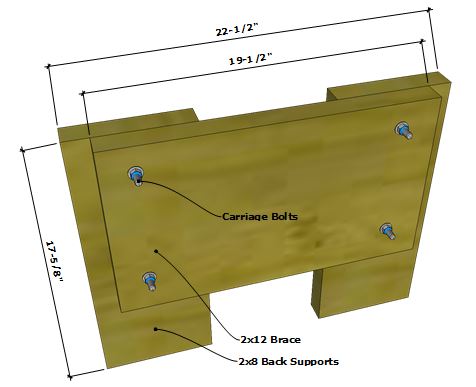
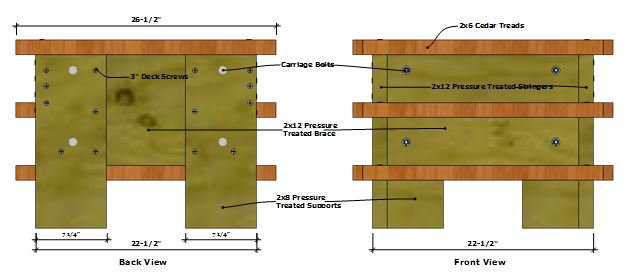
First, screw and bolt the 2x12 brace onto the two 2x8 back supports, letting the back supports extend 1 1/2 inches past the ends of the 2x12 brace (as shown in the drawings) using the 3-inch deck screws and 1/4-inch x 3 1/2-inch carriage bolts.
Next, cut the rise and run on the stringers, as specified by the Stair Calculator, and screw them into the ends of the brace using four 3-inch deck screws on each side.
Make sure the two stringers are square with the back support structure, and add three additional screws from the back supports into the ends of the stringers (see Back View diagram below).
Cut the six 26 1/2-inch long 2x6 cedar treads. Check the stringer/support structure for square (once more) and ensure that the lower ends of the stringers are the same distance apart as the upper ends, attached to each end of the brace. Attach the cedar treads using two 3-inch deck screws at each end, letting them hang over the stringers approximately two inches on each side.
Once assembled, I added a chamfer to the front treads of each step. It wasn't a requirement, but I thought it added a little style to these custom stairs. Finally, I sealed the completed stairs with a cedar stain/sealer.
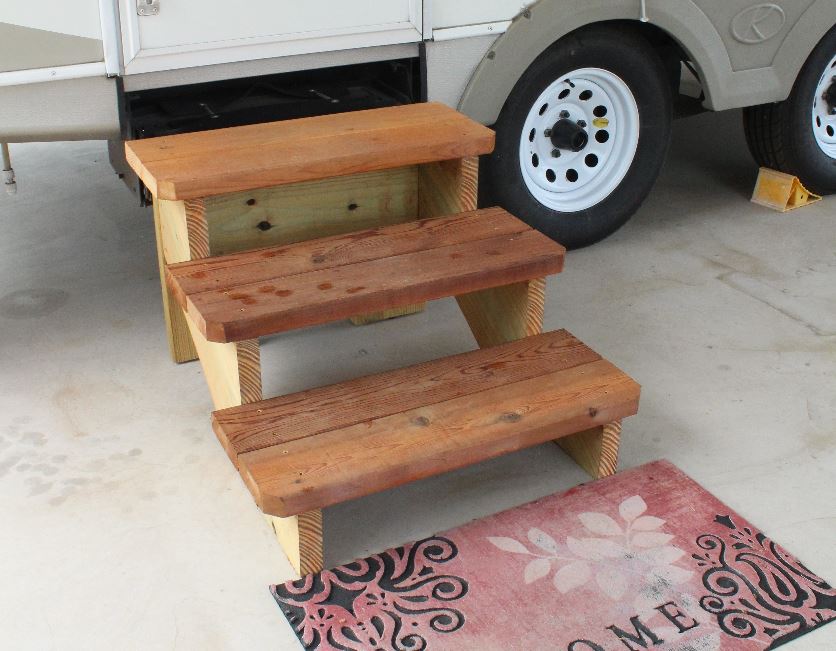
The steps worked better than expected. In addition to making access to our travel trailer easier, the new custom stairs made our house on wheels feel a little more like home.
** Note: See 2018 International Residential Code for One- and Two-Family Dwellings - Section 311 - MEANS OF EGRESS for building code information.
Stairs and Landings - Read more about building stairs and landings.
Building Deck Stairs - How to build stairs for a deck.
Building Stairs - Learn how to build stairs.
Stair Calculator - Calculate Stair Rise and Run.
What next?