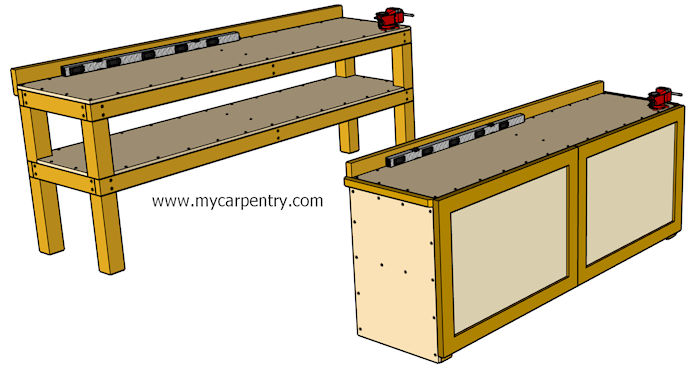
DIY Workbench Plans
These DIY workbench plans make building a workbench easy. These plans make the most out of nominal-size lumber to minimize leftover material. You can cut the top and bottom shelves from a single 4x8 sheet of plywood and most other structural members from 8-foot or 12-foot lengths of materials.
Power tools required:
- Circular Saw
- Power Drill
- Table Saw (for optional doors)
| Material | Quantity | Purpose |
| 2" x 4" @ 8' | 6 | Horizontal Framing |
| 2" x 6" @ 8' | 1 | Back Board |
| 4" x 4" @ 12' | 1 | Corner Posts |
| 4' x 8' x 3/4" Plywood | 1 | Top and Middle Shelf |
| 3" Deck Screws | 110 +/- | Fasteners (typical) |
Optional Sides and Doors - Material List:
| Material | Quantity | Purpose |
| 2" x 4" @ 8' | 4 | Cabinet Door Frame |
| 4' x 8' x 5/8" Plywood | 1 | Cabinet Doors |
| 4' x 4' x 3/4" Plywood | 1 | End Covers |
| 2" x 2" x 6' | 1 | End Trim |
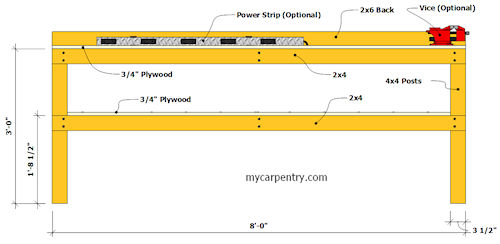
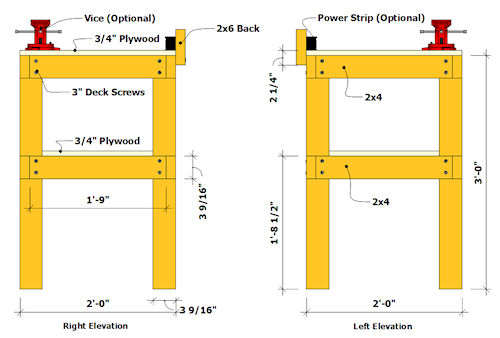
DIY Workbench Plans - Elevations
DIY Workbench Plans - Building Procedures
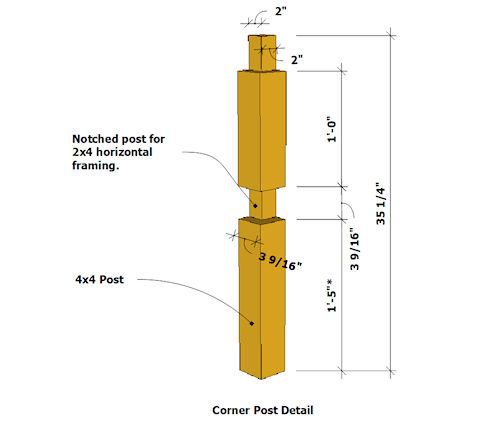
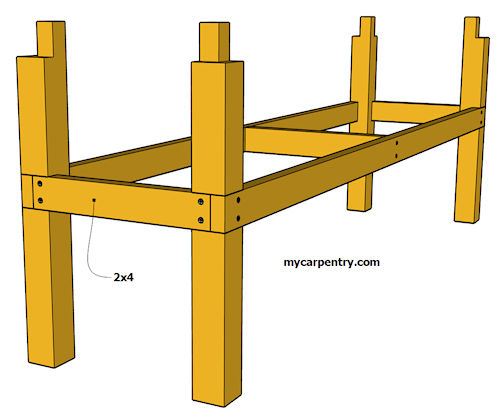
- Cut four 35 1/4" corner posts from the 12' 4x4. There is very little waste. Be sure to pick out a 4x4 that doesn't have damaged ends.
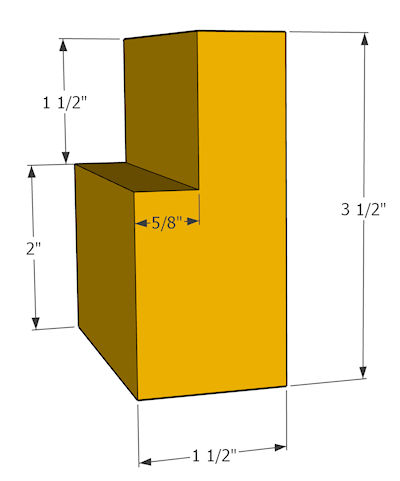
- Before notching the 4x4 posts, ensure the notches will accommodate the width and depth of the size 2x4 you plan to use for the frame. The diagram below assumes that the 2x4 material is 1 1/2" x 3 9/16".
- Cut two 8' rails from the four 8' 2x4s and attach the two middle ones to the 4x4 posts with 3" deck screws. Make sure that all of the pieces are square before securing them together.
- Cut three 21" 2x4s from the 12' 2x4. Use the three 2x4s to connect the front and back sections of the workbench (as shown below).
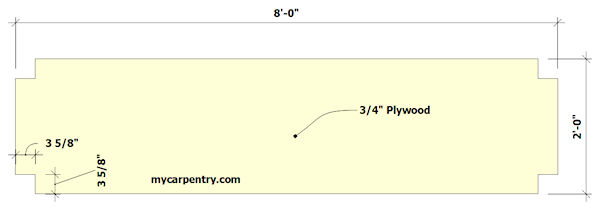
- Rip the 4' x 8' sheet of plywood into equal halves. Cut the corners out of one of the pieces, as shown below. Note: The corner cutouts assume that your 4x4 posts are 3 9/16" x 3 9/16". 3 5/8" cutouts on the shelf would provide about 1/16" space between the lower shelf and the four corner posts. I would measure the partially completed frame to get the actual dimensions of the frame before cutting the plywood shelf.
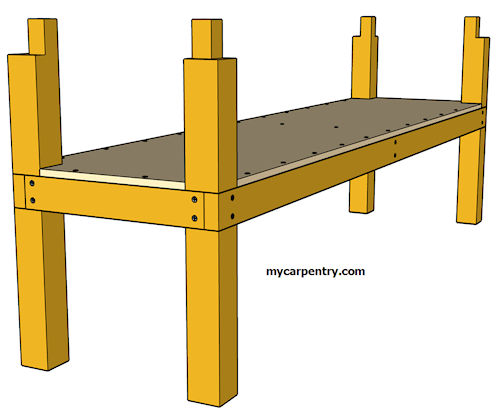
- Attach the middle shelf to the 2x4 framing using the 3" Deck Screws spaced approximately 8" apart.
- Complete the upper 2x4 framing and attach the remaining piece of 3/4" plywood. Attach the 2x6 Back to the framing using the 3" Deck Screws (see diagrams above and below).

Garage floors typically slope towards the garage door. If you plan to place this workbench along one of the side walls of your garage, you likely have to shim up the legs on one side so that the surface is level.
DIY Workbench Plans - Optional Doors and Side Panels
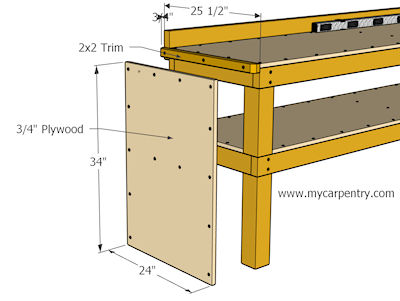
- Cut two pieces of 2x2 trim 25 1/2" long. Make a 45-degree angle at each end, leaving 3/4" of the 2x2 at 90 degrees. Attach them to the workbench using three of the 3" Deck Screws. The flat ends should be flush with the front of the workbench, overlap the 2x6 backboard, and flush with the workbench surface.
- Cut two pieces of 3/4" plywood 34" x 24". Attach them to each side of the workbench tight against the bottom of the 2x2 trim.
- Using a table saw, notch out the four 8' 2x4s (shown in the detail below).
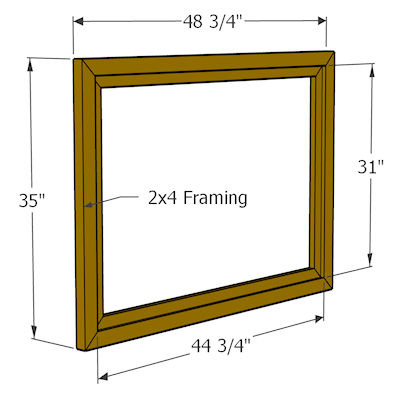
- Cut and assemble the door frame as indicated in the drawing below. The width of each door is half of the width of the workbench. In a perfect world, this would always work out, but how the door hangs on the hinges you select might make the doors either too tight or with an unacceptable gap between them.
- Once you have assembled the door frames, there should be roughly a 31" x 44 3/4" inset section where the 5/8" plywood fits. Before cutting the plywood centers, measure the actual height and width of the inside. Secure the 5/8" plywood to the 2x4 frame with 1 3/8" wood screws.
I used strap hinges on my doors because I already had them left over from another project, but you can choose from many other heavy-duty hinges. Ensure the hinges you select can support the weight of the assembled door.
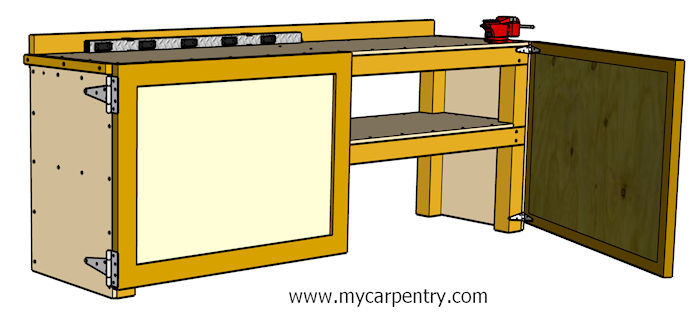
I used strap hinges slightly smaller than the ones shown on the left door (above). They have worked well for nearly 20 years. If you prefer to hide the hinge behind the door, you can purchase strap hinges and mount them similarly to the door on the right.
DIY Projects - Check out more DIY projects on mycarpentry.com.
Woodworking Projects - Use the old fence boards to create one-of-a-kind crafts.
Wooden Bench Plans - Build a new bench for your backyard with the old fence boards.
What next?
Leave DIY Workbench Plans and visit our home page.