Easy Bench Plans
The Aldo Leopold Bench
These easy bench plans were inspired by one I spotted while hiking in a state park. A reader recently informed me that an American conservationist, philosopher, forester, and author named Aldo Leopold created this bench design. I was so intrigued by its functional simplicity I built one to put under a shade tree in my backyard.
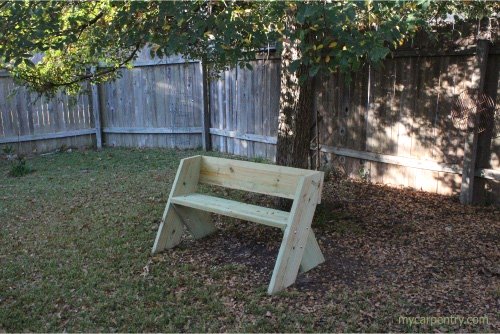
I have seen several variations of the Aldo Leopold bench (some taller, some wider, etc.), but I liked the dimensions on this one the best.
I used 2 x 10 pressure-treated lumber for every part of the bench. You can use any species of lumber to build this bench, but if you intend it for outdoor use, I recommend a material resistant to decay, like Cedar, Redwood, or Pressure-treated pine.
Easy Bench Plans
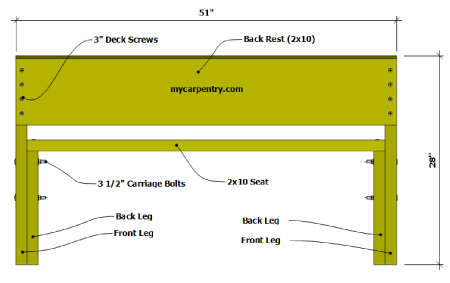
I used two 2x10s (10 feet long) and a handful of deck screws and carriage bolts to construct these easy bench plans. Here's the complete list:
- Two 2x10s @ 10 feet
- Six 3/8 inch diameter carriage bolts @ 3.5 inches (plus one washer and one nut for each)
- Sixteen-twenty 3-inch wood screws
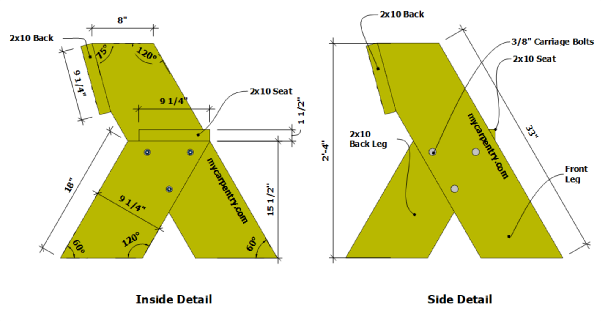
With a speed-square or similar tool, mark a 30-degree angle near the end of one of the 2x10s (this will result in a 60-degree angle on the 2x10). Cut it with a circular saw. Measure along the edge of the 2x10, 33 inches from the long point of the first angle, and mark another 30-degree angle. This angle should be parallel to the first angle.
Measure 8 inches from the top end of one of the front legs and mark a 15-degree angle (this leaves a 75-degree angle on the back support/front leg). Cut it with your circular saw. This cut is the angle of the backrest (see side view diagram). Cut this first leg and use it as a template for the other leg. These are the front legs of the bench. (see side view diagrams).
From the same piece of 2x10, measure 18 inches along the edge of the board from the long point of the last 30-degree angle, mark another 30-degree angle - parallel to the first - and cut. This piece is the first back leg. Use it as a template for the remaining leg.
On one of the uprights, measure 18 inches from the long point and make a 30-degree mark parallel to the top and bottom cuts. This line is the position of the back leg support. (See side view diagram)
Align the front support and back leg support as shown in the diagram and temporarily secure the two pieces together with 'C' clamps. Mark the holes for the carriage bolts by measuring 1.5 inches from the edge of all overlapping surfaces, forming a triangle. Drill 3/8 inch holes through both pieces and secure with three carriage bolts, washers, and nuts.
Repeat this process on the other upright and back legs, keeping in mind that the back legs must be on the inside of the two leg assemblies of the bench.
From the second 2x10, square off one end and cut it to ensure the end is square. Measure 48 inches and cut it to length. This piece is the seat of the bench. From the remaining section of 2x10, measure 51 inches and cut it square. This piece is the backrest of the bench.
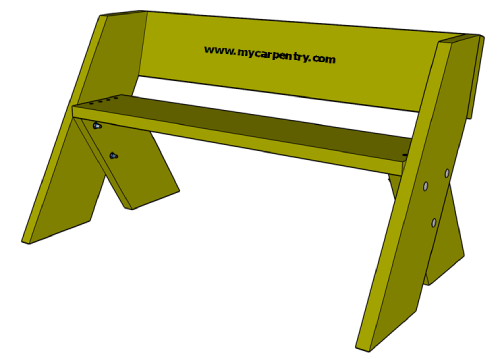
Secure the bench seat onto the top of the back leg supports on each side of the assembled uprights with four or five deck screws on each end of the bench. (see diagrams)
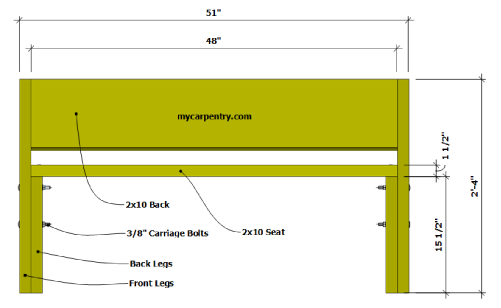
Using a square, make sure that the seat and uprights are square. Align the backrest to the top of the uprights and secure each side with the remaining deck screws. (See diagram below)
We hope you enjoy building this Aldo Leopold bench project as much as we did. Sometimes, it's the simple projects that provide the most value.
A Sand County Almanac
After reading about Aldo Leopold online, I decided to buy one of his famous books, A Sand County Almanac. His observations and views on conservation and wildlife ecology are inspiring. I am reminded of them whenever I see one of Aldo Leopold's benches.
By the way, my wife painted our bench purple once the moist pressure-treated lumber dried.
Outdoor Benches - Check out the other outdoor benches on mycarpentry.com.
Woodworking Projects - Learn about the woodworking projects on mycarpentry.com.
Outdoor Furniture Plans - Learn about our outdoor furniture plans.
Birdhouse Plans - Check out the variety of birdhouse plans on mycarpentry.com.
What next?
Leave Easy Bench Plans and visit our home page.