Framing a Wall
Framing a wall for windows and doors is essential to good structural design, but that same wall might also support second-floor joists and the weight of a roof. Wall framing can also be fun. At the end of a long day of building and erecting walls, you can see the fruits of your labor standing tall before your eyes. Before you frame a wall, you must know its purpose. Will there be windows and doors in the wall? Will the wall contain plumbing or ducts?
If you plan to build a wall for windows and doors, you must ensure the rough openings are sized and framed according to the wall's function. If the wall is a load-bearing wall, that is, if it carries the weight of joists, rafters, or beams, you must include adequately sized headers to carry the weight of the structure across the openings.
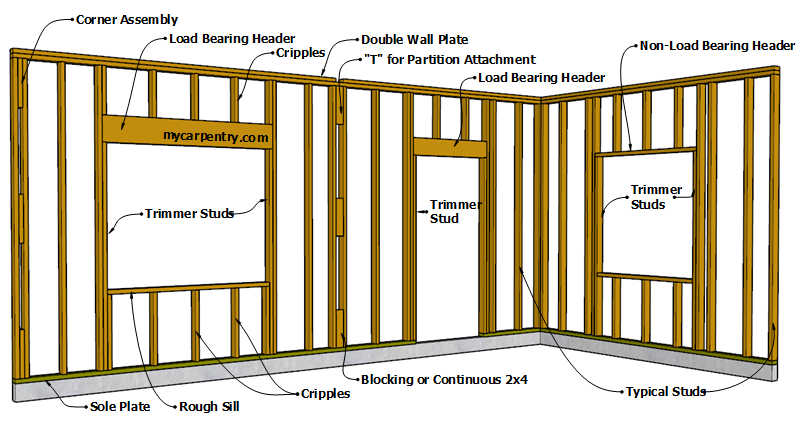
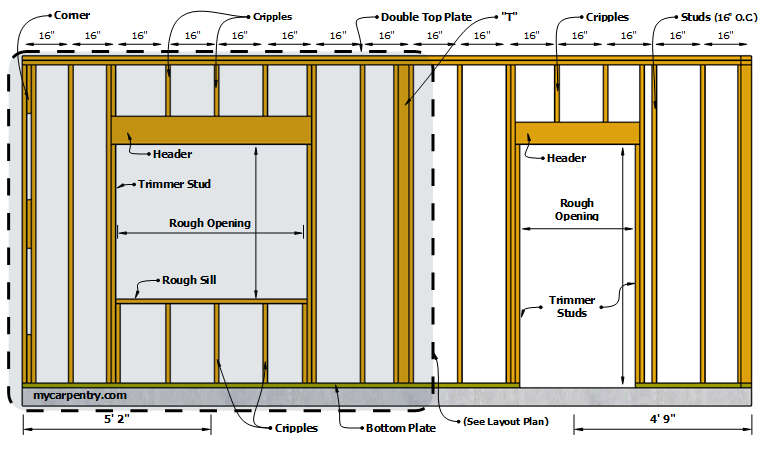
The diagram above shows two adjacent walls. The one on the left, with headers over the door and window, is load-bearing because it carries the weight of the roof plus the weight of the ceiling (not shown). The connecting wall on the right is non-load-bearing because it does not support any load from the framing above. This wall is parallel to the direction of the joists and rafters and does not require a structural header over the window opening.
If you plan to build a wall inside an existing structure, such as a basement (for example), with the floor and roof loads already supported by the existing framing, you can omit the double top plate and space the studs at 24-inch centers. Load-bearing walls typically have studs placed closer together (16" apart) and require a double-top plate.
Framing a Wall
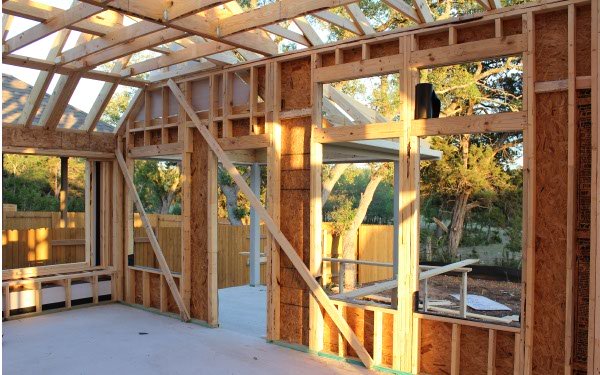
A lot is happening in the picture above. Both adjacent walls are load-bearing because they carry the weight of the ceiling and roof. There are load-bearing headers above all the door and window openings. The wall is diagonally braced - on the inside - with 2x4s to keep it plumb until the OSB (Oriented Strand Board) external wall covering can be attached to the wall studs.
Laying out the Top and Bottom Plates of a Wall
Select two straight 2x4s for the top and bottom plates; they must be long enough to build the complete section of the wall. Position the two plates on a flat surface so the ends line up. Pull a tape measure from one end and make a mark at 16". This will be the center of your second stud. Make another mark at 15 1/4" (shown in red) - this will be the placement of the left edge of the stud. Realign your tape measure so the end begins at the 15 1/4-inch mark and make a mark every 16". Continue this 16" layout until you reach the end of the wall, and draw a line to transfer the layout across both plates.
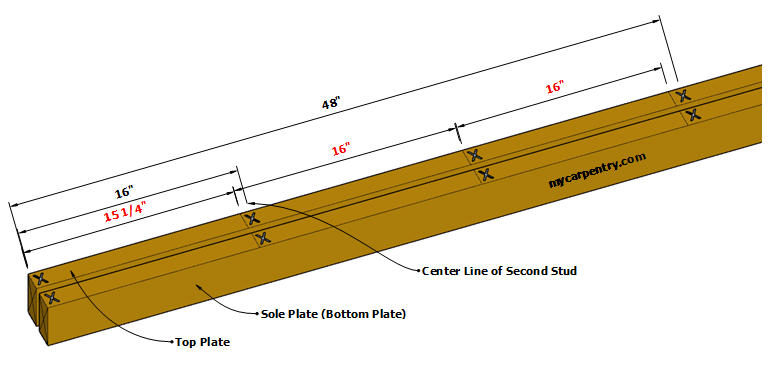
When you are laying out your studs, keep in mind the size of the materials that will be covering the wall. Typically, drywall, plywood, and exterior sheathing come in 4' x 8' sheets. For this reason, 16" and 24" stud spacing works well for wall framing. In the diagram above, a piece of 48" wide sheathing, held flush at the end of the wall, will break in the middle of a stud. This is the reason for making the first layout 15 1/4".
Wall Framing for Doors and Windows
In addition to wall studs, most walls have windows, doors, "T"s, corners, etc., located at specific positions for connecting walls. These additional framing members require extra layout marks on the wall plates.
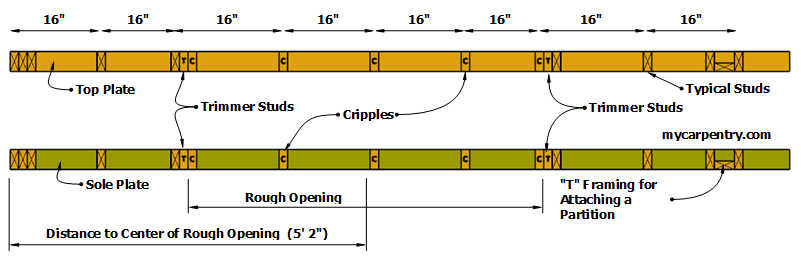
The diagram above shows the plate layout for the highlighted wall section from the drawing below. Notice that, despite the location of windows, doors, and other framing elements, the 16" spacing between studs is maintained. Cripples are used to maintain the 16" layout above door headers and below rough sills.
Trimmer studs, also called Jack studs, support the weight of the headers installed over openings in a wall and define the width of rough openings.
Wall Header Construction
The size of a load-bearing 2x header depends on the width of the rough opening and whether the wall will support a second-story plus roof load. Headers of doors and windows are constructed from two pieces of properly sized 2x material with 1/2" plywood spacer(s) sandwiched between them (see below). Check out the International Residential Code (IRC) for the latest Header Span Tables.
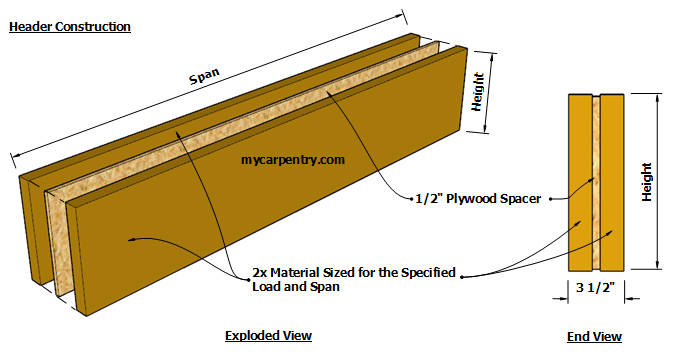
I have worked for some builders that use 2x12s on all window and door headers, regardless of the span. The extra wood ("meat," as some would call it) behind the wall can serve as blocking to support various window treatments.
Connecting Wall Partitions
When connecting a partition wall to another wall, a 'T' should be added for nailing the edges of sheetrock or other wall covering on the inside corners. The two designs below are each acceptable framing methods. The framing method on the left - in the diagram below - could be built from scrap material and wouldn't require two additional full-length studs, thus saving costs.
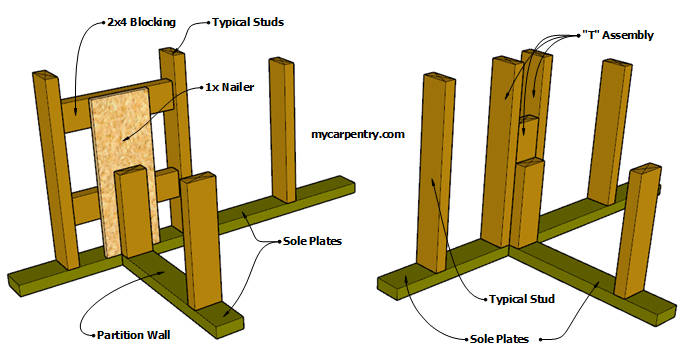
The blocking used in the framing on the right - commonly called a "T" - could also use scrap material. Though the "T" style framing uses two more studs than the design on the left, it is easier to mass-produce. If you have a lot of connection points on your project, the "T" might be the faster way to go.
Framing a Wall Corner
The diagram below shows two methods for framing corners. The design on the left, while saving slightly on the amount of materials, is less common than the corner framing on the right.
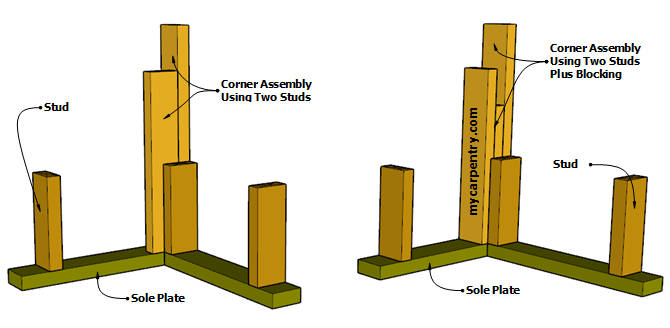
I have used the corner framing shown on the right many times. Like the "Ts," they are easy to build. The corner assembly can make use of scrap materials in the center.
Wall Framing for Connecting Partitions
After erecting the walls, add a double top plate. The double plate on walls helps carry the weight (between studs) of the ceiling, floor, or roof framing above it. It also helps tie the walls together.
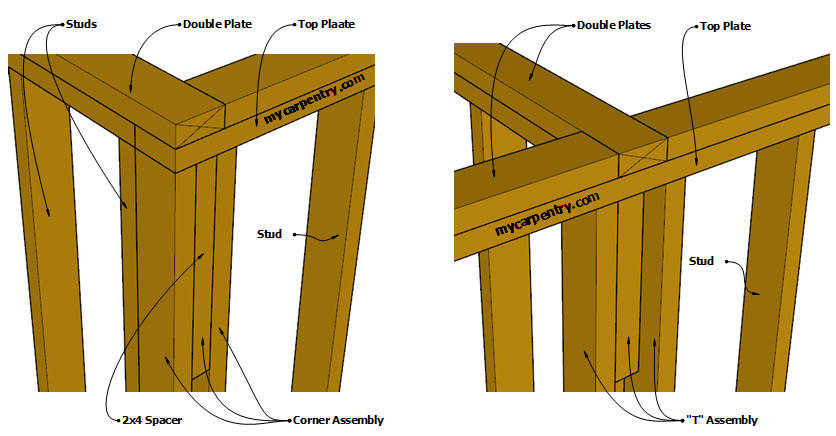
The diagram on the left shows how two walls connect at a corner, with the double top plate on one wall overlapping the other. The image on the right shows the double-plate connection on a perpendicular wall.
For building code information related to building walls used in residential construction, check out the International Residential Code (IRC). The IRC provides detailed information about wall construction (fasteners, header sizes and spans, drilling and notching studs, insulation, seismic and wind load requirements, fire blocking, metal studs, and much more).
Carpentry Calculators - Calculators used in carpentry.
Framing Carpentry - How to build residential structures.
DIY Projects - Explore the DIY Project on mycarpentry.com.
Carpentry Terms - Common terms used in carpentry and construction.
What next?
Leave framing a wall and explore the other framing carpentry pages.
Leave framing a wall and visit the mycarpentry home page.