Home Bar Plans
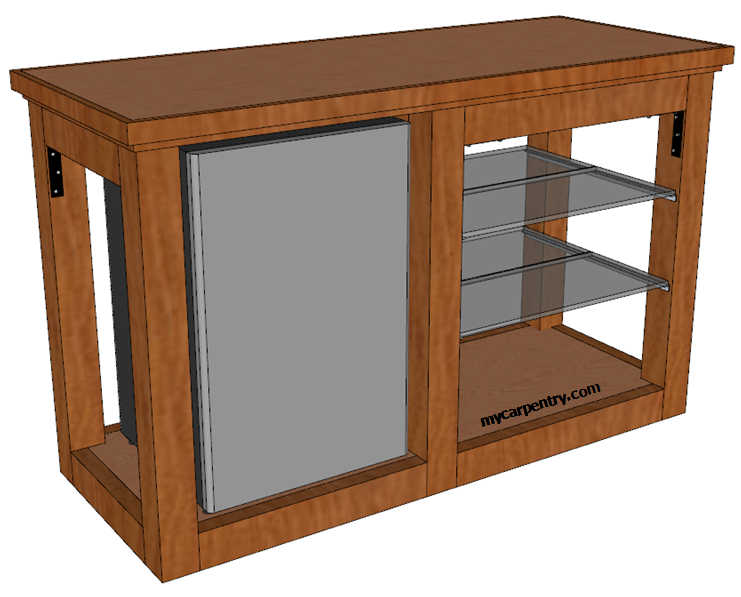
These home bar plans have a space for a small refrigerator on the left and glass shelves on the right. This particular buffet-style bar design stands next to a wall and has front access to the refrigerator and shelves.
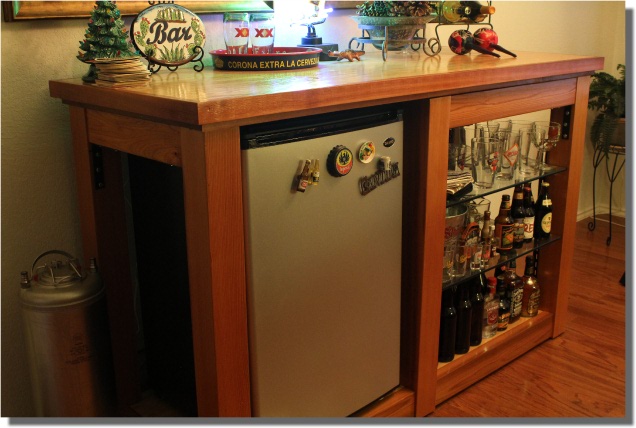
I measured the actual Sanyo SR-4912M 4.9 Cubic Foot counter height refrigerator to determine the width, height, and depth of the refrigerator space. I wanted this particular refrigerator because it does not have a freezer unit, and it can hold a 5-gallon Cornelius keg and a small CO2 tank. See below.

If you are not a home brewer, you might consider using a refrigerator that includes a freezer. It all depends on your needs. If you don't already have a refrigerator, I recommend purchasing the one you want to use before you build your bar. This way, you can measure the exact size of your new refrigerator before making the space for the opening.
The width of the shelf opening matched the width of six glass shelves I had stored in my garage for more than ten years. I was finally able to put them to good use.
The wood used in these home bar plans was Western Red cedar, oak plywood, and pine. I used 2x3 pine framing lumber to frame the base of the bar and some metal strapping to tie in the top of the refrigerator opening. I did this to keep the height of the bar near 42" (+/-) and to provide additional structure to the bar frame.
Purchasing the Wood
If you choose to use Western Red cedar for your home bar, as I did, you might find a few challenges out there. Western Red cedar is a beautiful wood, but it wasn't easy finding straight pieces that didn't have too much character.
Cedar is excellent wood for building a fence or deck, but it can be sanded down to a smooth finish and used to construct interior projects inside your home or business. I visited two or three different lumber yards before I found one with a sufficient quantity of Western Red cedar to pick through and find the best-looking pieces for my home bar.
Home Bar Plans - Assembly
Materials List:
| Material | Size | Quantity |
| Western Red cedar | 4" x 4" x 8' | 3 |
| Western Red cedar | 2" x 4" x 8' | 3 |
| Oak plywood | 4' x 8' | 1 |
| Hex screws and washers | 4" x 1/4" | 6 |
| Hex screws and washers | 1.5" x 1/4" | 60 |
| Corner braces | 5" x 5" | 10 |
Preparing the materials:
Cut the 4x4 posts to the length specified in the drawing(s). Sand the 4x4 posts and 2x4 trim until they are smooth. Apply one coat of polyurethane to all the cedar framing members and let them dry for at least 24 hours. Lightly sand the parts again with fine sandpaper. Apply another coat of polyurethane to all the surfaces and let them dry for another 24 hours.
Paint the ten corner braces black using a high-gloss oil-based spray paint. Allow them to dry thoroughly before attaching them to the bar frame.
Assembling the frame:
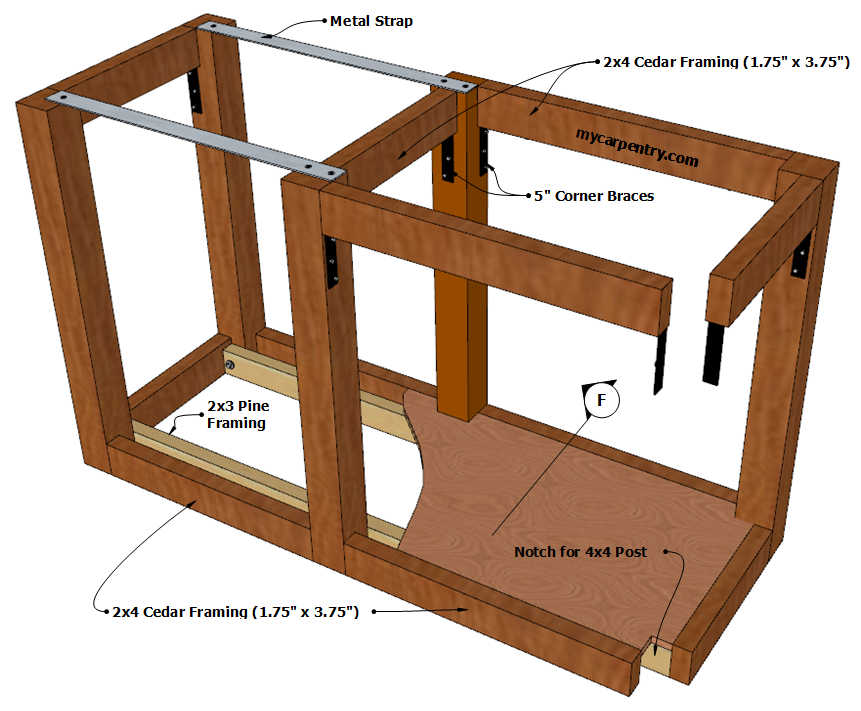
The easiest way to build this home bar plan is to assemble the front and back sections first, then tie the two sections together, starting with the oak plywood base and then the 2x4 cedar framing and corner braces.
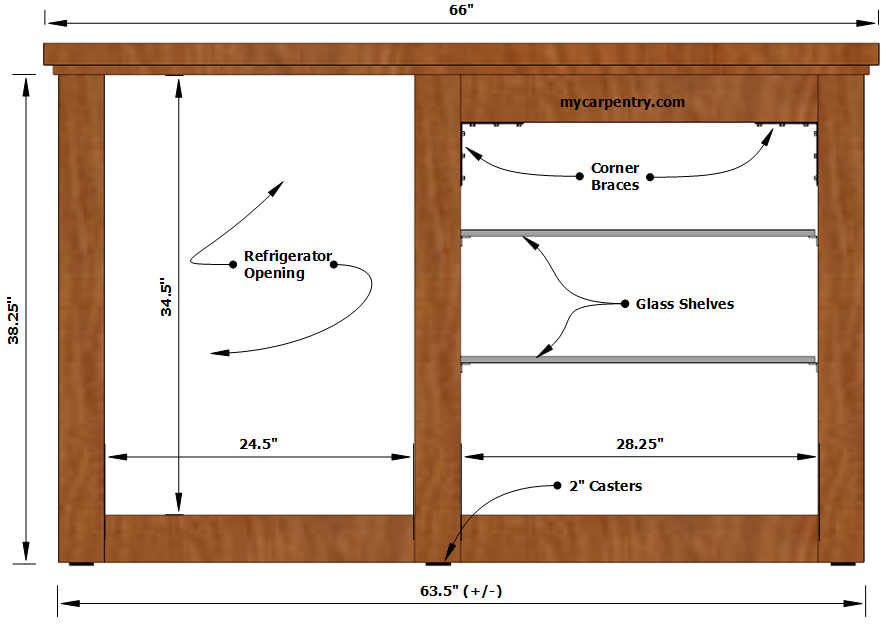
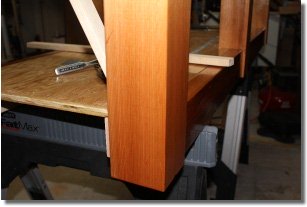
Starting with the back section of the bar, on a flat surface, lay out three of the 38.25 inch 4x4 posts as shown in diagram A. Cut two pieces of 2x4 cedar 28.25 (for the glass shelf space) inches long and one piece of 2x4 cedar 24.5 inches long (for the refrigerator space).
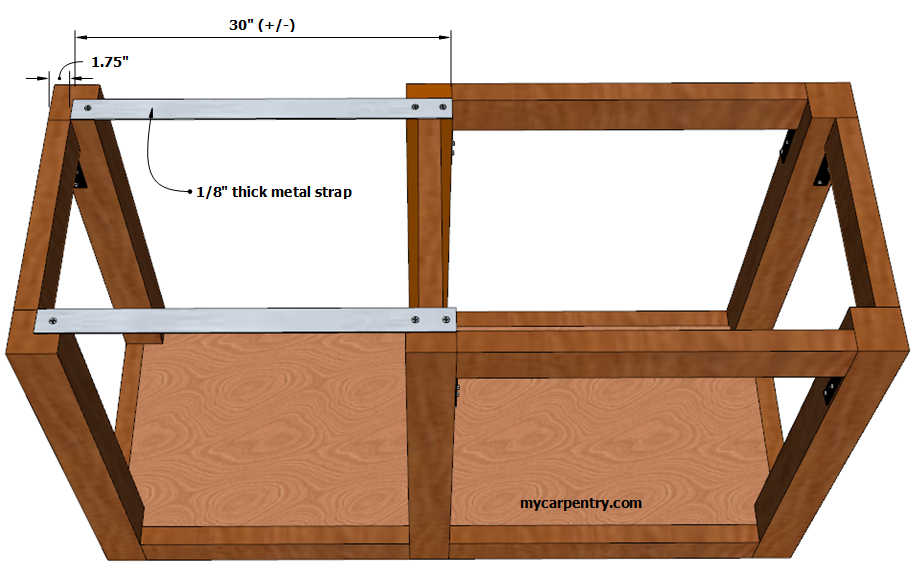
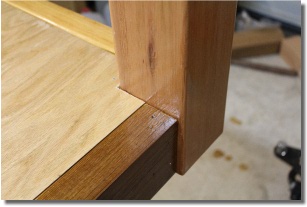
Square all the corners and attach the 2x4 cedar framing elements using a combination of glue and 6D finish nails (or any other method you might prefer). The overall width of the back section should be about 63.5 inches but will vary slightly, depending on the finished dimensions of the 4x4 posts.
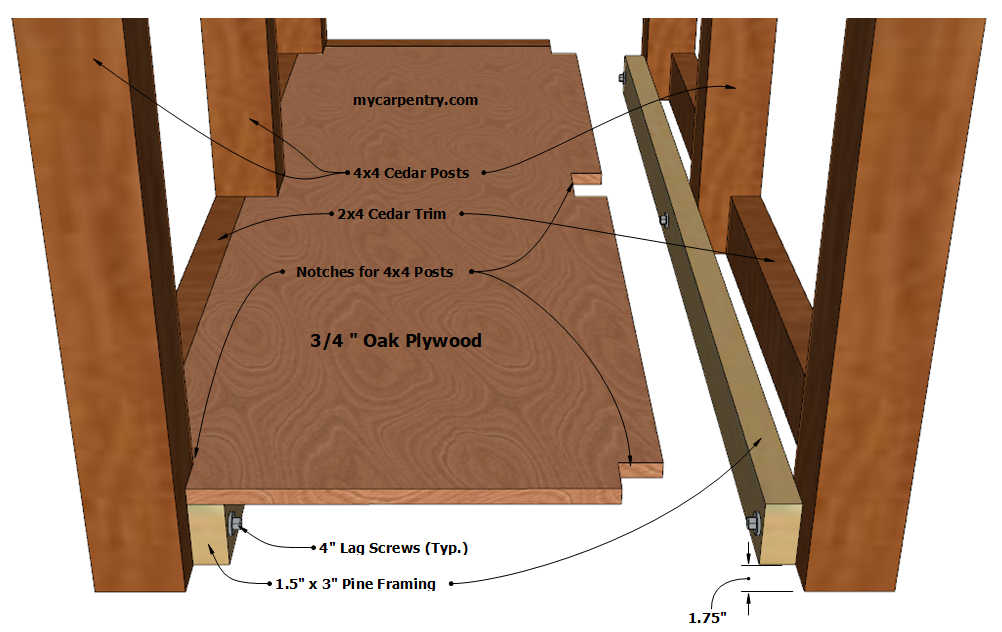
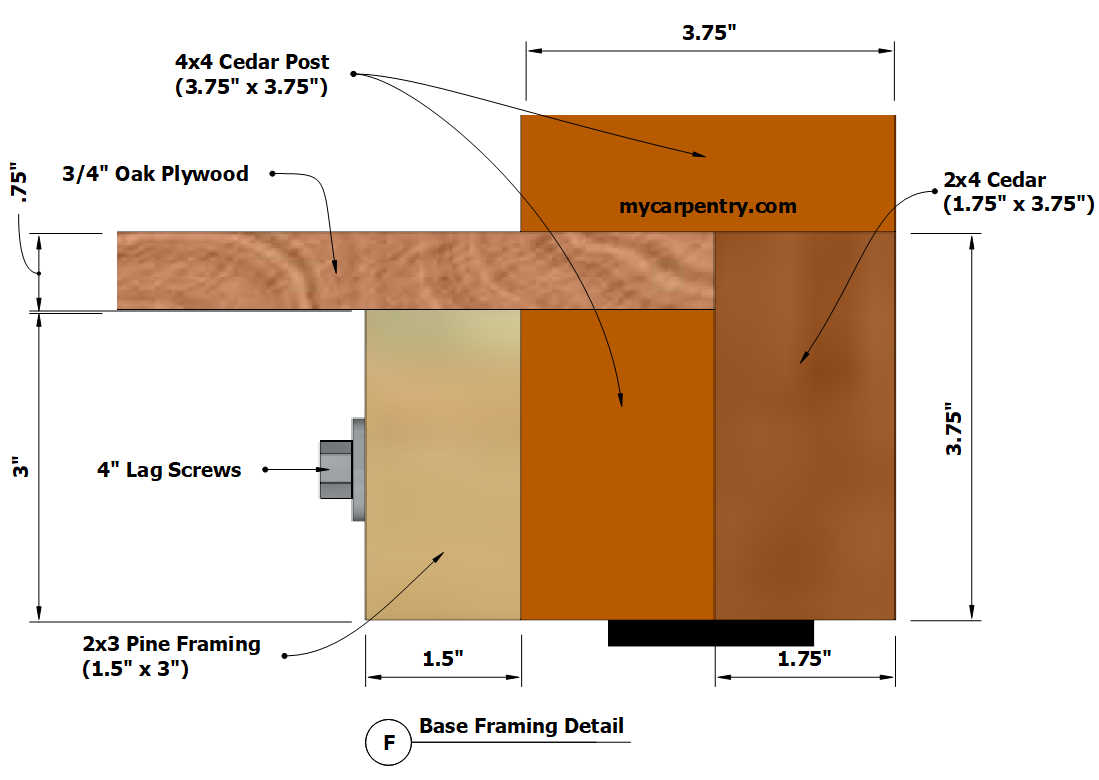
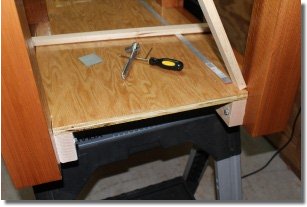
Whatever the actual size is, subtract 3.5 inches from that number and cut the 1.5" x 3" pine framing that length. It should be approximately 60" long. The important part is that once assembled, there is 1.75" of space at each end (see Diagrams). This space is for the lower side sections of the 2x4 (1.75" x 3.75") cedar framing.
With a 1.75" gap at each end, attach the pine framing member using one .25" x 4" hex screw and washer per post.
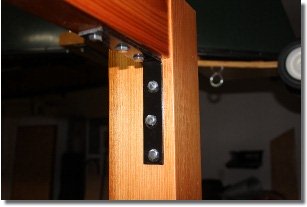
Ensure that the corners of the assembled back section are still square, and attach the 5" corner braces with .25" x 1.5" hex screws and washers.
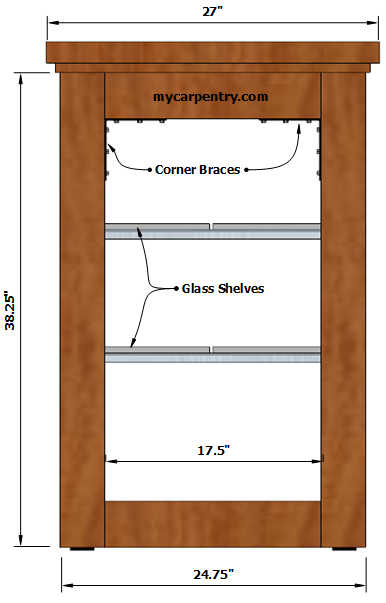
Using the steps above, cut and assemble the parts for the front section. Bear in mind that the front section is the mirror image of the back section.
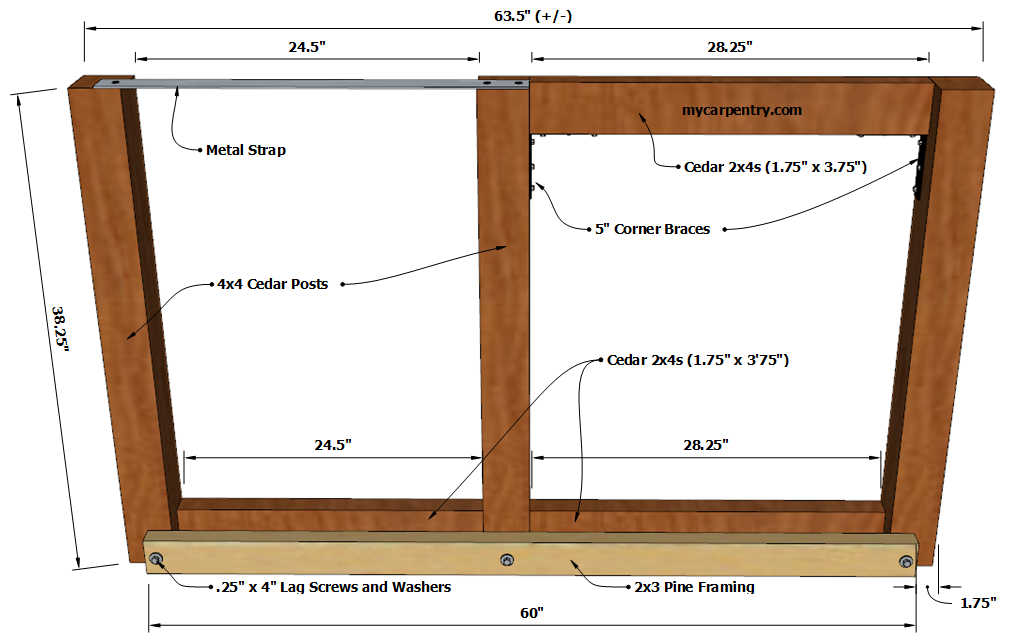
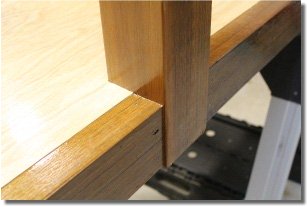
Cut two pieces of metal approximately 30 inches long. (I used a piece of aluminum I bought from the hardware store - 1/8 inch thick and 1 inch wide). Drill a hole 1/4" in each end of the metal strips and secure them to the top of each post using flush-style low-profile wood screws. When attaching the metal strips to the posts, position them such that the metal strips leave at least 1.75" space on the outer edges. (see diagram below)
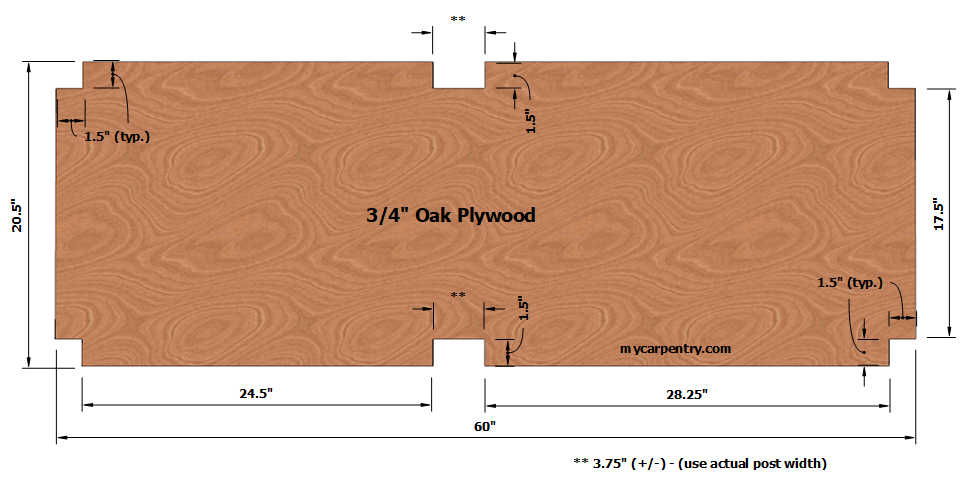
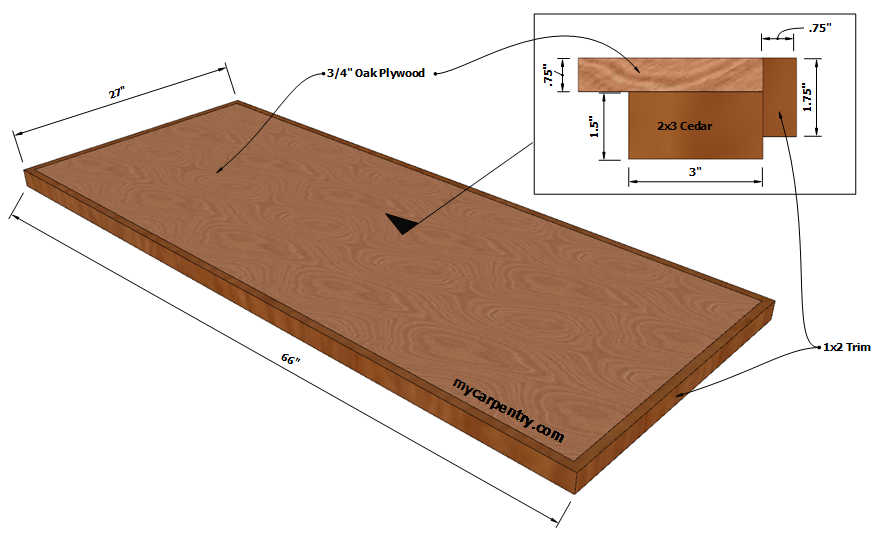
Cut the plywood base as indicated in diagram C. To be precise with the notch cuts, you can cut the plywood to its base dimensions (20.5" x 60"(it should be the same length as the pine 2x3)), then hold it up to the front and back sections of the bar and mark the exact location and width of the posts. The depth of all of the notches is 1.5 inches.
The exploded view of these home bar plans (below) shows how the back and front sections of the bar tie together.
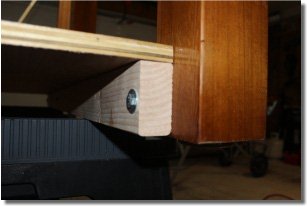
The diagram below shows the frame completely assembled, with a cutaway of the base clarity on how the base plywood is supported and trimmed. Diagram F shows the detailed view of the bottom base framing, plywood, and trim.
The actual dimensions of the bar top plywood section with 2x3 cedar support are 64.5" x 25.5". When you add the outer 1x2 trim, the dimensions become 66" x 27". You can use any method to attach the perimeter cedar support and trim to the plywood top - but I prefer glue to eliminate nail holes. I clamped all the pieces until the glue dried.
With the top assembled, sand it smooth with fine sandpaper, apply a coat of polyurethane, let dry 24 hours (or longer), and again with fine sandpaper, then apply the final coat of polyurethane.
Final notes:
This home bar furniture was relatively easy to build. I put a lot of thought into the structure and sizes of the openings to ensure that they accommodated my refrigerator and glass shelves.
The Sanyo SR-4912M 4.9 Cu. Ft refrigerator can be converted to a kegerator (though this is not the manufacturer's recommendation - several websites provide the details).
I didn't attach the bar top to the bar frame. The weight of the bar top is enough to hold it firmly on the frame. I left the bar top unattached so I could add a tap later.
Please verify all of the measurements before cutting any wood.
I hope you enjoy building these home bar plans. If you have any questions or suggestions about bar designs, I would love to hear them. Please send me a note. Cheers!
Bar Plans - Check out the other bar plans on mycarpentry.com
Woodworking Projects - Try more woodworking projects on mycarpentry.com.
DIY Projects - Are you looking for a DIY Project?
What next?
Leave Home Bar Plans and visit our home page.