Outdoor Bar Furniture - Patio Bar Plans
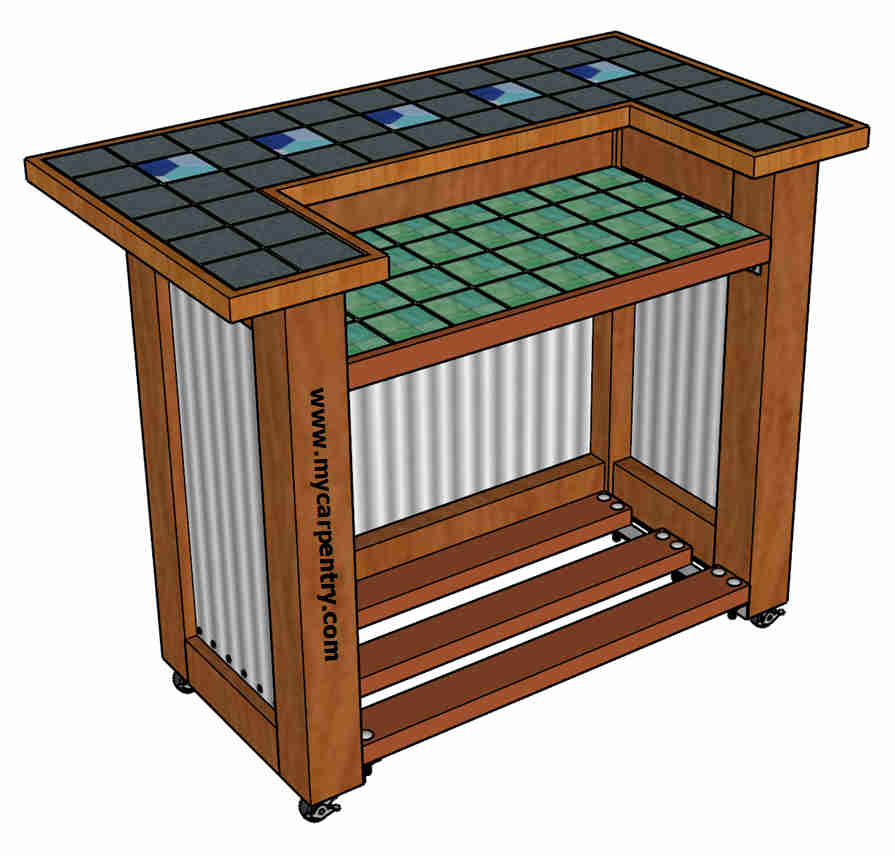
This outdoor bar furniture, patio bar plans, was built from a combination of Western Red Cedar, Corrugated Tin, 3/4" Plywood, Ceramic tile, and a couple of old indoor-style bar stools. This outdoor bar design tolerates occasional moisture and indirect sun, but it should not be left uncovered and exposed to direct sun or rain.
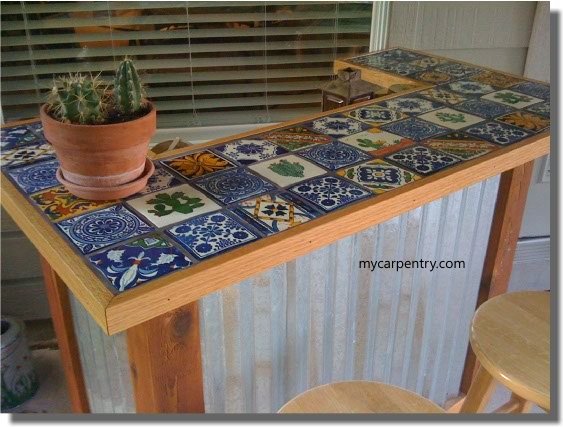
Objectives: Design a bar for use under a patio cover that can withstand occasional moisture from rain or heavy fog. This bar design should reflect the surroundings of south-central Texas (a dry climate). Corrugated tin and cedar are common materials used in many rural structures, and the painted Mexican tiles used on the bar top are also local decor.
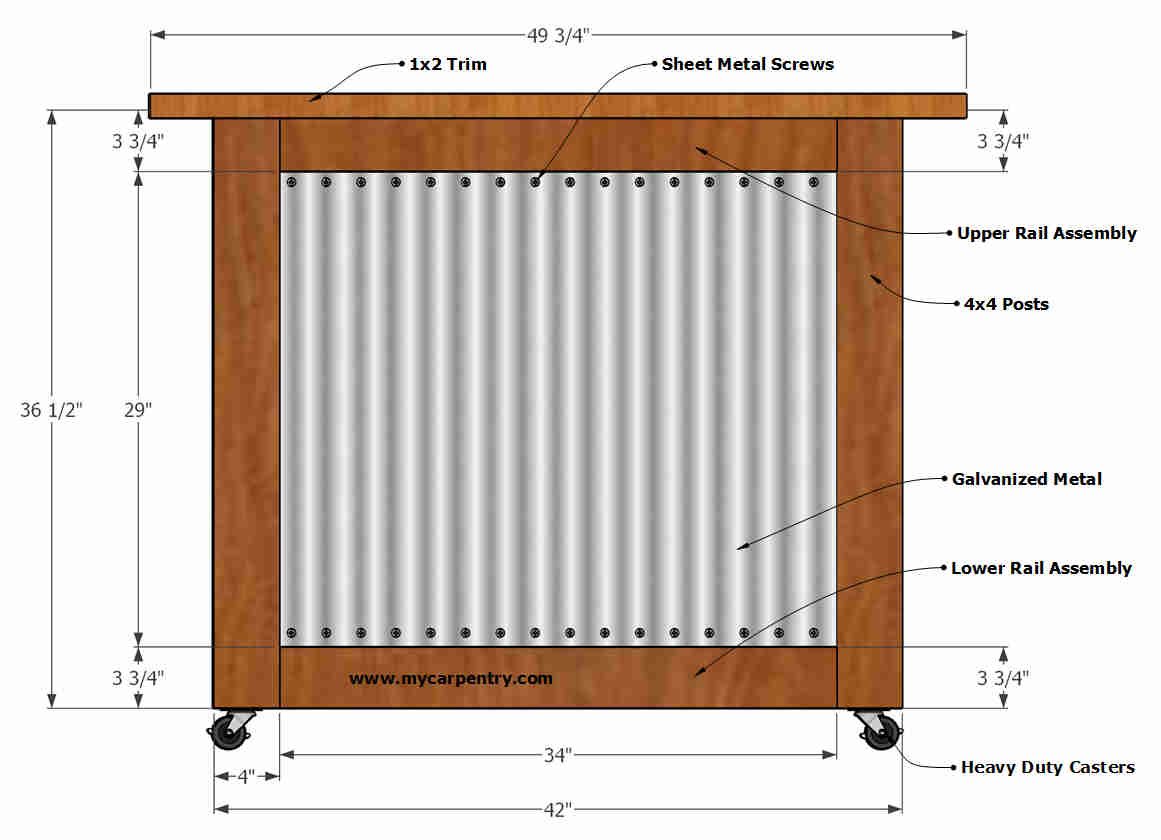
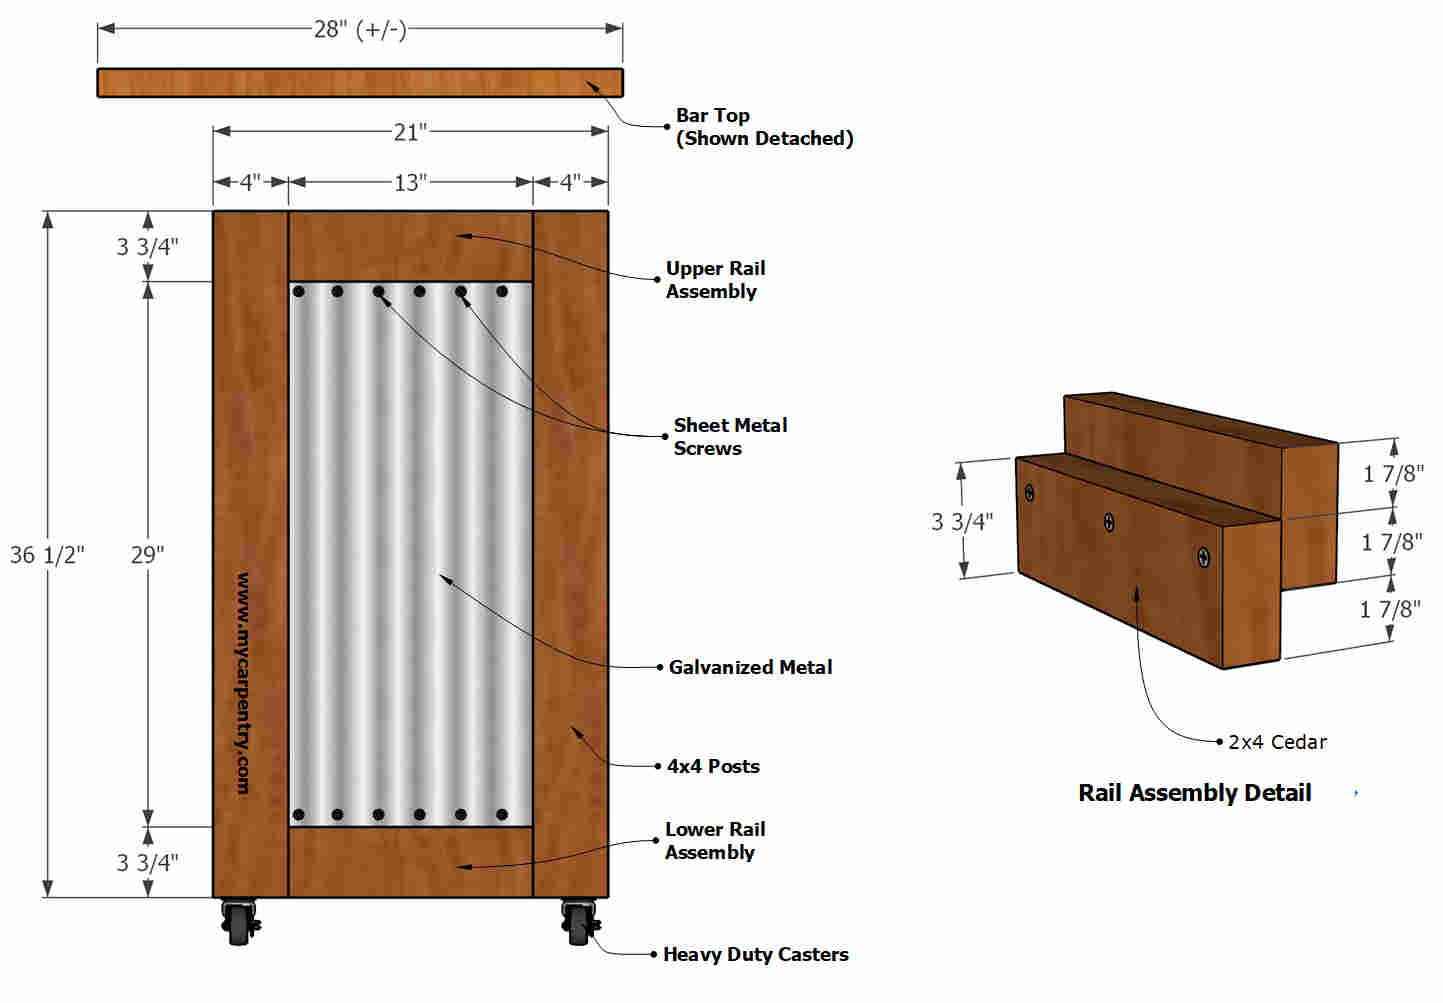
Diagrams A and B show the outside dimensions of this outdoor bar.
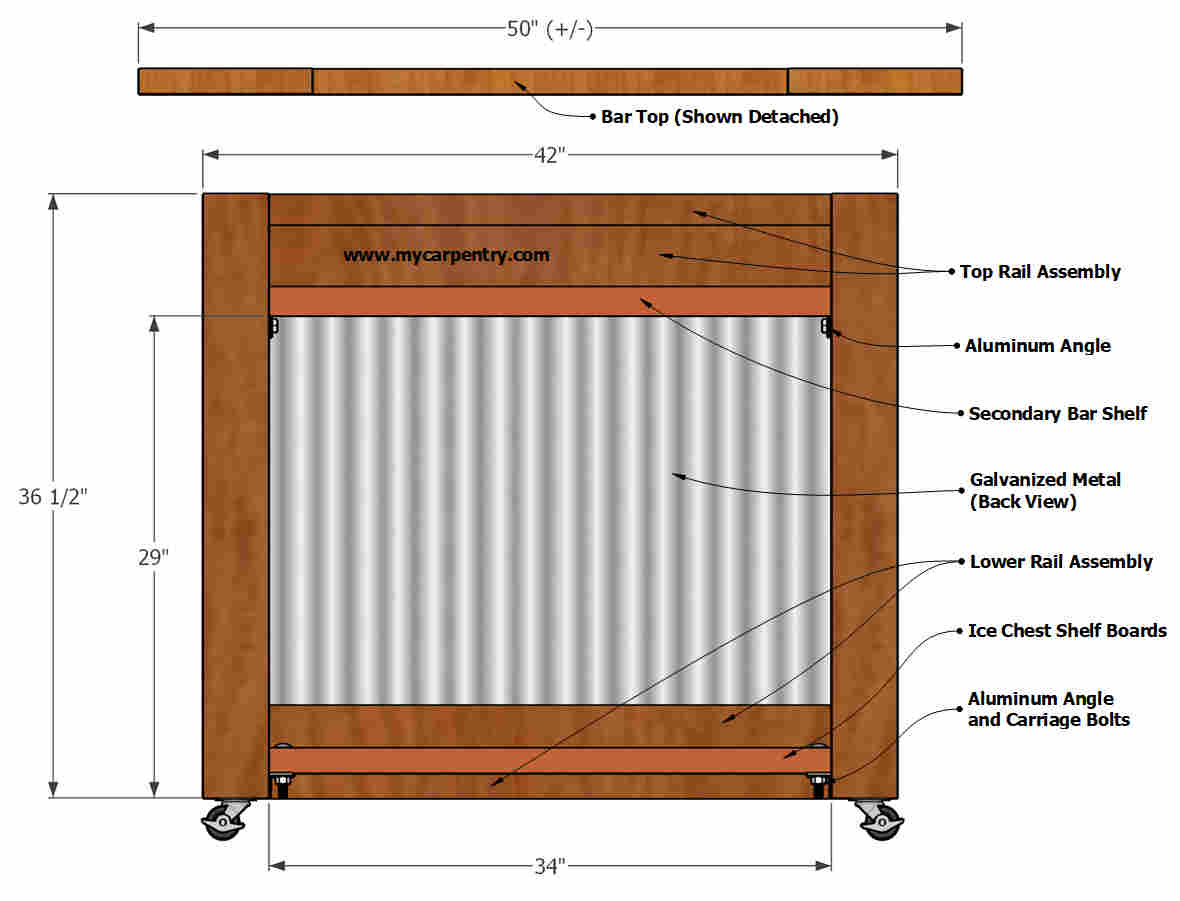
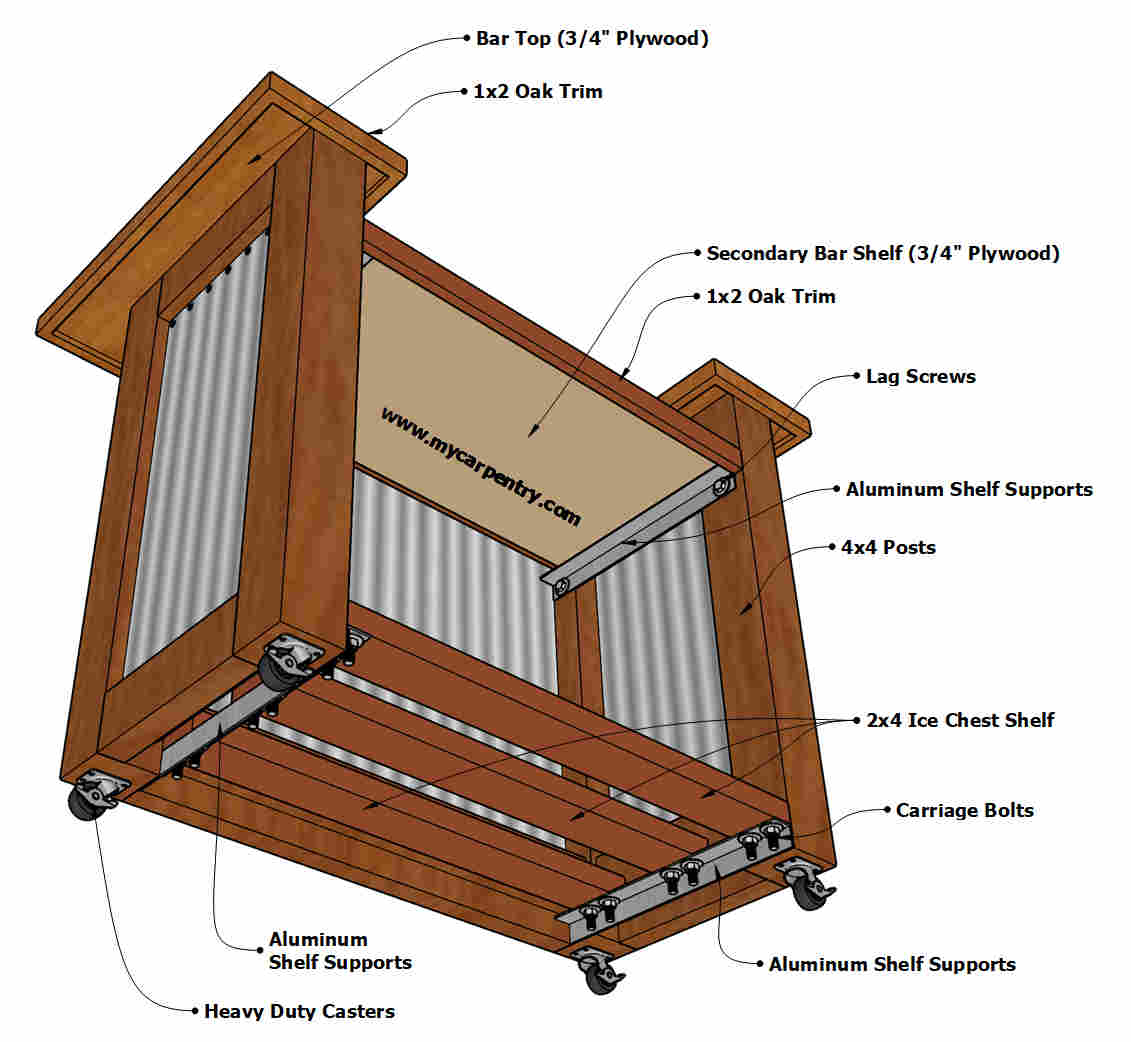
The view of the back of the bar (C) shows two additional shelves under the main bar top, the secondary shelf (for mixing drinks, etc.) and the ice chest shelf (designed to support an ice chest full of beer or other drinks).
The secondary shelf is not permanently attached to the bar. It rests on two pieces of aluminum angle attached to either side of the inside of the bar frame. I made the secondary shelf from a piece of tiled 3/4" plywood, trimmed on the front side with 1x2 oak. I designed the shelf to be removed easily for cleaning.
I made the ice chest shelf from three pressure-treated 2x4s bolted to two more pieces of aluminum angle attached to either side of the inside bottom of the bar. Use two 2-inch x 1/4-inch carriage bolts, with nut and washer, on each end of the three 2x4s (see diagrams C, D, and G).
Recommendation: Do not cut all of the materials for the bar in advance. It is best to measure and cut them as you build. The sizes of lumber can vary between regions. Verify the actual dimensions before cutting.
Outdoor Bar Furniture - Materials List:
| Description | Size | Quantity |
| 4x4 Rough Cedar Corner Posts | 36 1/2" | 4 |
| 2x4 Rough Cedar Rail Assemblies (front) | 34" | 4 |
| 2x4 Rough Cedar Rail Assemblies (sides) | 13" | 8 |
| 3/4" Plywood Bar Top | 48" x 26" | 1 |
| 3/4" Plywood Secondary Shelf | 17 1/4" x 33 7/8" | 1 |
| 1x2 Oak Trim | 20' (approx.) | 1 |
| 2x4 Pressure Treated (Ice Chest Shelf) | 34" | 3 |
| Galvanized Metal | 29" x 13" | 2 |
| Galvanized Metal | 29" x 34" | 1 |
| Aluminum Angle (lower) | 18 1/2" | 2 |
| Aluminum Angle (upper) | 17 3/4" | 2 |
| Lag Screws & Washers | 2" x 1/4" | 8 |
| Carriage Bolts & Washers | 2" x 1/4" | 12 |
| Deck Screws | 2 1/2" | 105 (approx.) |
| Sheet Metal Screws | 1" | 60 (approx.) |
| Finish Nails (GALV) | 2" | 40 (approx.) |
| Casters | 2" | 4 |
| Ceramic Tile | 4" x 4" | 77 |
| Tile Adhesive | Small Container | 1 |
| Grout | Small Bag | 1 |
| Cedar Stain | Small Can | 1 |
| Polyurethane | Small Can | 1 |
Building the Outdoor Bar
The diagram below (D) shows the basic framing of the bar. The offset 2x4 rail assemblies provide structure for the frame, as well as provide a surface for fastening the top and bottom of the galvanized metal (see A & B).
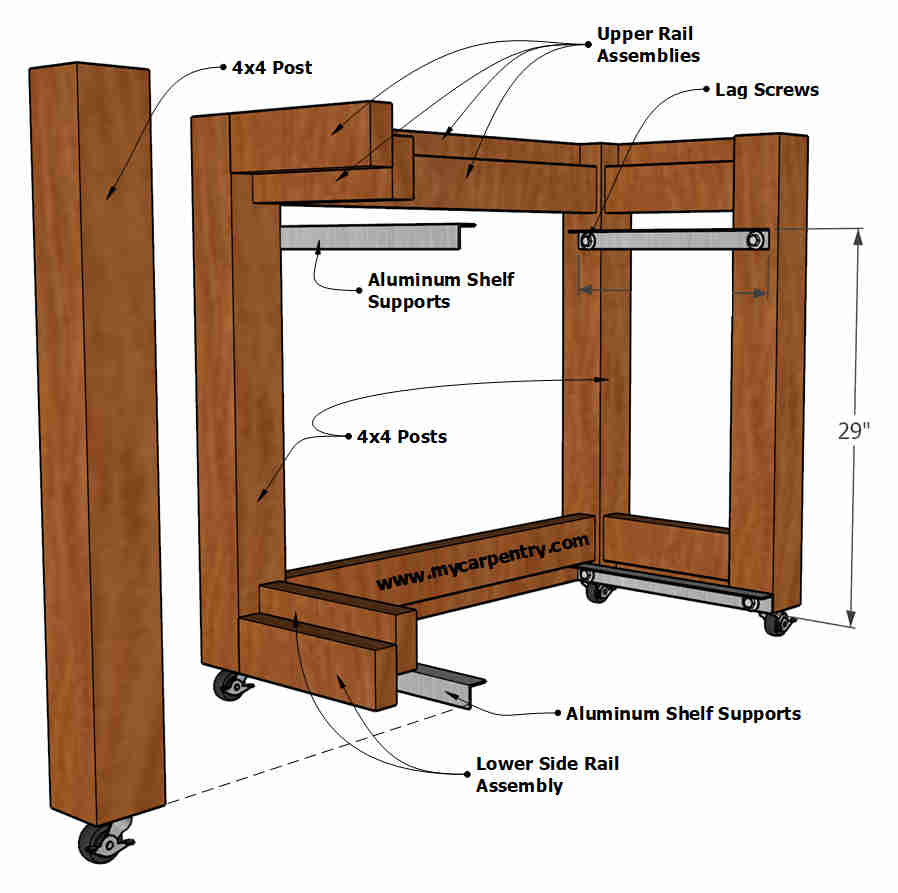
Assemble the six rail assemblies indicated in the Rail Assembly Detail (two front and four side assemblies).
Cut the four 4x4 posts to length and toe-screw the rail assemblies (using the 2 1/2" deck screws) into the 4x4s (position them as shown in the drawings). Flip the bottom and top rail assemblies so the grooved edges face each other.
Square the corners of the frame. Cut and attach the sheet metal sections as shown in the drawings.
Cut the four aluminum shelf supports and drill a 5/16" hole about an inch from each end. Attach them to the 4x4 posts using the eight lag screws.
Flip the bar frame upside down and attach the four casters using the 2 1/2" deck screws. (or other screws, depending on the type of casters you choose)
Flip the bar frame once more so that it is resting on the newly added casters.
Choosing Tile and Cutting the Bar Top
The tile you choose will likely be different from the ones I used. If you plan to use custom hand-painted tiles for your outdoor bar furniture, I recommend laying out your tiles how you would like them to align on the uncut bar top before you cut it to size. Also, before removing the temporarily placed tiles from the bar top, mark the location of each one with a pencil. Note: The hand-painted Mexican tiles I used for my outdoor bar furniture were close to 4 inches square but varied from tile to tile. If you are using commercially produced tile, the size should not vary much at all.
Square the two sides of the bar frame to the front section. Cut the 3/4" plywood bar top to size (see note above), add three coats of polyurethane to all surfaces, and attach it to the squared frame (using 2 1/2" deck screws), as shown in diagram E.

Cut the 3/4" secondary shelf to size, making the width about 1/8" less than the actual inside width of the opening (should be close to 34"). Verify the width of your opening before making any cuts.
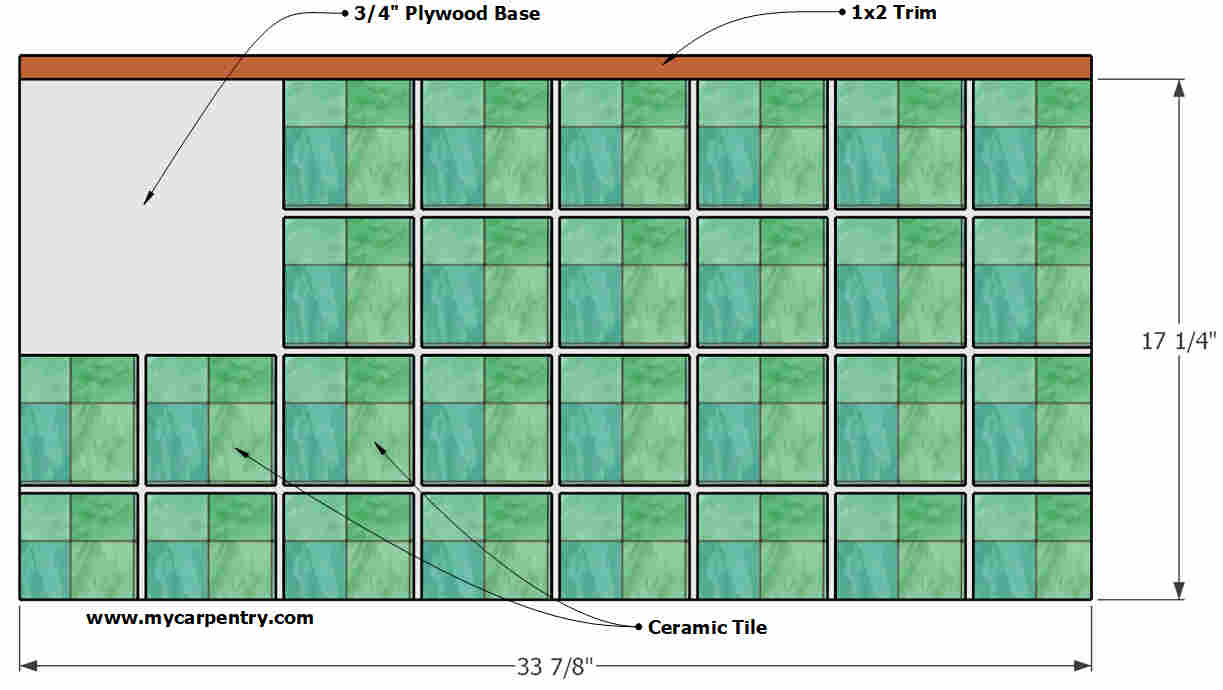
Note: The 4" tile will not fit on the secondary shelf without trimming a little off of the edges of the tiles on each side and the back. You will need a tile cutter for this.
Cut the three 2x4 ice chest shelf boards and place them on the lower aluminum supports (spacing them evenly apart). Once they are in place, drill two 5/16" holes at the end of each board (through the wood and aluminum supports) and attach them using the 2" carriage bolts and washers (see diagram G below).
Adding the Tile
Once the structure of the outside bar is assembled, with all of the fasteners, etc., it is time to apply the tile on the bar top. Apply the tile adhesive, using the manufacturer's recommendations, and carefully lay the tiles next to the pencil marks you made for them in a previous step.
Attach the 1x2 trim around the bar top, raising it to the level of the top of the newly applied tiles. Applying two or three coats of polyurethane to the 1x2 oak trim will make it last many years and should be performed before you grout the tile.
After the tile adhesive had dried and the tiles were firmly in place (24 hours or more), I used a dark gray grout to fill the space between the tiles. The space between the tiles varied between 1/8" and 3/8" due to the irregularly sized hand-painted Mexican tiles.
Outdoor Bar Furniture - Finish
Finish: Seal all western red cedar surfaces with a stain/sealer of your choice. The plywood used for the under-deck work surface - and the 1x2 oak trim - should be protected with three coats of polyurethane.
Bar Plans - Check out the other bar plans on mycarpentry.com
Woodworking Projects - Try more woodworking projects on mycarpentry.com.
DIY Projects - Are you looking for a DIY Project?
What next?
Leave outdoor bar furniture and visit our home page.