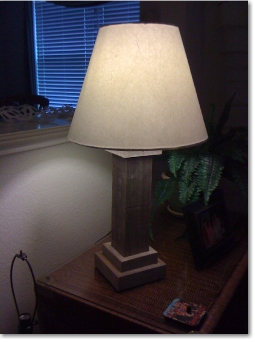
Rustic Table Lamp
You can build this rustic table lamp from old fence boards or any other type of weather-seasoned wood. Since the materials used to create this lamp are from repurposed wood, the only cost is the fasteners and lamp hardware (socket, cord, etc.).
Building the Rustic Table Lamp
The tools you will need for this project are:
- Tape Measure
- Pencil
- Table Saw
- Mitre Saw
- Finish Nailer (air-powered or electric)
Note that a circular saw can perform the same tasks as a table or miter saw. It is much easier to rip wood using a table saw, so a table saw is recommended for ripping. However, a circular saw can replace a miter saw for cutting the lengths of the pieces if you don't own a miter saw. The wood that you will need is as follows:
- Three 6' cedar or redwood fence boards (1x4) with the fewest knots (unless you like very rustic).
- One lamp socket kit (the working parts of a lamp).
- One lampshade.
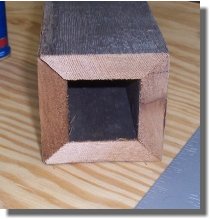
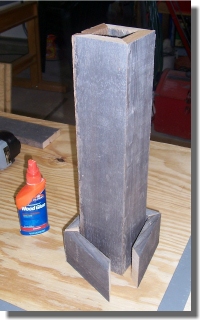
The base of the lamp is made of four 1x3.25-inch x 16-inch pieces of wood (the fence material), each with a 45° bevel angle on the inside so that when the pieces are attached, you don't see any of the edges of the material.
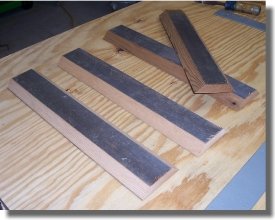
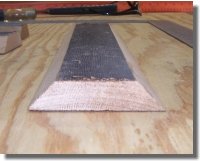
To create these pieces, set your table saw at a 45° bevel angle and lock the table saw's fence at 3-1/4 inches. Feed one of the 1x4s (best side down) into the table saw to bevel one edge. Flip the board around (same side down) to bevel the other side. Repeat this process on another 1x4 fence board.
Use a miter or circular saw to cut off 1 or 2 inches of one of the new beveled 1x3.25-inch rips to square up one end. Measure 16 inches from the squared end and cut it. Repeat this process to create three more 1x3.25-inch x 16-inch pieces. Assemble the four pieces with a finish nailer. You can apply a little carpenter's glue to the joints before nailing them together. The glue will strengthen the lamp body.
Build a lamp base. Trim the bottom part of the lamp base with two courses of 1x material. The first, or inside course of the lamp base, will be cut from the full uncut width of a fence board (1x4). Bevel-cut each piece of 1x4 trim 45°, measuring the length of each piece of trim from the short point.
Tip: Before mass-cutting each trim piece, verify that the lamp body is the same width on all four sides. If it isn't, you should custom-cut each piece of wood.
Attach the 1x4 trim to the base of the lamp, flush at the bottom, with an air nailer using 1.25-inch finish nails.
To complete the bottom part of the lamp base, measure the width of one of the unused 1x4s to get the exact width; it will probably be around 3.5 inches. Set the fence on your table saw to half of the width of the 1x4 (probably 1.75 inches). The idea is to rip the piece of wood in two so that both pieces of the rip match in width.
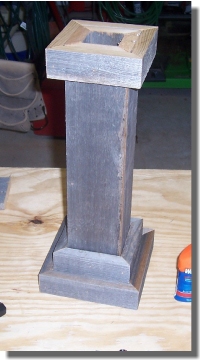
Use the new 1x1.75-inch material to trim out the lower part of the lamp, using the same method as the previous step (flush at the bottom). Be sure to position the ripped side of the 1x1.75 material facing toward the bottom of the lamp.
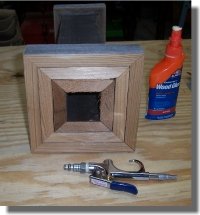
Next, make a square out of four 6-inch pieces of 1x4 cut at a 45° angle (see diagram). Assemble the pieces with glue and brads. Once assembled, drill a hole at the center for the lamp socket to fit into. There are several different types of lamp hardware kits, so it depends on which one you select as to what size hole to drill. It is best to purchase the lamp kit before you start building this lamp.
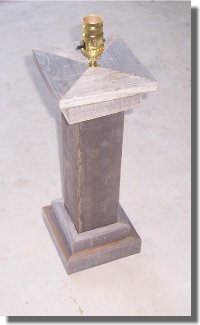
At this point, follow the lamp kit instructions to complete the assembly of your new lamp. Add a lampshade to finish the project.
Now that you have built this rustic table lamp, you can use what you have learned to make other styles of rustic lighting.
Design Options:
You can adjust all the dimensions of this rustic lamp. You can change the lamp's height by altering the length of the four 16-inch lamp body pieces and the width by adjusting the size of the rips. There's always more than one way to make a lamp!
Woodworking Projects - See more woodworking projects on mycarpentry.com.
Birdhouse Plans - Check out more birdhouse plans on mycarpentry.com.
DIY Projects - Check out the DIY projects on mycarpentry.com.
What next?
Leave Rustic Table Lamp and visit our home page.