Wooden Privacy Fence
How to Build a Wooden Privacy Fence
Building a wooden privacy fence is a somewhat easy DIY project that can save you money! Building a wooden privacy fence can be broken down into three phases:
- Digging the post-holes is the most difficult. You never know how hard it will be until you dig your first hole.
- Setting the fence posts is the second most difficult fence-building phase. Mixing concrete in a wheelbarrow is not too hard, but moving the bags of concrete from point A to point B can be strenuous.
- Setting the rails and pickets is the fun part - you finally get to see the results of your hard work rise above the ground.
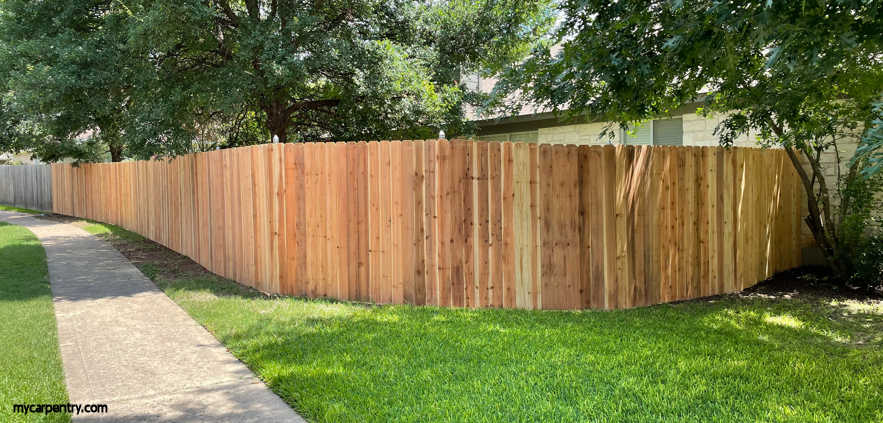
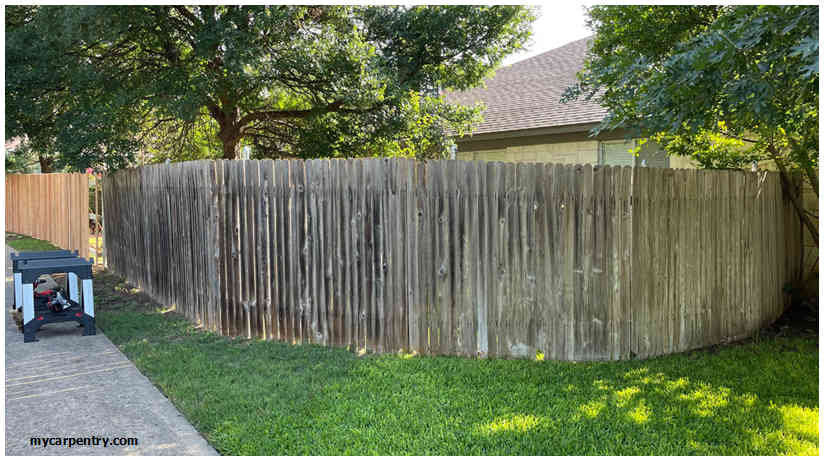
My fence project was to replace a 100-foot section of a 20-year-old wooden privacy fence I had built years ago on the west side of my house.
Replacing an Existing Privacy Fence (my plan)
- Locate the post holes for the new fence next to the existing 4x4 posts so that the old fence could remain standing while I took as much time as I needed to dig the holes for the new posts. Digging new holes was much easier than jackhammering the concrete on the existing holes, and I could keep my yard secure with the old fence while making steady progress on the new one.
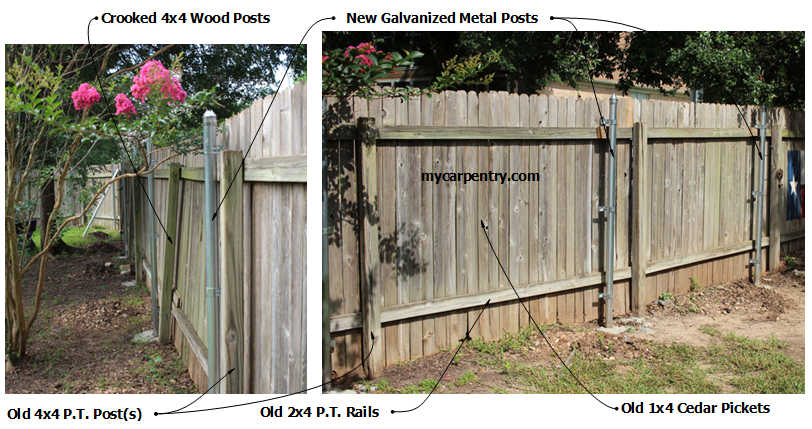
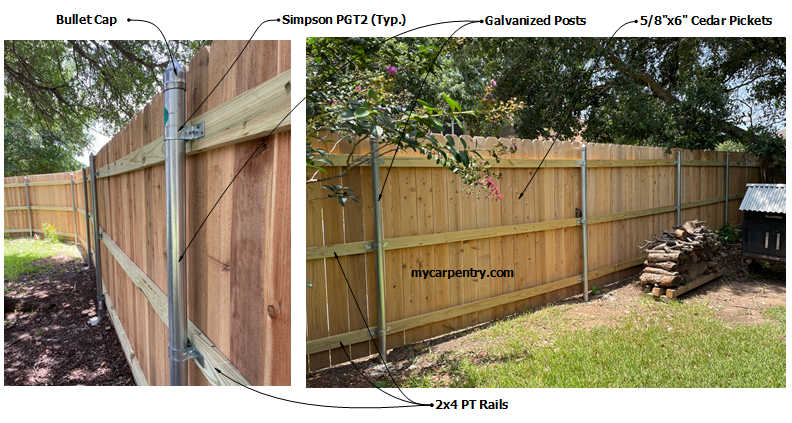
- Use galvanized metal posts instead of 4x4 wooden posts. They won't warp and are a lighter-weight material, thus making them easier to work with. The 4x4 posts on my first wooden privacy fence warped after only a few months in the ground.
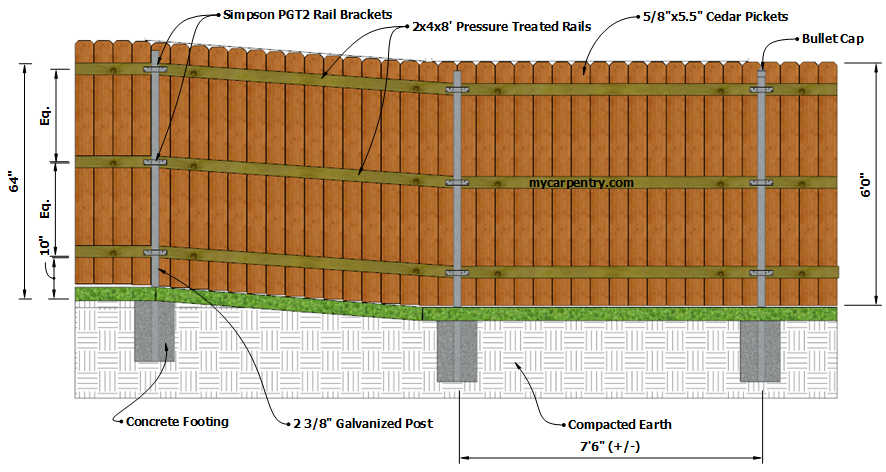
- Use three 2x4 rails (#1 grade pressure treated) instead of two. I added a third rail to the design to help prevent the fence boards from bowing between the top and bottom rails. Two rails would have probably been okay, but three are better.
- Use #2 grade 1x6 (3/4" x 5.5") cedar pickets. I used 1x4 cedar pickets on my first fence, which was perfectly acceptable, but I wanted to use wider planks to reduce the number of gaps between pickets along the 100-foot stretch.
Using 4x4 pressure-treated posts for your fence is a perfectly acceptable design. But if I were planning to use wooden fence posts again, I would ensure they are center-cut #1-grade pressure treated.
Digging Post Holes for a Wooden Privacy Fence
Before digging a single post hole, call 811 (in the US) to have officials mark the ground on your property for underground utilities. It might take them a few days to complete their work. Make sure you build that time into your schedule. Knowing the location of your underground utility lines is very important!
As mentioned earlier, the post-hole digging phase is the hard part of building a wooden privacy fence. My soil conditions were medium-hard. The ground was about 70% dirt and 30% rock. Most of the stones I ran into were about the size of tennis balls or smaller, but in two or three of the 13 holes, some were as big as footballs. Below is a list of essential post-hole digging tools:
- Post Hole Digger
- Digging Bar
- Shovel (I use a short 'Round Point' with a 'D-Handle')
- Work Gloves (If you don't wear gloves while handling the digging tools, blisters will soon appear.)
I put on my gloves and began digging each new post-hole with a Round Point shovel. I dug a 1-foot diameter hole about four to six inches deep, then switched to the post-hole digger to dig deeper. If the ground was too hard or I ran into rocks, I used the digging bar to help break up the soil and pry out the stones. If I couldn't loosen the ground sufficiently with the digging bar, I added a little water to the hole.
I dug each post hole at least 12" in diameter and about 18" deep. Your soil conditions may have different requirements. Check your local building code to determine if there are footing size requirements in your area.
The post-holes took about an hour each to dig (on average), but I often had to wait a week or two between diggings due to the weather. Finally, after an extremely cold and rainy Spring, I got the last post-hole dug by the first week of May.
Wooden Privacy Fence - Material List
I estimated that my new 100' wooden privacy fence project required approximately 218 pickets, 13 posts, 13 post caps, 39 post brackets, 39 rails, 5 lbs of 1 1/4" deck screws, 5 lbs of 2" deck screws, and about twenty 60 lb. bags of concrete. Here's the list:
| Item: | Size: | Quantity: |
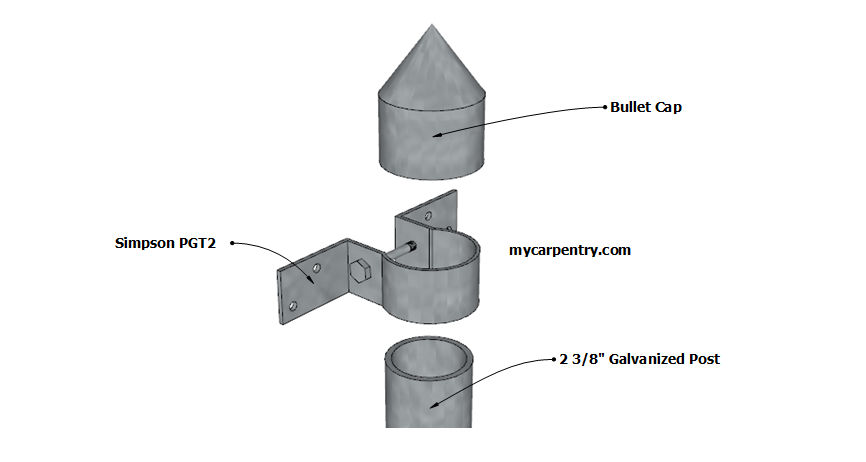
| Fence Posts | 2 3/8" x 8' Galvanized | 13 |
| Post Caps | 2 3/8" Bullet Cap | 13 |
| Post Brackets | Simpson PGT2 | 39 |
| Rails | 2x4 @ 8' (PT) | 39 |
| Pickets | 6 x 5/8" @ 6' Cedar | 218 (Approx.) |
| Concrete | 60 lb. bag | 20 (Approx.) |
| Deck Screws | 1.5" | 5 lbs |
| Deck Screws | 2" | 5 lbs |
Setting the Posts for a Wooden Privacy Fence
With all the post holes dug, the next step was to install the 2 3/8" diameter x 8-feet long galvanized posts.
I did not purchase the entire list of materials at once. For one thing, the complete list would not fit in the bed of my truck. On top of that, I knew it would take me a week or so to set the 13 posts in concrete, and I wouldn't need the other materials until the posts were ready. I drove to the lumber yard and only purchased what I needed to set the posts: the 13 8-foot galvanized posts; the 39 brackets; the 13 post caps; and six 60 lb bags of concrete.
I knew six bags of concrete would not be enough to set all the posts, but I didn't want to buy more concrete than I could mix in a day. I also wanted to see how far six bags would go before I purchased the balance - I didn't want any extra bags of concrete lying around in my garage at the end of the job.
I placed one of the full-length 8' galvanized posts into the first hole (at the point where I wanted the post to be). Next, with a 2x4 block placed on top of the post (to protect it from the 4-pound sledgehammer), I gently pounded it vertically into the ground, just enough so the steel post would stand plumb, while I mixed the concrete.
To make things easy for myself, I moved the bags of concrete (one at a time) directly from the tailgate of my truck to my wheelbarrow. Once loaded, I wheeled each bag of concrete over to the hole before mixing it.
I used 60 lb. bags of concrete because they are easier to carry than 80 lb. bags.
I mixed the concrete with a minimum amount of water so that, once in the hole, the concrete would have enough integrity to hold the metal posts plumb without requiring any temporary supports. I shoveled the thick-mixed concrete, from the wheelbarrow, into the hole, around the steel post while frequently checing the post for plumb before the concrete hardened.
The first six bags of concrete were enough to set 4 posts. The next day, I bought eight more bags and set another five posts in concrete. Later that day, I made another trip and bought seven more bags for the remaining four posts.
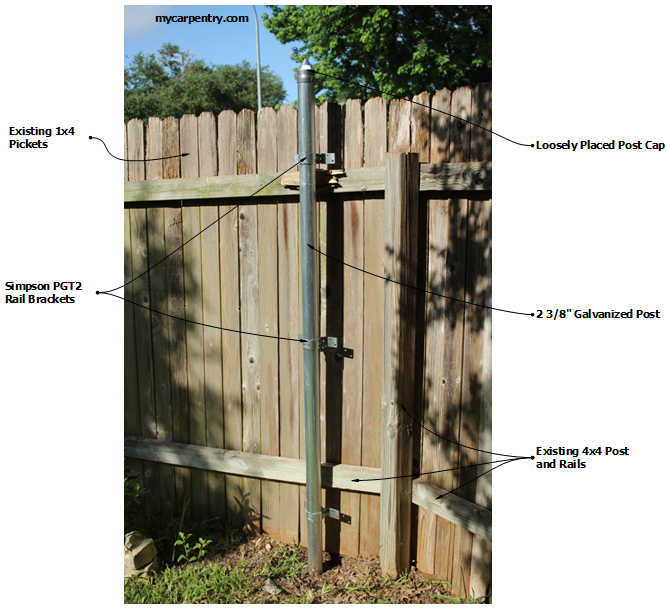
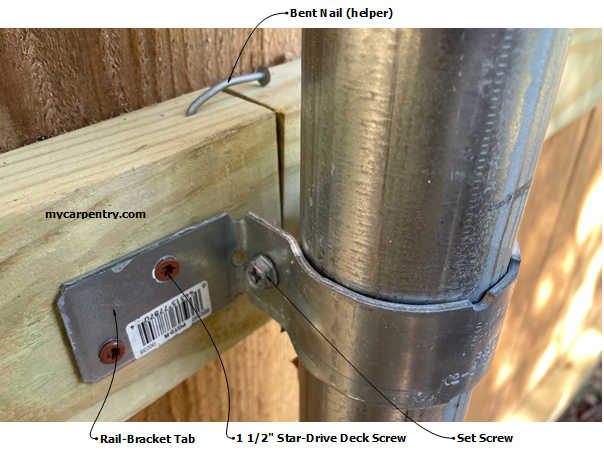
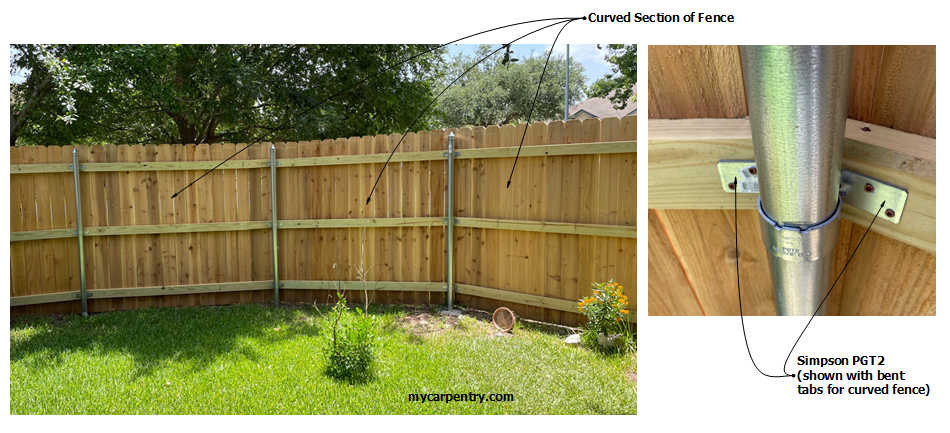
With the posts set in concrete, I slipped three Simpson rail brackets onto the top of each post, then positioned them along the vertical length of the posts as indicated in the diagram above, then aligned the bracket tabs horizontally with the adjacent steel posts. Next, I secured the locking screw on each bracket to hold them in position. Finally, I loosely placed the post-caps on top of each uncut 8-foot post to prevent rainwater from getting inside until I could determine the finished height (the last step of the project).
Essential Fence Building Tools (part 2)
- Circular Saw
- Reciprocating Saw (Sawzall)
- Power Drill
- Saw Horses
- Tape Measure
- 4-foot Level
- Speed Square
- Hammer
- Chalk Line
- Carpenter's Pencil
- Nail Bag
Wooden Privacy Fence - Attaching the Rails
On Friday, June 11, the forecast called for high temperatures in the low 90s with a 10% chance of rain. There would probably not be a better time to install the rails and pickets before the summer heat kicked into high gear.
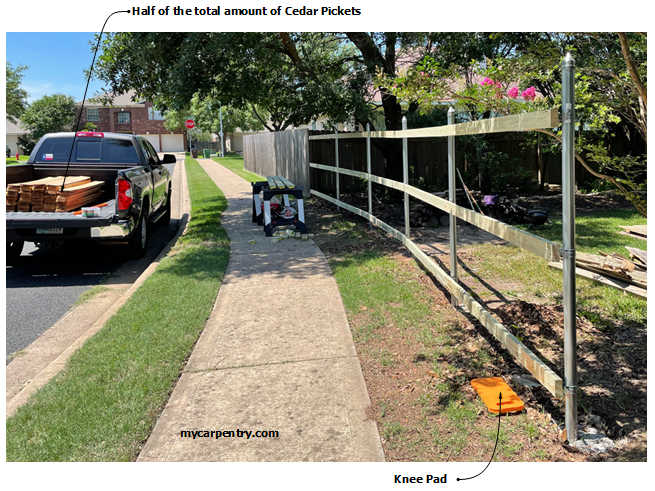
I took off from work at about 11:00 am that Friday and drove to the lumber yard to pick up the first batch of pickets, rails, and screws. I didn't want to purchase any more fencing than I could install that afternoon, so I bought half of the 2x4 rails (18), about half of the pickets (100), and 5 lbs of 1 1/2-inch deck screws.
When I returned from the lumber yard, I began dismantling just enough of the old fence to clear the way for what I planned to replace that day.
I cut the (roughly eight-foot) sections of the old fencing in half to make them easier to manage. Once the fencing sections were removed and stacked up neatly in my backyard, I cut the remaining wooden 4x4 posts off at the base with a reciprocating saw (Sawzall).
With nothing but the new posts set in concrete and rail brackets secured in place, I began measuring, cutting, and installing the 2x4 rails.
The new 2x4 rail material was #1 grade and straight, but if you look down the length of any 8' board, you'll always find a slight bow. Place the bow upward between posts.
If you don't have a helper to hold up one end of a long 2x4 rail, you can drive a nail halfway into the top of one end of the rail, then bend it so that it can hang onto the top end of a previously installed rail, while you screw the other end to the next set of post brackets.
With the rail brackets securely attached to the galvanized posts and the 2x4 rails screwed to the rail brackets, it was time to install the fence pickets.
I planned to pull the fence pickets straight from the bed of my truck rather than unload them someplace else first. That would mean moving the material twice. If you can avoid doing that, it will save you some work.
Wooden Privacy Fence - Installing Pickets
It is worth noting that (on my fence) none of the posts were on level ground or in straight lines. The first half of my fence posts followed the edge of a curving (and continually descending) concrete sidewalk, while the second half made a quarter-round turn back to the side of my house.
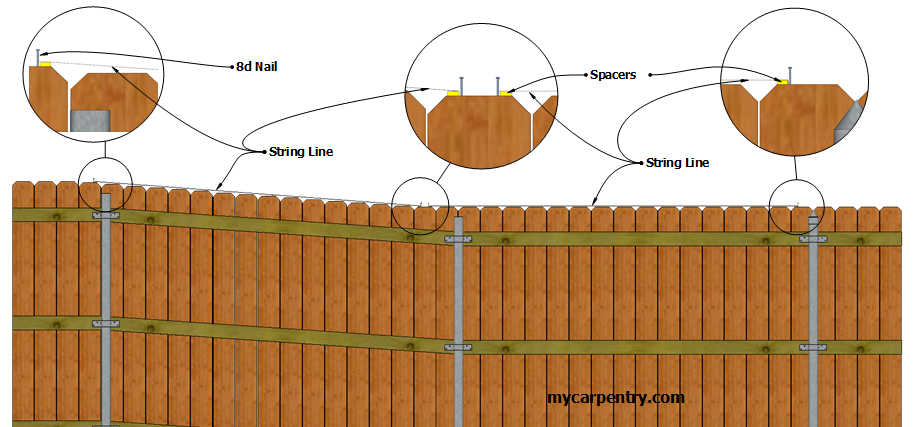
Given my scenario, I ran the string line from the tops of the pickets (post to post) and installed the pickets one section at a time. Each of the sections was slightly different from the others.
I finished setting the rails and pickets on the first half of my new wooden privacy fence on Friday before dark. After I put away all of my tools and cleaned up the scrap material from the sidewalk, there was just enough daylight left to enjoy a couple of cold drinks while I admired the work I had accomplished.
Finishing the Wooden Privacy Fence Project
On Saturday, I woke up early and drove back to the lumber yard to purchase the remaining rails, another 5 lbs of screws, and 100 more pickets. I knew I would be short a few pickets, but I didn't want to purchase them until I could determine the exact number I needed to complete the job.
When I returned from the lumber yard, I set up my operation on the sidewalk, as I had done the day before, and began removing the rest of my old wooden privacy fence.
Even though I was tired from Friday's work, Saturday's work went well once I had established a rhythm of productivity: measure the rails; cut the rails; hammer in a bent nail; mount a screw onto the star-drive bit inserted into the chuck of my cordless drill; rest the bent-nailed end of the rail on the previously installed rail; screw the other end into the post bracket; add the remaining screws; repeat for the other two rails and move on to the next section of fence.
Once all of the rails were in place, another level of productivity began with adding the remaining fence pickets - attach a temporary picket at the location of the next post (to determine the height of the fence pickets between posts); drive a nail or screw halfway in from the top of the two outer fence pickets; stretch a tight string line between the two pickets; add a 1/4" spacer under the string at each end (see diagram); load a nail-bag with 1 1/2" deck screws and begin attaching the inner fence pickets (holding them 1/4" below the tight string-line) while periodically checking them for plumb using a 4' level. When you reach the temporarily installed picket, remove it and attach it to the next post.
At the end of Saturday, as anticipated, I would need to purchase another 15 pickets to complete the job. On Sunday morning, I grabbed a fast food breakfast and picked up the remaining pickets from the lumber yard. After the last few pickets were attached, I had one remaining task: Cut the tops of each post and install the post caps.
Cutting Galvanized Fence Posts
I removed the loosely placed temporary post caps from each post, then measured down from the top of the nearest fence picket (5 inches) and made a mark on each post using a carpenter's pencil. I attached a metal-cutting blade to my reciprocating saw (Sawzall) and cut each post. Then, I reattached the post caps and permanently tapped them down onto the tops of each post with a hammer.
Project completed.
Wooden Privacy Fence Building Tips
Use a nail bag to hold your screws or nails while attaching the pickets. If you operate your cordless drill (or hammer) with your right hand, position your nail pouch so that you can get to the screws with your left hand. You can also use a nail gun to attach the pickets.
Put your fasteners in one of the top pockets of your nail bag so that you don't have to dig deep for them.
Do not add space between pickets when installing them unless your fence pickets are completely dry (and they rarely are). I installed my pickets with no gap between them and still, after a couple of days, ended up with close to a 1/4-inch gap between planks (once they had time to dry out).
If you have any thoughts or experiences regarding building a wooden privacy fence, please share them with us!
Woodworking Projects - Use the old fence boards to create one-of-a-kind crafts.
Birdhouse Plans - Use the old fence boards to build a custom birdhouse.
Wooden Bench Plans - Build a new bench for your backyard with the old fence boards.
What next?
Leave Wooden Privacy Fence and visit our home page.