Framing a Floor
Framing a floor is critical to good structural design. If you are building a structure with a pier and beam foundation, you must ensure the first floor is square and level before you add walls, ceilings, or roof structures. If it isn't, you will have framing issues to the last trim board.
Framing a Floor
The design of a pier and beam foundation starts with the floor plan. The location of partition walls, plumbing, HVAC, etc., determines the structural elements of the floor. For example, if a partition wall needs to be built parallel to the floor joists, extra structure will be required to support the load.
How to determine the size and spacing of Floor Joists?
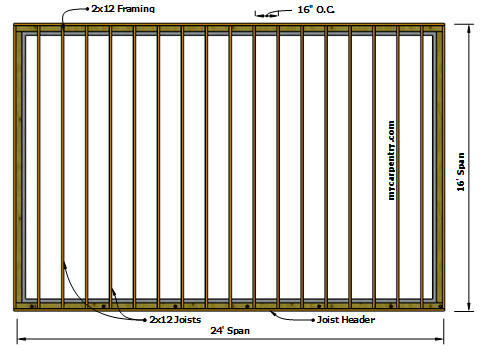
The diagrams below show two optional joist layouts for framing the same size (16' x 24') floor plan. Of course, the availability and cost of framing materials play a huge role in the design phase. Fortunately, there is plenty of flexibility in floor framing design.
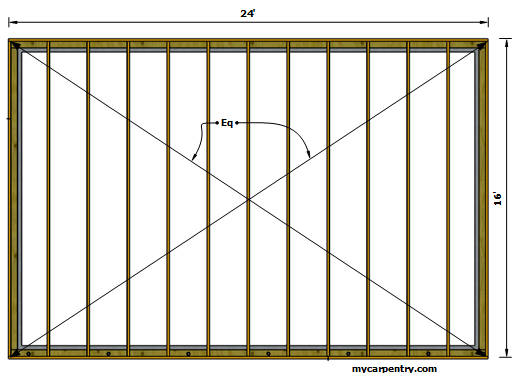
Using the Floor Joist Span Table (where Live Load = 40 lbs/ft² - S. Pine), we can see that, in order to span 16 feet, the 2x12 Southern Pine (#2 grade) joists, spaced 16 inches apart, can be used. These floor joists have a maximum span of 16-6 (16 feet + 6 inches) when spaced 16 inches apart. In the floor framing plan below, nineteen 2x12 joists @ 16 feet long would be required to carry the load.
When framing a floor, or any structure, I prefer to over-design my floor joists (slightly) to reduce deflection. While it does comply with building code, 16-foot 2x12s spaced 16" apart are too close to the maximum allowed span (16-6). The joist span table shows I could space the 2x12s 12 inches apart and get a new maximum span of 19-1. But that's a lot of expensive 2x12s.
The second joist framing plan (below) shows a properly supported girder or beam placed in the middle of the 16-foot dimension, thus creating two 8-foot joist spans. Using the same span table as above (Live Load = 40 lbs/ft² - S. Pine), we can see that 2x8 joists can be used (with floor joists spaced 24" apart) for the required 8' span, with a maximum span of 9-8, resulting in a total of 13 16-foot 2x8 joists (considerable cost savings). Of course, you would need to factor in the cost of the beam or girder if you choose this design. Alternatively, you could purchase 26 8-footers. There are many framing options. You have to explore the pros and cons of each plan.
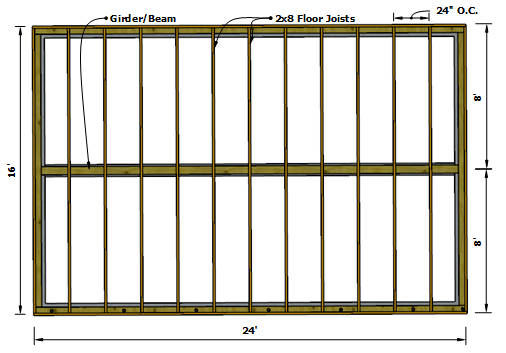
I prefer the second-floor joist plan when framing a floor. 2x12s are heavy, especially 16-footers, and are hard to work with, compared to 2x8 material. Smaller dimensional lumber (2x8s in this example) is considerably less expensive (per foot) than the larger 2x12 material. Longer lengths also tend to be more expensive and hard to find.
Squaring a Floor Frame
If the floor framing is not perfectly level and square, the difference will haunt the builder throughout the construction process. If the floor is not level or square, neither will the decking, walls, ceiling, or roof.
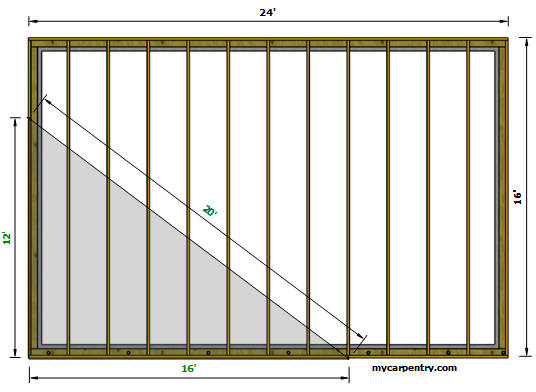
The most common method for squaring a floor frame is to use the Pythagorean Theorem (A² + B² = C²) or C = sqrt(A² + B²).
One of the magical things about the Pythagorean Theorem is that there is an easy-to-remember 3-4-5 proportion that you can use to square anything. Basically, if side A equals 3 feet and side B equals 4 feet, then side C (the long side) will equal 5 feet.

Any combination of numbers proportional to 3-4-5 will work (3-4-5, 6-8-10, 12-16-20, 30-40-50, etc.).
For example: On any frame, measure 12 feet from the 90° corner and make a mark on the outside edge of the frame. Next, measure 16' from the same 90° corner along the adjacent framing, and make a mark. The space between the two pencil marks should be exactly 20'. If they are not, the frame is out of square and should be adjusted.
Another option for checking the square of a frame is to cross-measure the opposing corners. If the frame is square, the numbers will be equal.
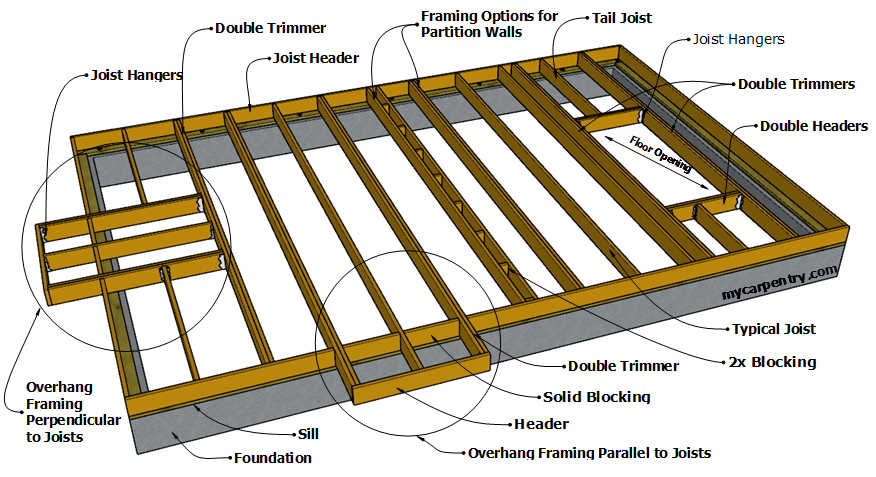
Floor Joist Framing for Partitions, Openings, and Overhangs
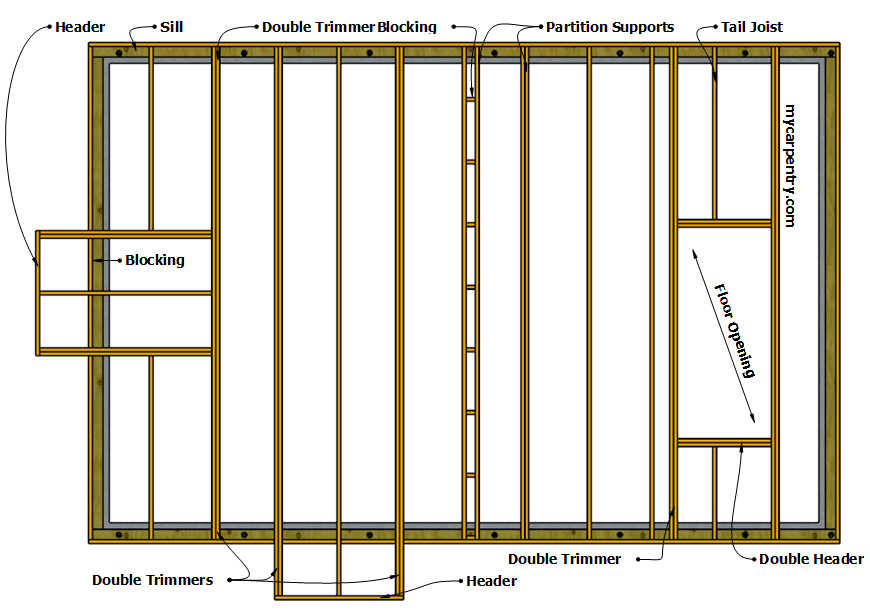
The floor framing plan below shows examples where some features extend beyond the outside of the foundation (like a bay window). There are two framing options, depending on the direction of the floor joists.
Openings in the floor, such as stairwells, also require floor joists to be doubled on either side of the floor opening and require headers at each end.
These aren't the only scenarios where double-framing might be required, but these are the most common. If in doubt, add extra structure.
Floor Joist Layout
There are also two framing options where wall partitions are installed parallel to the joist direction. The first option is to double the floor-joist framing beneath the wall. The second option - with 2x spacers sandwiched between two floor joists - works best if you plan to route plumbing through the floor into the wall.
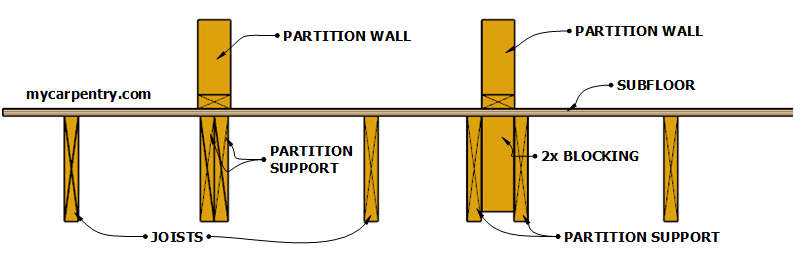
Framing Floor Joists for Partition Walls
The diagram below shows typical floor joist layouts; one with 16" O.C. (on center) and the other with 24" O.C. spacing. Whatever the floor joist spacing, the process is the same - use a tape measure to lay out the joist header (at the desired spacing) and mark an X on the side of the line where the joists will attach.

Laying Out Joist Headers for Floor Joists
Additional structural framing required for floor openings or partition walls should be included in the floor joist layout while always maintaining the calculated spacing on the remaining joists.
When I design any structure, I like to use dimensions that make the most out of the material sizes. It helps to minimize cost and waste. The 16' x 24' floor plan described on this page makes the most use of almost the entire length of the 16' joists (or 8-footers if you choose that route) and every square inch of the 4x8 sheets of plywood decking.
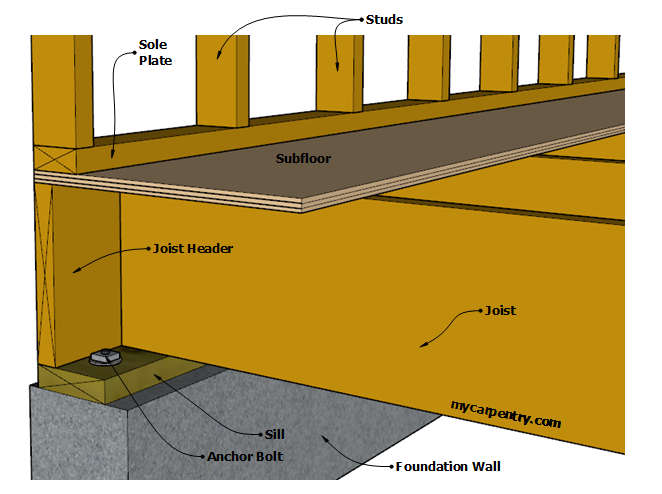
First Floor Framing
The first level floor framing (in this example) ties to the sole plate bolted to a foundation wall.
For building code information regarding residential floor construction, go to the Wood Floor Framing section of the International Residential Code.
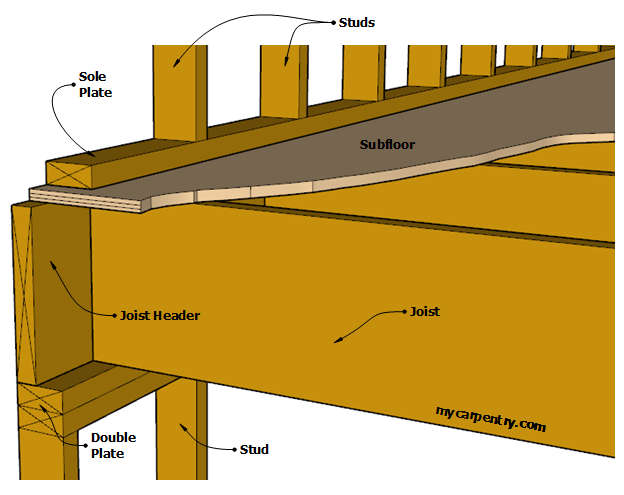
Second Floor Framing
The second-floor framing attaches to the double plate on top of the first-floor walls.
Floor Joist Span Tables - Determine the maximum joist spans for different species of lumber.
Ceiling Joists - How to design and frame a ceiling.
What next?
Leave Framing a Floor and visit our home page.