Free-standing Pavilion
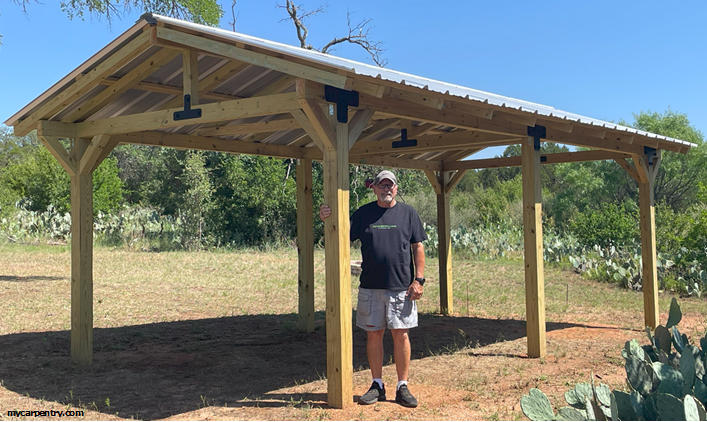
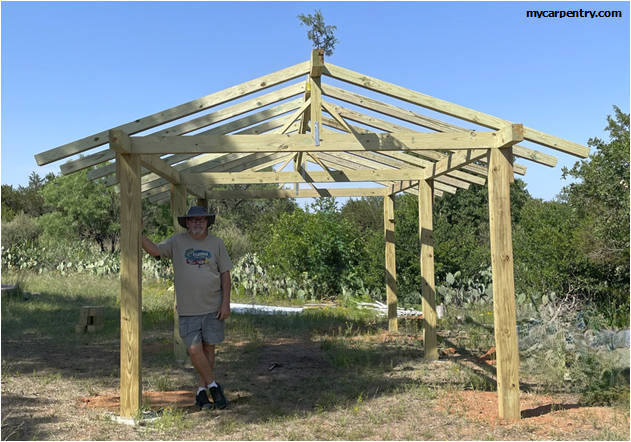
I have wanted to add plans for a free-standing pavilion or a free-standing patio cover to mycarpentry.com for years. Well, here it is. With some help setting the heavy 6x6 posts and moral support from my wife, Tammy, I built this one myself in May 2025.
Project Scope:
- Replace a ten-year-old 10'x 20' portable canopy with a permanent free-standing pavilion.
- Increase the size of the permanent structure to add approximately 60% more shade area.
- Build the structure using pressure-treated pine posts, beams, and rafters.
- Install a 24-foot-long, 4-12 pitch metal "Galvalume" roof.
- Complete the entire project by May 16, 2025.
Feasibility:
Before committing to the project, I needed a feasibility study. The soil where I planned to build the new pavilion was primarily composed of crushed granite; however, there were areas on the property where solid granite outcroppings broke through the surface of the soil. One of these rock-hard outcrops could be beneath the surface of the soil where I planned to dig my post holes. That wouldn't be a complete showstopper, but it could impact the timeline.
Materials List:
| Usage | Material | Length | Quantity |
| Posts | GC Treated 6x6 | 10' | 6 |
| Beams | Treated 4x6 | 12' | 6 |
| Beams | Treated 4x6 | 10' | 3 |
| Rafters | Treated 4x4 | 8' | 22 |
| Purlins | Treated 2x4 | 12' | 12 |
| Wood Braces | Treated 4x4 | 8' | 2 |
| Roof Sheets | 3' Galvalume | 7' | 16 |
| Ridge Cap | Galvalume | 15' | 2 |
| Corner Braces | 3x3 Galvanized | - | 24 |
| Rafter Ties | 3x2 Galvanized | - | 22 |
| Roofing Screws | Sheet Metal | 7/8" | 200 |
| Roofing Screws | Wood Grip | 1 1/2" | 300 |
| Concrete | 60# Bags | - | 14 |
| Brackets | Decorative (Large) | - | 6 |
| Brackets | Decorative (Small) | - | 6 |
| Framing Screws | Deckmate (1 lb Box) | 3 1/2" | 4 |
Free-standing Pavilion: The Feasibility Study:
On a cool morning in early April, I loaded my digging bar, shovel, posthole digger, leather gloves, and two 5-gallon plastic jugs of water into my truck, then headed 50 miles out to our property to begin the feasibility study. The only variable was ground conditions. If the ground were too rocky, I would likely have to hire a contractor to dig the holes or rent a machine and do the work myself.
I started digging my first hole in the packed crushed granite with just the posthole digger. Impossible. It was like trying to dig through solid concrete. I broke out my digging bar and began to break up the surface. That worked, but when I tried to remove the dry soil with the posthole digger, the crushed granite slipped right through its jaws. When I added a little water to the hole, that made all the difference; it not only made breaking up the soil easier, it turned the dry grit into a light, muddy consistency that the posthole digger could grab onto.
I dug the first two post holes in just a little over an hour, much faster than I anticipated. Building the free-standing pavilion seemed a possibility as long as I could complete it before our May 16 family reunion. There was no time to waste.
Free-standing Pavilion
After Easter weekend in Houston, I purchased six 10-foot-long 6x6 ground-contact pressure-treated posts, took them to the job site, and dug another post hole. A few days later, I bought sixteen 7-foot-long "Galvalume" roof panels and fasteners and staged them near the future pavilion.
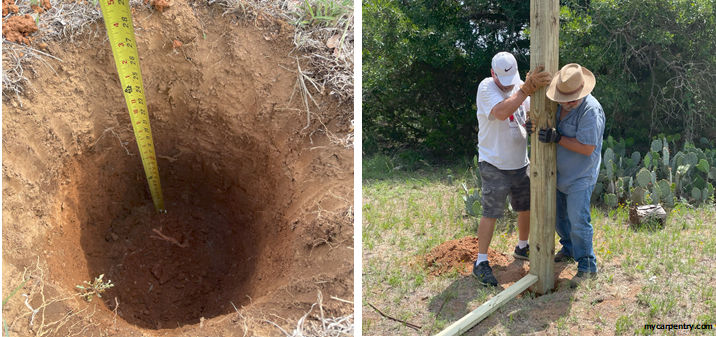
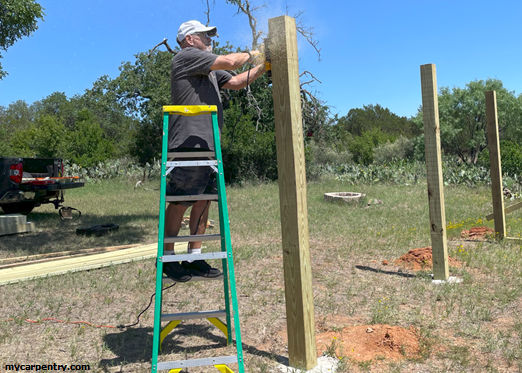
On Saturday, April 26, Tammy and I purchased twelve 12-foot pressure-treated 2x4s and eight bags of concrete and met my buddy, Albert, on-site to dig more holes and set the first four posts in concrete. In a couple of tiring hours, Albert and I had all four posts concreted into the ground. Later, while Albert was digging the fifth and last hole of the day, I added 2x4 cross-bracing to the 6x6 posts to keep them plumb while the concrete cured until it was time to start framing the roof. At quitting time, we headed for shade, enjoyed a couple of cold Beasts and one IPA each, and called it a day. It felt good to get the project off to a strong start.
Tammy and I returned to the job site the following Monday with 22 8-foot 4x4s (rafter material), more 2x4 bracing, and enough concrete to set the two remaining posts. We knew it would be challenging to finish our free-standing pavilion in time, given that we were making 100-mile round-trips back home each day, so we planned to bring our travel trailer to the property earlier than we typically do for our family reunions. We could accomplish more work by utilizing the time spent on unnecessary travel to work on the pavilion.

On Friday, May 2, we hooked up our trailer, loaded our gear, and headed west. About 10 miles away from our property, we noticed a storm brewing in the distance. We managed to arrive at the lake, set up our trailer, and get it under cover before the downpour. The unusually intense storm built up over the lake and didn't budge for nearly four hours. The news reported that the disturbance produced two-inch-diameter hail (that we saw) and one tornado (that we didn't see). The inclement weather cooled the air but kept us indoors all evening. The news forecasted worse foul weather on Saturday with higher winds and three-inch hail.
Saturday morning, we drove to a lumber yard in Kingsland and purchased the straightest 4x6 beams we could find to complete the roof perimeter and ridge. We unloaded the materials at the job site and, due to the gloomy afternoon forecast, headed back home. Well, the bad weather never developed; in fact, it turned out to be a beautiful Saturday afternoon. Better safe than sorry, I guess.
Sunday, I loaded my transit level into my truck, along with some tables and chairs for the reunion, and headed back to the lake.
Post Height:
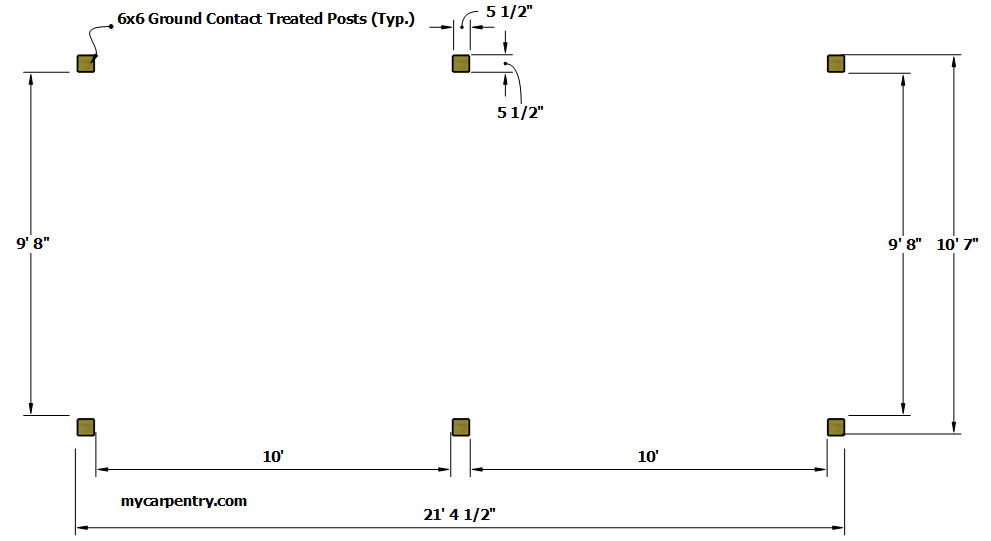
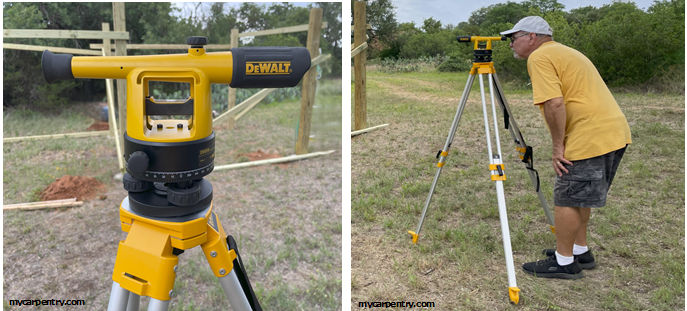
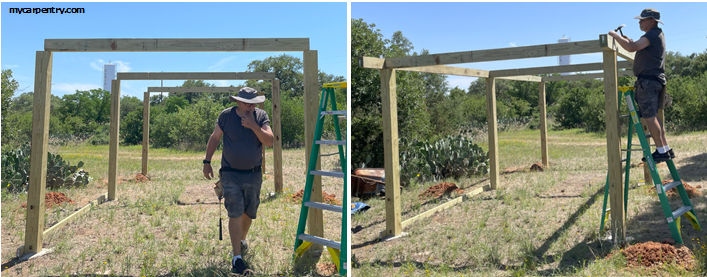
Monday morning, after breakfast, we set up for a long day of construction. I planned to level and cut the tops of each post to prepare them for roof construction. My Transit Level worked well for this. I hung my tape measure from the top of each post and made a mark where the crosshairs of the scope intersected with a gradient on the tape. Once I marked all the posts with a point that was level across each post, all I had to do was determine the height of the shortest post, then measure up from my level mark, the same length on each one.
With the height of each post marked on each face of the 6x6 posts, I used my circular saw to cut the top off each one.
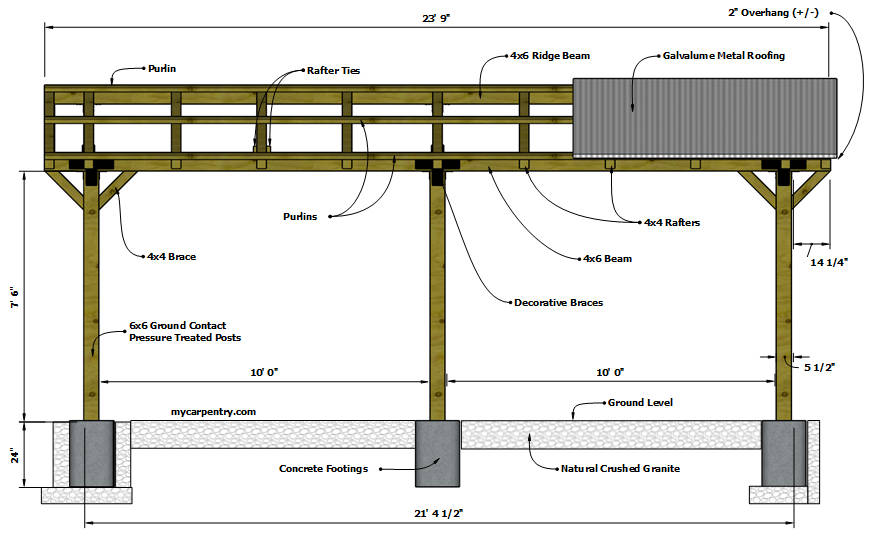
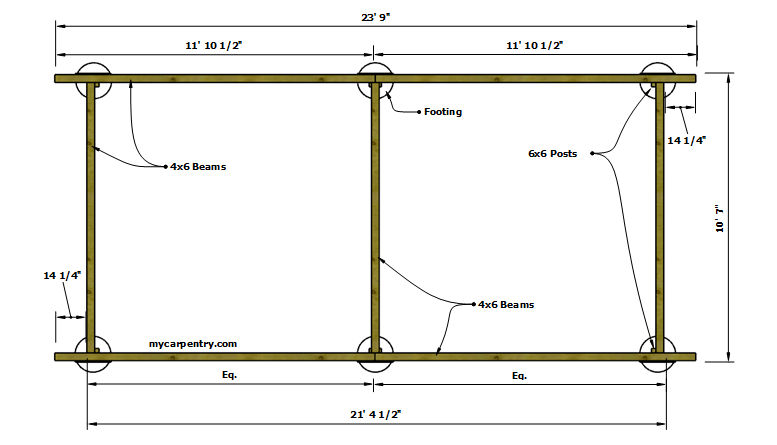
Once I leveled and cut the tops of each post, I built the 4x6 perimeter roof frame using the following plan.
Crowning Lumber: Almost all dimensional lumber has some bow in it. When working with horizontal framing members, like beams, rafters, and joists, always install them crown-up, that is, with the bow on top, so that the forces of gravity will tend to straighten the member over time.
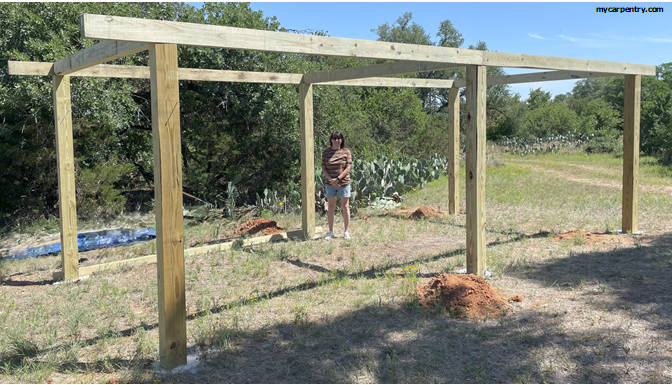
I set and secured the three 10' beams (crown-up) that tied each pair of posts together, leaving a 3 1/2-inch space on top of each post to set the 12' beams.
Next, I fastened the four 12-foot beams to the 10-foot beams using two counter-sunk 6-inch x 3/8-inch lag screws per connection. Then, I used galvanized angle brackets to secure the framed beams to the posts.
Setting the Ridge Beam:
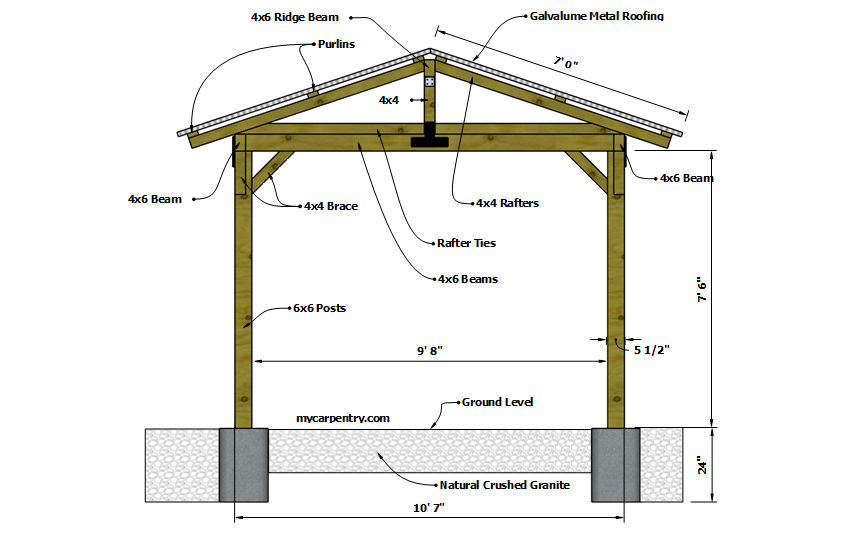
I selected two of the 8-foot 4x4s I purchased for rafter material and marked an 18.4-degree angle on one end of each, ensuring that the long point of the angle was on the crown-up surface of the rafters.
To determine the finished height of the ridge beam, I used the Roof Pitch Calculator on mycarpentry.com.
Note: The Roof Pitch Calculator only accepts decimal numbers, and as you change the values in the Input Fields, the Result Fields automatically update.
On the Roof Pitch Calculator, I selected "Rise" from the *Calculate section since I need to calculate the ridge beam height, then entered 61.75 inches in the rafter Run(R) field and the number 4 in the Pitch (/ 12) field (four inches of rise for every twelve inches of run).
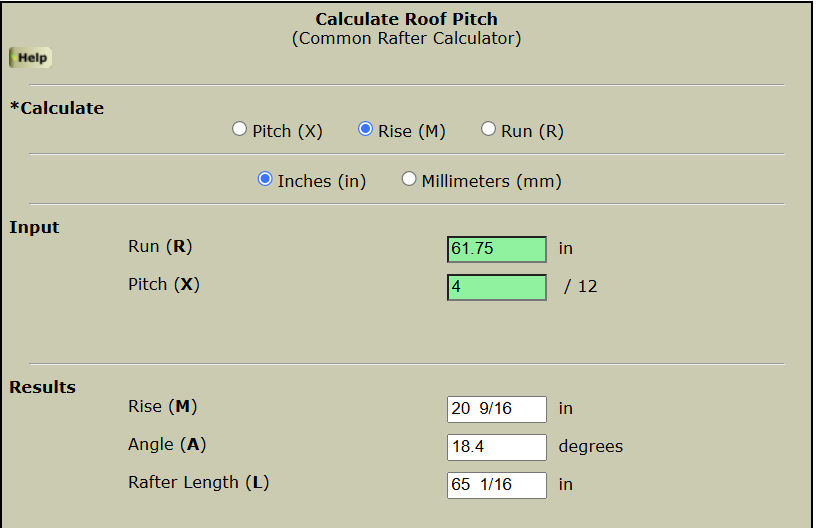
The result: 20 9/16 inches. That was the calculated height of the short point of the 18.4-degree angle on the rafter above the lower 4x6 beam. To complete the ridge beam height calculation, I added the length of the 18.4-degree cut-face to it: 3 11/16 inches, in this case. (see diagrams)
20 9/16 inches plus 3 11/16 inches equals 24 1/4 inches, the finished height of the 4x6 ridge beam.
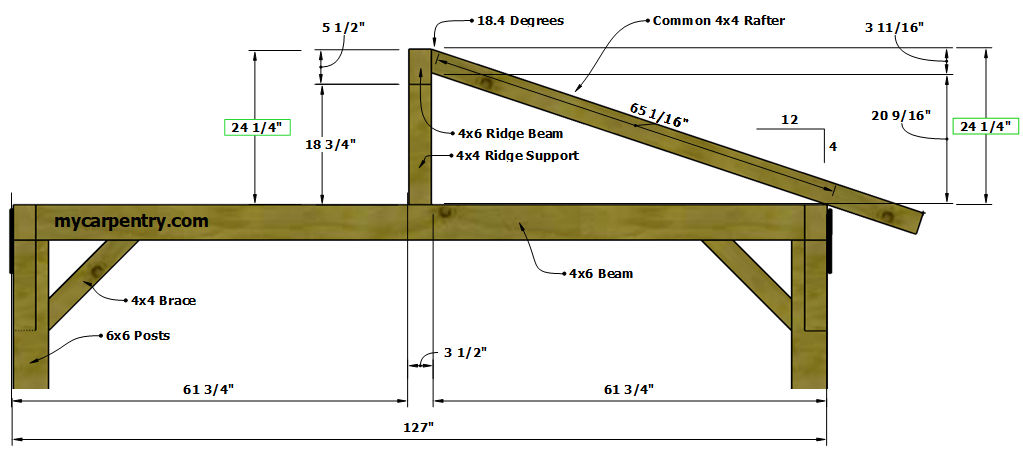
To determine the height of the 4x4 posts that support the 4x6 ridge beam, subtract the height of the ridge beam (5 1/2") from 24 1/4 inches. The result is 18.75 or 18 3/4 inches.
Next, I cut three 4x4 ridge beam support posts, each 18 3/4 inches in length, and attached them to the center of each 4x6 beam. Next, I added braces to support the 4x4 posts, side-to-side and front-to-back, so that they stayed plumb during ridge beam installation.
Note: The Rafter Length value is the Line Length of the rafter between the two points of the hypotenuse. The Rafter Length value wasn't needed for this project since there was no birdsmouth to calculate, but I used it as a checkpoint by making a mark on the underside of the rafter 65 1/16" from the short point of the pitch cut. If my calculations were correct, the mark on the underside of the rafter should land on or very close to the edge of the perimeter beam.
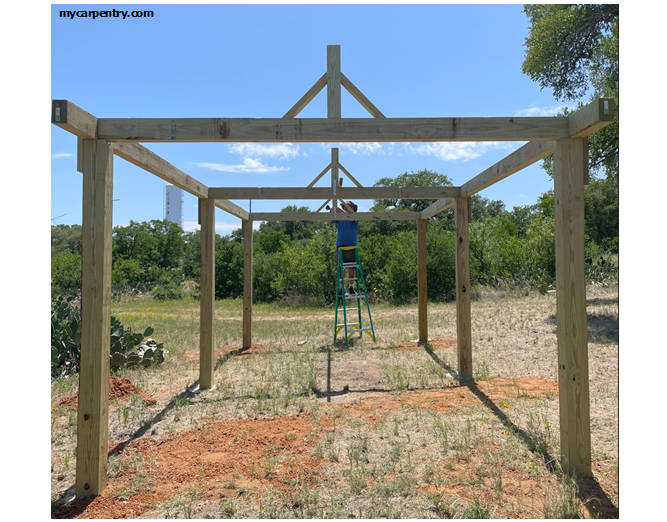
Next, I squared the inside ends of the two 4x6 ridge beams, leaving the outer ends uncut. I installed the two 4x6 ridge beams, crown-up, on top of the 4x4 posts using galvanized angle brackets and screws, centering the break between the ridge beams over the center 4x4 support.
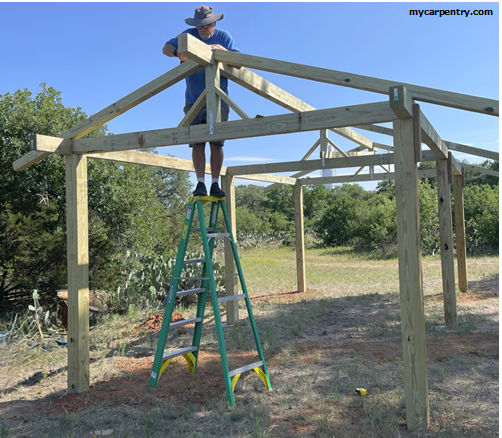
With the ridge beam in place, I installed the first pair of rafters, one on each side of the ridge beam, above the center 4x4 ridge beam support using two 3 1/2-inch wood screws, toe-screwed from the top of each rafter, and one from each side, into the ridge beam. I positioned the tail ends of the rafters so that they aligned with the lower beam and toe-screwed them into the perimeter beam using a 3-1/2-inch wood screw on one side and a galvanized hurricane tie, or angle bracket, on the other. I planned to cut the rafter tails once they were all installed.
I repeated the above step at the location of the remaining two vertical 4x4 supports. These six rafters supported the ridge beams while I installed the remaining rafters.
Rafter Spacing:
Using the Rafter Span Table, shown below, from mycarpentry.com, I determined that I could comfortably use 2x4 rafters spaced 24 inches apart to support my roof, given that my rafter span is only 5-2 (5 feet, 2 inches).
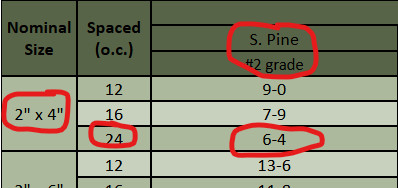
Since I chose to use 4x4s for rafters, which added 2 inches of width support to the 2x4 rafter span calculation, I decided to space them evenly within the 112-inch gap between the first three pairs of rafters I installed at each 4x4 ridge beam support. Making them roughly 28 inches apart.
Note: If I were using 4x8 sheets of plywood for decking, I would have adhered to a rafter layout designed for that size material. Since the Galvalume sheets of roofing were attached to 2x4 purlins laid perpendicular across the rafters, there was no need.
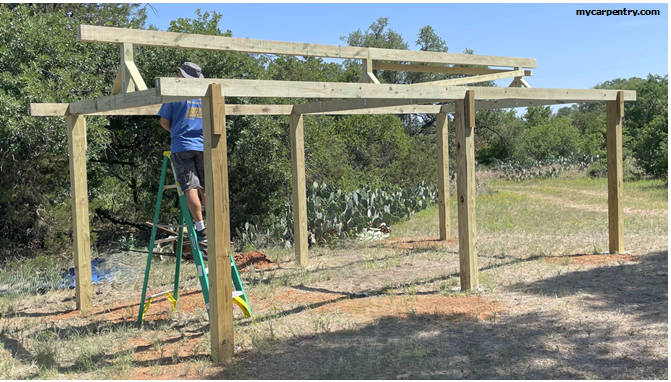
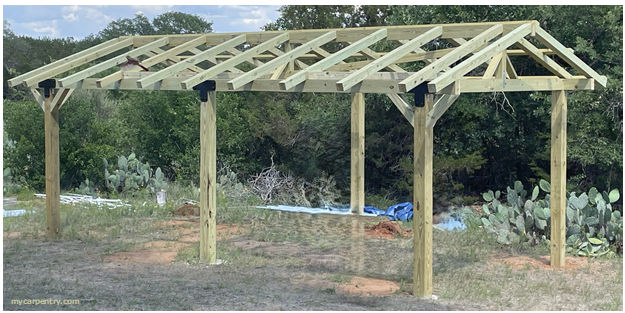
The next day, after last night's Top-out party (three beers and a frozen dinner), I cut the three 4x6 beams that were running long on both ends to a length of 14.25 inches from the outer face of the 6x6 posts. Next, I added three 4x4 diagonal braces to the four outer corners, installed the decorative T-brackets, and installed the remaining rafters.
Next, I determined the rafter length to be 6 feet, 9 inches long. I marked that length on the two end rafters on one side of the roof with my carpenter's pencil, then drove a nail at each point, angled away from the opposing rafter, and stretched a tight string between the two nails across the tops of the inside rafters. I used my Speed Square and pencil to mark the cut lines along the string line where it touched each rafter, and then cut them using my circular saw. I used the same procedure to cut the rafter tails on the other side of the roof.
Before installing the roof panels, I needed to install the three rows of 2x4 purlins: one at the top end of the rafters, one at the bottom, and one in the middle. I used two 3 1/2" galvanized deck screws to fasten the purlins to each rafter.
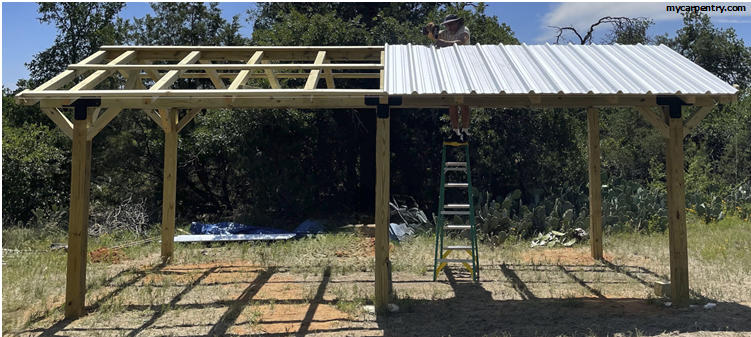
I wanted my 7-foot roofing panels to extend three inches past the ends of the rafter tails so that I might later add 1x6 fascia, 2x4 sub-fascia, or gutters. I used the same nylon string line stretched 3 1/4 inches past the rafter tails, the entire length of the roof. As I installed each roofing panel, I held it about a quarter inch from the string and screwed it in place using a combination of two kinds of self-tapping galvanized screws.
I installed all 16 sheets of roofing, adding only the screws I could reach from my step ladder, thinking I would climb on top of the roof at a later time and add the remaining screws. Outside of the missing screws, the only remaining step was to install the Galvalume Roof Cap. I planned to install it the next morning, on May 15, one day before the family reunion. It wouldn't take long, but since I had a history of falling off extension ladders, I was apprehensive, no, scared to death, about climbing one to access the rooftop.
The next morning, after a waffle and egg breakfast, I set up my extension ladder against one of the gable ends of the pavilion so I could tie the top rails and rungs of the ladder to the roof's rafters and beams. I tied it tight, shook it a few times to test its sturdiness, then climbed to the top. I was too frightened to climb out onto the roof because there wasn't anything to hold onto. I almost gave up on the idea of installing the roof cap.
"I'm just going to pay some poor sucker to do it for me," I said.
"Are you sure," Tammy said. "The roof will block the sun as it is now, but if it rains, things are going to get wet."
"You're right. I'm giving up to easily. Let me try something else."
I untied the ladder and moved it past the roof peak to the front slope, then extended it, where about two feet of ladder stuck above the middle part of the gable roof, and tied the ladder off to the rafters again, even more securely than before, and climbed to the rung just below the roof surface. Holding on to the top of the ladder, I delicately swung around it on the low end and climbed onto the roof on my knees. Even with the low slope, the sheet metal was slicker than owl crap. But I was on it now and was ready to get my job done and get off!
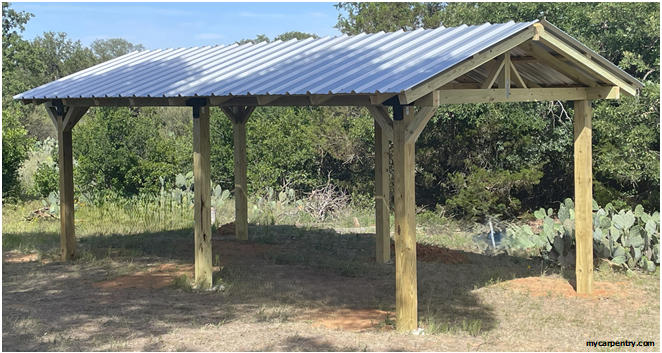
I managed to add the missing screws to the tops of the roof sheets as I carefully crawled over each panel to the other end of the pavilion, but my bare knees were killing me on the hard roof surface. Tammy found my knee pads in the basement of our RV and threw them onto the roof, but when I reached for them, I lost my grip on the sheet metal and began sliding off. After a struggle and a few cramps, I managed to get my knee pads on, but not very well; they were too loose and kept sliding off my knees. But they were better than nothing. While I was at the opposite end of the roof from the ladder, Tammy handed me one end of the first piece of roof cap. It wasn't heavy and slid easily into place. I began screwing it to the tops of the roofing panels, starting at the far end, one at a time, as I slowly made my way back to the ladder. After enduring much knee pain, I had the roof cap installed and climbed down to solid earth without injury.
Yeah, I knew it was only 11 a.m., but I was ready for a cold beer!

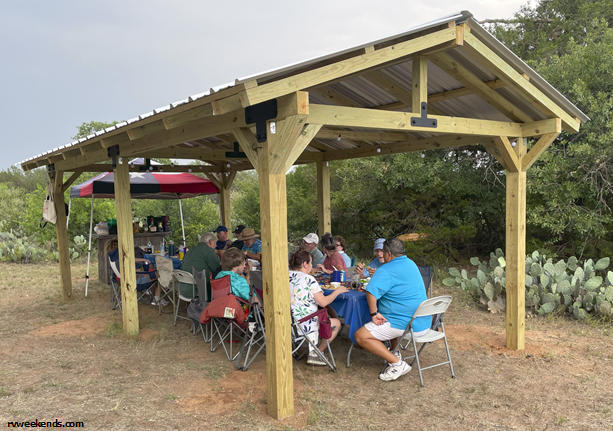
There were loose ends to finish before we could declare the Free-standing Pavilion project 100% complete, but we had completed all the necessary work to provide shelter from the sun and rain before the May 16 reunion.
Rafter Span Tables - Determine maximum rafter spans for different species of lumber.
Roof Pitch Calculator - Calculate roof pitch, angle, rise, run, and rafter length.
Roof Framing - How to design and frame a roof.
Building a Patio Cover - How to design and build a patio cover.
What next?
Leave the Free-standing Pavilion Page and visit mycarpentry.com's home page.