Outdoor Shower Stalls
A guide to building an outdoor shower
When designing outdoor shower stalls, like any bathroom shower design, there are many things to consider. The available materials (and the sizes of those materials) can make a big difference when determining the overall plan.

The Outdoor Shower Stall - Design
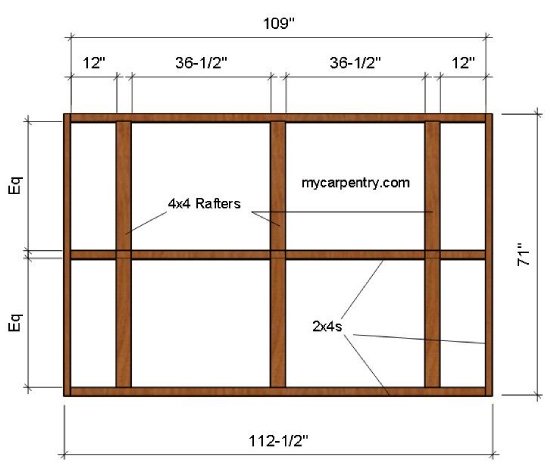
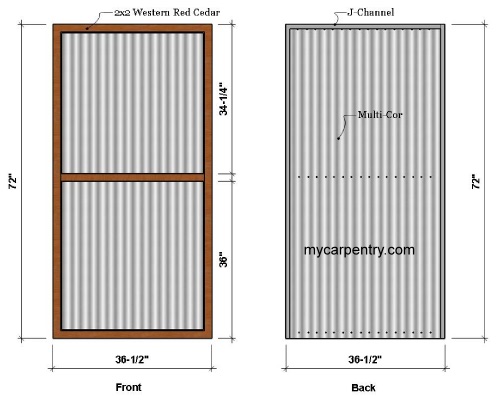
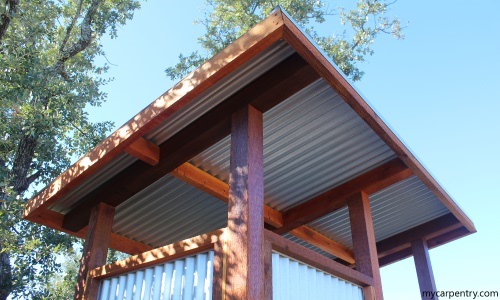
I designed my outdoor shower around the factory width of GALVALUME MULTI-COR corrugated metal sheets (35 1/2 inches). You can order them from Metal Mart any length that you want. I ordered nine sheets 6 feet long, so I didn't have to cut them. I used six MULTI-COR sheets for the wall panels and the other three for the roof.
I used western red cedar for all the wooden parts. I used 4x4 posts 8 feet long for the structure and primary roof rafters. I ripped 2x4s in half to make 2x2s to build the frames for the wall panels and door. The ripped 2x4's were roughly 1 3/4" x 1 3/4".
I used GALVALUME J-CHANNEL to trim out the tops and sides of the MULTI-COR sheets. I used 3-inch galvanized wood screws to fasten all the wooden materials and self-piercing galvanized screws to attach the MULTI-COR panels and J-CHANNEL to the wooden frames.
As I constructed the structure of the wooden shower frame, I stained/sealed all of the wood surfaces with SUPERDECK Transparent Stain - 1902 - Red Cedar.
Building the Outdoor Shower Enclosure
Building the form for the concrete slab was the first step in constructing the outdoor shower enclosure. I purchased 2x6 pine for this small rectangular form and nailed the pieces with 12d framing nails.
I leveled the top of the form to use as a gauge for leveling the concrete and secured the form with wooden stakes. I drove 1/2" pieces of Rebar into the ground along the outsides of the form to prevent bowing after the concrete pour.
I used 6x6 inch welded wire mesh in the slab to reinforce the concrete and prevent cracking. I filled the gap between the bottom of the forms and the ground with dirt to keep the wet concrete from running out below the form.
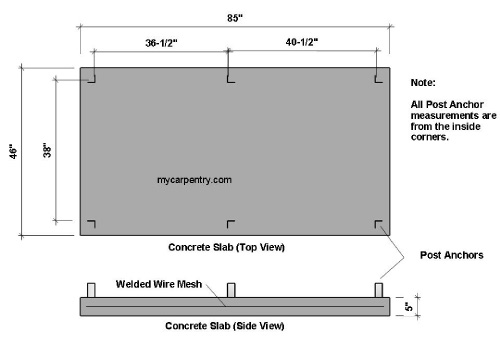
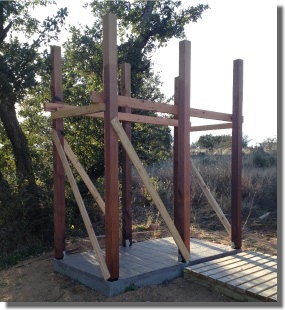
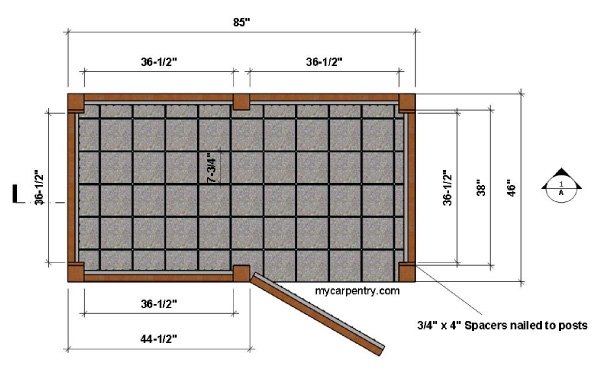
Once the concrete was poured (and before it hardened), I added galvanized post anchors for securing the wooden posts to the slab. I offset the center post anchors four inches so that the front and back posts are 36 1/2" apart when added. (see diagrams)
I added an extra 1 1/2" to the short dimension of the post anchors to increase the depth of the outdoor shower (slightly) making them 38" apart. So that the wall panels were all the same size (36 1/2" x 72"), I added 3/4" x 4" planks of cedar to the insides of the four end posts (see diagrams).
There are several types of galvanized post anchors. I used galvanized angle braces as post anchors because I already had them and didn't want to spend the extra money on standard post anchors.
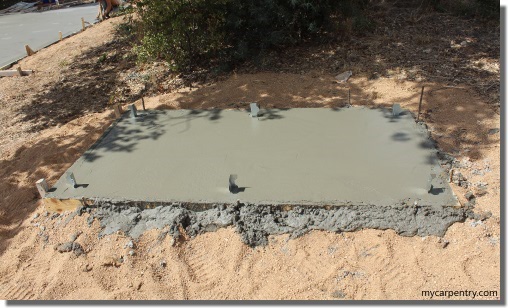
Before and after I added the post anchors, I troweled the wet concrete so it would harden to a smooth finish. The picture below shows the wet concrete with forms attached and anchors installed.
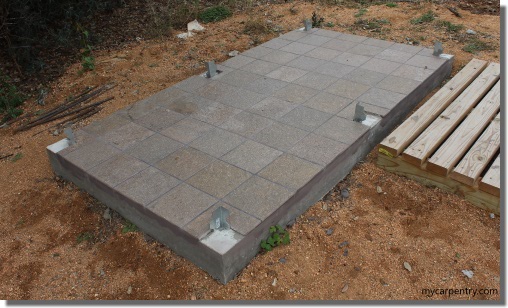
Once the concrete hardened, I removed the forms and laid 8-inch outdoor tile to provide a non-stick surface for the shower floor. The next day, I grouted the tile with a dark gray grout to match the shower floor tile.
I added plastic "feet" to the bottom of each post before I secured them to the post anchors so that the wood would not rest directly on the slab. Thus allowing the post bottoms to dry between showers and prevent rotting.
Once I secured the uncut 4x4 posts to the post anchors, I plumbed each post and used the 3/4" x 4" cedar planks (later to be used as spacers) and temporary 2x4s to secure them in place.
 |
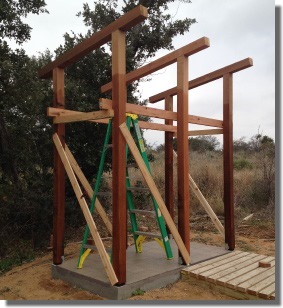 |
I constructed the rest of the roof structure using the roof plan (below). I determined the width of the roof by laying three MULTI-COR roof panels on a flat surface - as they would attached to the roof - and measured the overall width.
The width could vary, depending on how much overlap you prefer.
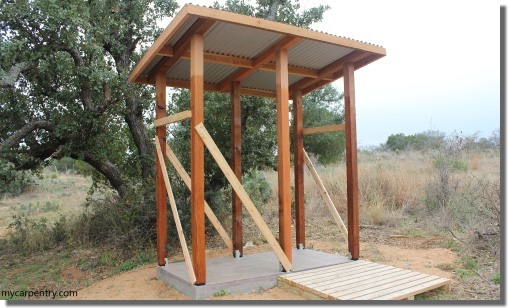
Once I completed the roof framing, I secured the MULTI-COR panels to the wooden roof frame with 1 1/2" self-piercing galvanized screws. With the roof panels screwed in place, I could remove some of the post bracing to make room for the wall panel installation.
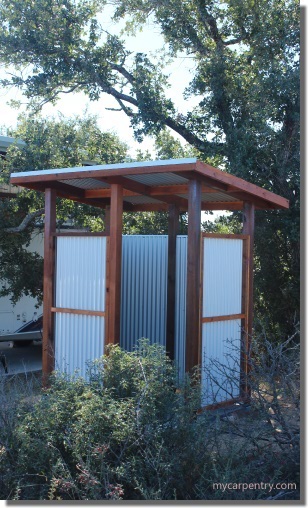
The floor plan below shows the wooden posts and wall panels installed. I custom-built each one of my wall panels rather than pre-building them since the actual distances between posts varied slightly.
Note: Before adding the wall panels, I installed 2x2 galvanized angle trim along the inside corners of the 4x4 posts to protect them from water (see images below).
To construct each wall panel, I measured the distance between two posts and custom-built the 2x2 cedar wooden frame to match. I screwed the wooden wall panel frame to the 4x4 posts, holding them up 3 inches from the top of the shower floor and flush with the outside of the 4x4 posts.
I cut a piece of J-CHANNEL the width of the top of the frame and secured it on the inside of the top 2x2 with 1 1/2" self-piercing screws. I added J-CHANNEL trim to both sides of the frame as well, butt-jointing them to the upper piece of J-CHANNEL.
Next, I installed the MULTI-COR sheet by bowing it slightly - so it would fit between the two side pieces of J-CHANNEL and then pushed it up into the top piece of J-CHANNEL. I held it in place with a 2x4 shim (on the bottom) while I secured it with 1 1/2" self-piercing screws.
With the wall panels installed, I removed the remaining braces and completed staining the western red cedar wood surfaces with the red cedar stain/sealer.
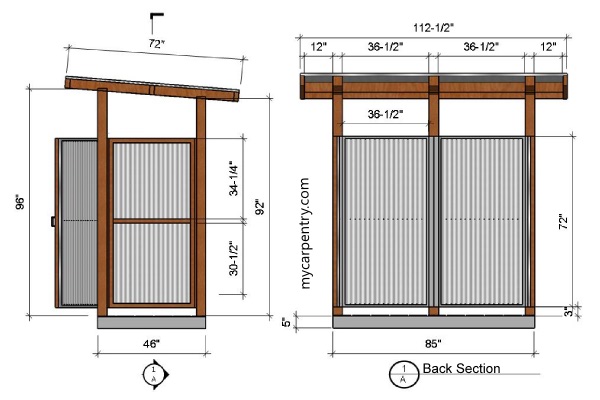
The above elevations show the roof pitch dropping 4 inches in height from the outside of the front wall to the outside of the back wall. The result is a pitch slightly more than 1-12.
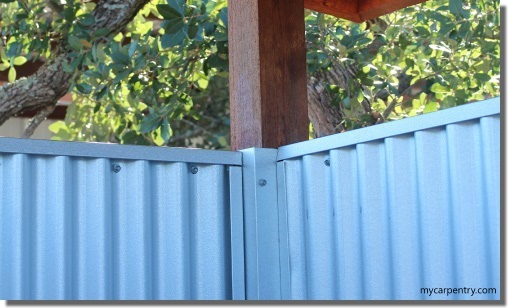
The view above shows the 2x2 galvanized corner angle with the two adjacent wall panels. The result is an outdoor shower with no exposed wood in the shower area.
The door, not shown in these pictures, is the same construction as the other wall panels but with hinges on one side and a latch on the other.
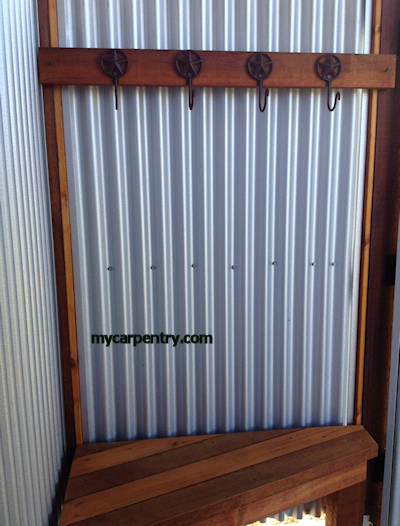
The design of this outdoor shower stall was to have the shower area on the left and a dressing area on the right. I plan to add hooks for towels and clothes and a small triangular bench to fit in the right back corner.
 |
 |
In the future, I plan to add plumbing from a rainwater catchment system that I have not installed yet. In the meantime, I am using a 'Solar Shower' that you can purchase from most camping supply stores.
DIY Projects - Check out the DIY projects available on mycarpentry.com.
Cedar Deck - Building a cedar deck - step by step.
Outdoor Benches - Build an outdoor bench for your backyard.
What next?
Leave outdoor shower stalls and visit our home page.