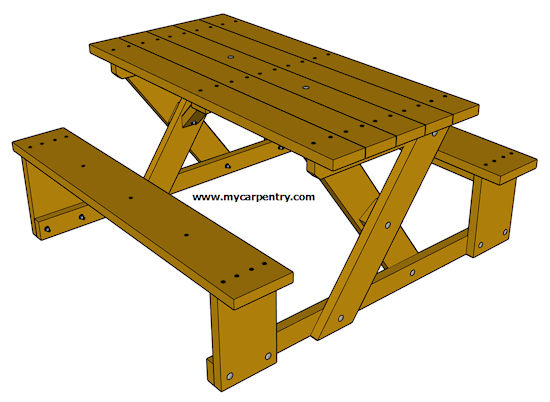
Picnic Table Plans
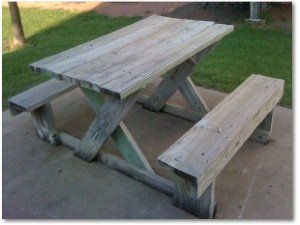
These picnic table plans are one of several types of all-in-one picnic table designs. I saw this one at an RV park near central Texas. It is a solid one-piece picnic table that is easy to build.
Building the all-in-one picnic table
Note: Before cutting any wood or building this picnic table, read through to the end of these instructions so that you can visualize the finished product and verify the material list. You also might have scrap material of your own that you can use for some of the smaller parts. These instructions and material list assume that you do not.
I think a better option for assembling this picnic table is to build the table, as per instructions on this picnic table plan, then add the Bottom Rail and Bench Sections. You can decide for yourself after you read these instructions.
Note on Materials: In some cases, the material list (below) specifies using a 10' piece of lumber for two 5' table parts. Some new materials may be 1/2" (+/-) longer than their specified length, but some are not. Also, lumber is sometimes split or damaged at the ends. If either is the case, you may want to purchase the next size up. Alternatively, you can make the table slightly smaller (58" or 59" tabletop boards instead of the specified 60").
Power tools required:
- Circular Saw
- Power Drill
Material list:
| Material | Qty | Purpose |
| 2" x 6" @ 10' | 5 | Top, Bench Support, and Legs |
| 2" x 4" @ 10' | 1 | Bottom Rail |
| 2" x 4" @ 12' | 1 | Table Top Supports, Diagonal Braces |
| 2" x 10" @ 10' | 1 | Bench seats |
| 2" x 10" @ 8' | 1 | Bench Uprights |
| 3/8" x 3.5" Carriage Bolts | 18 | Bottom Rail, Bench, Legs, and Diagonal Braces |
| 3/8" x 7" Carriage Bolts | 2 | Mid Point of Table Legs and Diagonal Brace |
| 3" Galvanized Deck Screws | 60+ | Everywhere, except Table Top Brace |
| 2.5" Galvanized Deck Screws | 10+ | Table Top Brace |
Picnic Table Plans
You can adjust the dimensions of these picnic table plans to suit your specific needs. The dimensions indicated are the actual measurements from the picture I took of the one at the RV park.
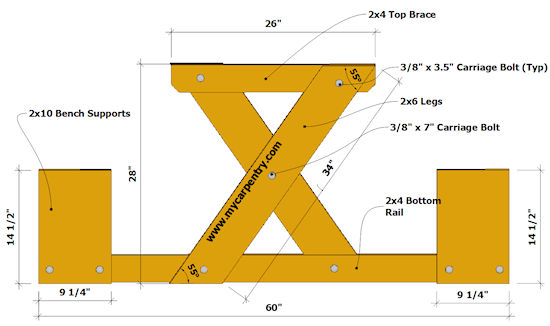
- With a Speed Square, mark a 35-degree angle on one end of one of the 2x6s (this leaves a 55-degree angle on the table leg). Measure 34" from the first mark and mark another 35-degree angle. Cut it and use it as a pattern for the other three.
- To assemble the table legs, hold two of them together (one on top of the other) with the long points opposing each other, and make a mark in the center (as if you are making a large pair of scissors). Drill a 3/8" hole in the center through both legs. Repeat these steps for the remaining set of table legs.
- Cut two 4" long blocks from the 12 foot 2x4. Drill 3/8" holes in the middle of these blocks. These will be used as spacers to hold the leg sections apart.
- Sandwich one of the 2x4 blocks between two of the legs at the connection point and bolt the three pieces together with one of the 7" carriage bolts (as shown in the drawings). Do not over-tighten.
- Align the assembled legs - like a pair of scissors - until the 35-degree angle cuts are in line. When sitting upright, the bottom of the legs should be flat on the ground, and the two bottom and top points should be 26 inches apart.
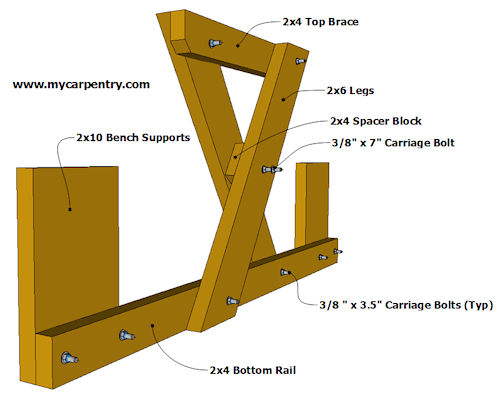
- Cut two 2x4s @ 26 inches. These will tie in the top part of the table legs and serve as framing for the table surface. Cut a 45-degree notch at the bottom of the 2x4s at both ends. Align the table legs so the 35-degree angle cuts are parallel (see diagram above). Attach the 26-inch 2x4 to the top of the table legs with the 3.5-inch carriage bolts to hold the table legs in position.
- Cut two 2x4s 60" long (Bottom Rail). These will tie the bottom of the table legs together with the vertical 2x10 bench supports. Center these 2x4s side-to-side, in between the table legs. Secure with 3.5-inch carriage bolts (see below).
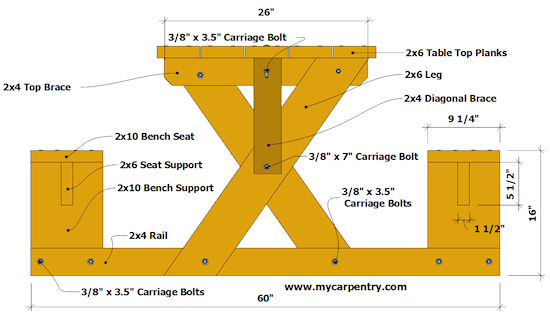
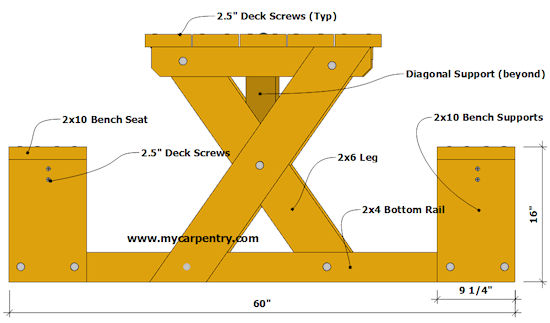
- Cut four 14.5-inch length sections from the 8-foot 2x10. These are the bench supports.
- Screw the 2x10s into the lower 2x4s with deck screws (to hold them in place) and drill/bolt them with two 3.5" carriage bolts per support.
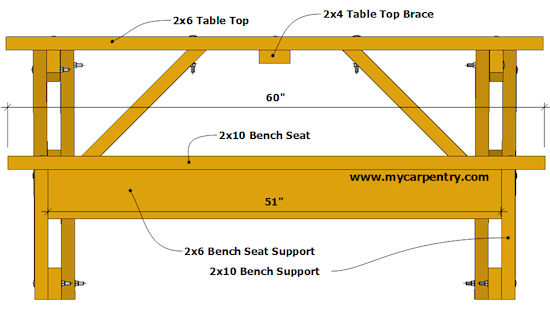
- Cut two 2x6s at 51 inches. Screw them between the two 2x10 bench supports (as shown in the diagram above) using three 3-inch deck screws on each end.
- After attaching the 2x6 braces to the vertical bench supports, the table should be able to stand upright. It may not be perfect - just so long as they are close.
- Cut five 2x6s @ 60 inches to use as the tabletop. Starting at the middle of the table, screw in the middle 2x6 with the 3-inch deck screws.
- Before attaching the remaining 2x6s, cut two 2x4 braces @ 21.25" from long point to long point (below).
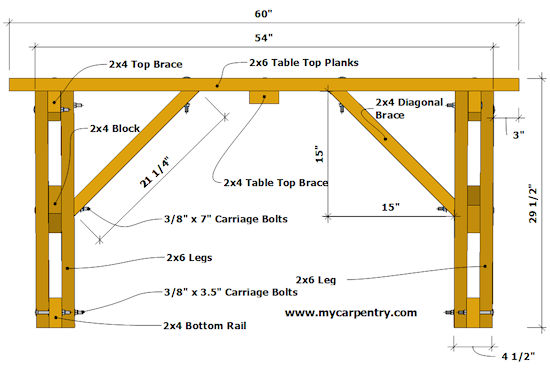
- On the underside of the 2x6 tabletop plank, measure over 15" from the inside 2x6 leg and make a mark. Measure down 15" from the underside of the tabletop, on the inside table leg, and make another mark on the leg. Screw in one of the 21.25" supports such that the long points of the brace line up with the two 15" marks (see side view above). Repeat this on the other end of the table.
- Ensure the picnic table structure is square and that the two leg assemblies are in line with each other.
- Screw in the remaining 2x6 tabletop boards working from the center board outwards. Leave a 1/8 inch space between each board.
- Cut the remaining 2x10 in two pieces @ 60 inches. Center them and screw them into the bench supports, shown in the end view below.
Once the picnic table is assembled, square, and straight, tighten all the bolts. The table should now be complete.
Success!
Picnic Table Plans - Check out more styles of picnic tables.
Outdoor Furniture Plans - More plans for outdoor furniture.
Birdhouse Plans - Build a birdhouse to go with your new picnic table.
What next?
Leave picnic table plans and visit the home page.