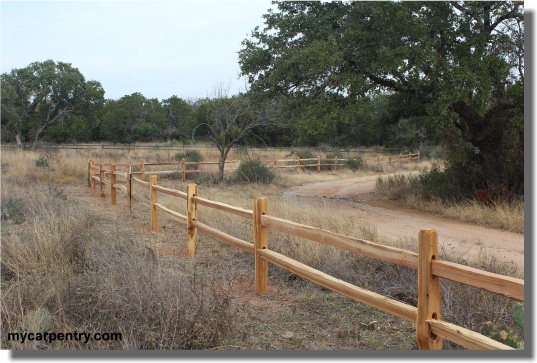
Split Rail Fence
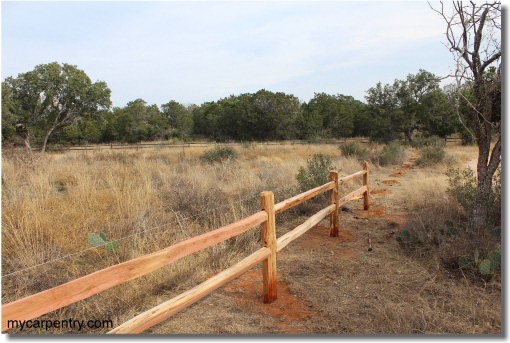
My split rail fence project was the most fun fence I have ever built. Fences are generally not physically easy projects. Any time you have to dig holes in the earth and mix concrete, you're getting a workout. But it was simple because all the posts were pre-drilled for the 10-foot pre-cut rails.
When assembled, the ends of the rails butt together in the middle of the posts. So, if you lay out the location of your post holes on 10' centers, you can assemble the entire fence without making a single saw cut on the posts or the rails.
Locating the Post Holes
Stretch a nylon string tightly between two temporary posts. T-Posts work great for this. Locate the T-Posts at least two feet beyond the beginning and the end of the section of split rail fencing you are building, and offset the string/posts from the actual location of the post holes by one foot (see diagram below).
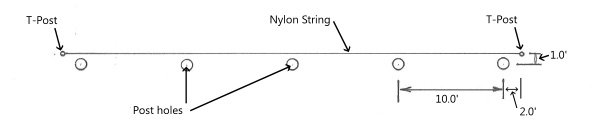
Positioning the string one foot away from the post-hole locations will help prevent damage to the string by a post-hole digger or auger bit.
Digging the Post Holes of a Split Rail Fence
The hard part of building any fence is digging the holes for the fence posts. I rented a Boxer 320 series mini-skid to dig 30+ post holes for my split rail fence project. If there were just a handful of post holes, I would have used a post-hole digger and saved a little money on the mini-skid rental.
I tried digging my first post with a post-hole digger - it took me four hours to dig a hole 12 inches in diameter by 24 inches deep. However, my soil was mostly compacted crushed granite. If my soil conditions had been easier for digging, I might not have rented the mini-skid. That's a choice you can make yourself.
If in doubt, try digging one hole with a post-hole digger on your split rail fence. You'll know very quickly which way you will want to go.
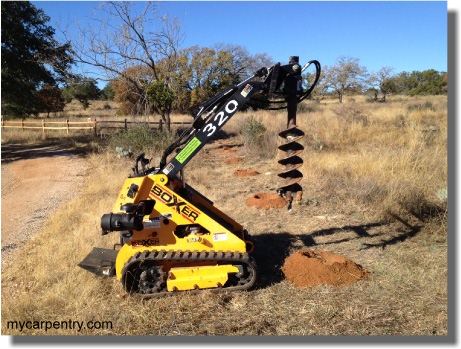
The Boxer Mini-Skid came with several attachments, including three sizes of auger bits. I chose the 10" bit to drill the post holes for my split rail fencing project.
Preparing the Split Rail Posts
Before setting the posts in soil or concrete, seal the bottoms with a stain/sealer. One fence builder I talked to suggested dipping each post into used motor oil before sticking them in the ground - it is supposed to be the best and cheapest method for preserving your fence posts.

Setting the Fence Posts and Rails
Once the post holes are at the desired depth, you can start setting all the posts and rails. Unlike many other types of fencing, you cannot install all the posts first and then install the rails.
Since the rails are notched on each end, just enough to fit into the slots in the posts, you must install each post/rail section as you go. Here is the process:
- Install and plumb the first post (usually an end post).
- Fill in around the post with dirt/concrete.
- Insert the rails into this post and set the other ends of the rails beside the hole for the next post (called a line post because it has slots on both sides of the post).
- Install the 2nd post into its post hole and insert the ends of the rails into it.
- Make sure that the rails are inserted into the posts as far as they will go - and that the posts are plumb - before backfilling with dirt/concrete.
- Repeat the process, starting with step 3.
You can use the string you used to lay out the post holes to ensure that the fence stays straight while installing the posts/rails.
Finishing Up
After installing the posts and rails, secure each end of the rails into the cedar posts using 3.5" galvanized deck screws.

Notes:
Consult your fencing supplier for advice on securing the posts in the ground. Soil conditions vary considerably in different regions. My soil was primarily crushed granite that packs well. I did not use concrete to secure the posts on my split rail fence.
I plan to seal my posts and rails with a cedar stain/sealer, but many people choose to let the cedar age naturally to a dark grayish finish.
If you have any questions about split rail fencing, please do not hesitate to contact us.
DIY Projects - Check out more DIY projects on mycarpentry.com.
Wooden Privacy Fence - Design and build a wooden privacy fence.
Wooden Bench Plans - Build a new bench for your backyard with the old fence boards.
What next?
Leave Split Rail Fence and visit the mycarpentry.com home page.