Deck Railing (6)
Deck Railing (phase 6 of 7), of the, how to build a 10' x 10' deck example. Railing is required if the deck is more than 30 inches (762 mm) above the ground.
This tutorial provides the procedures for constructing deck railing using international building codes. But you should always check your local building code for specifics related to deck and railing requirements before you design and build your deck.
Designing Deck Railing
Besides safety, deck railing serves other purposes as well. For example, it provides a place to lean on while having a detailed discussion with someone about how you built your own deck. It also provides a great place to set your coffee or cold beverage.
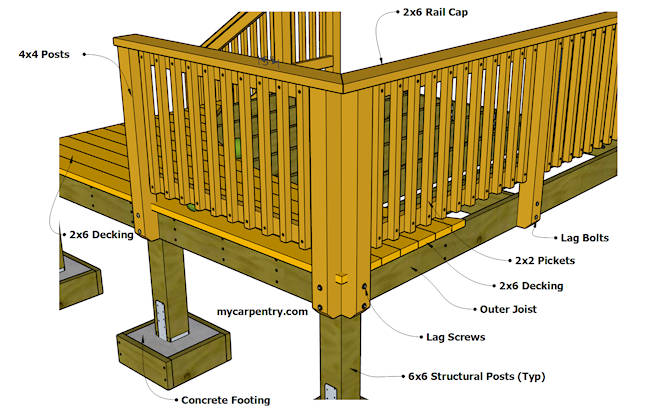
Deck Railing
The building code suggests that the rail post span should not exceed 72" (1829 mm) - measured from the center of each post. Rail posts (also called Guard Posts) are generally spaced evenly between straight runs of the deck.
Space between the pickets and below the bottom rail should not allow a 4" (102 mm) sphere to pass through. The finished height of the deck railing should not be less than 36" (914 mm), measured from the surface of the decking to the top of the rail cap.

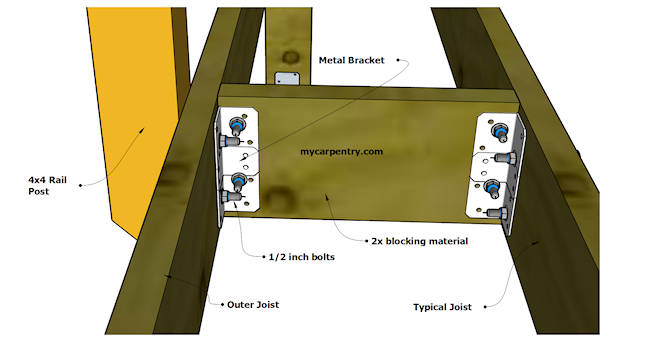
Deck rail posts attached to the outer joists should have 2x blocking material at each post location and hold-down anchors similar to the metal brackets shown in the diagram below. Two 1/2" through-bolts should be used to attach each 4x4 post to the outer joists through the hold-down anchors. Corner posts can be attached using two 1/2" screws per post. For complete details on the 4x4 deck post attachment, refer to the Prescriptive Residential Wood Deck Construction Guide (link at the bottom of the page).
Picket Layout
Once the 4x4 rail posts are plumbed and attached to the deck frame, the 2x4 rail sections with attached pickets come next. There's no real trick to laying out the 2x4 rails for pickets, but there are a few things to consider before you begin. First, you want the picket spacing on each end of the rail section to be equal. Second, you want the run-out of the pickets to be such that a picket layout mark does not land partially on the end of a 2x4 rail.
There are two ways to lay out the 2x4 rails for the pickets (shown as Option A and Option B below). Either one can be used, but the one you choose depends on the width of the rail section between the 4x4 posts. We will compare both options.
The Prescriptive Deck Guide shows the 2x4 rails attached to the inside face of the 4x4 posts, not between them. I have always built deck railing where the 2x4 rails attach between the posts. Contact your local building code authorities for details in your area. I will proceed as though it is acceptable to attach the 2x4 rails between the posts. Either manner you choose to fasten your 2x4 railing, the picket layout is the same.
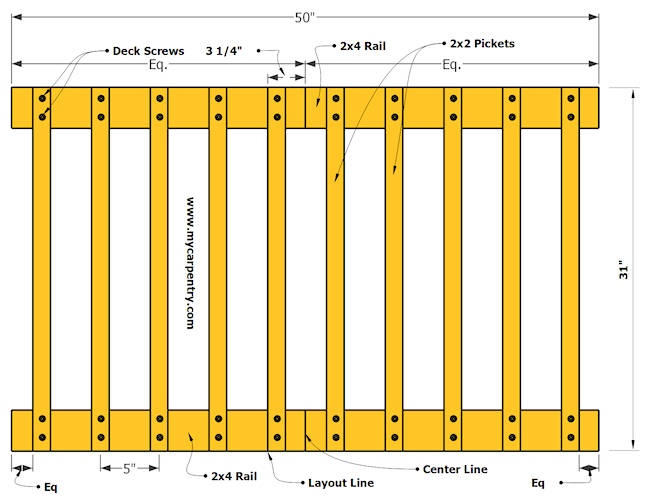
Measure between two 4x4 posts at the deck level (just in case the posts aren't perfectly plumb) and cut both top and bottom 2x4 rails this length. For the purpose of example, I will use 50" (1270 mm) as the distance between 4x4 posts.
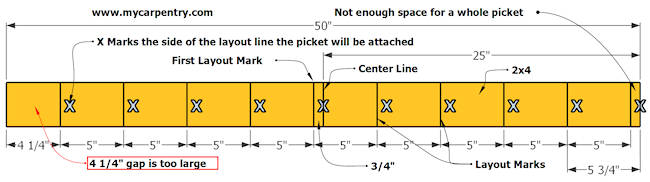
To determine which layout option to use (A or B), I will test them both. First, Option A - determine the center of the 2x4 railing (25" from each end). Option A starts with a picket at the center of the 2x4 railing. To start the layout, measure from the center mark to the left, half the width of a picket (3/4"), and make a mark. This mark will be the location of the left edge of the first (center) picket. Measure to the right of this mark and make a mark every 5" (127 mm) until you reach the end of the 2x4 rail (See Option A diagram below). The diagram shows that Option A is not the best choice because the middle of one picket breaks at the end of the 2x4 rail. We could move it over, but that would be ugly and mess up the spacing between pickets. We could get rid of the last picket, but then the space between the last picket and the 4x4 post would exceed the 4" gap requirement.
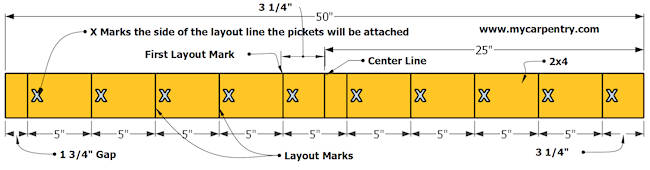
Option B - Determine the center of the 2x4 railing (25") and measure to the left, half the width of a picket (3/4") plus half the spacing of the pickets (2 1/2"), resulting in the first layout mark to be 3 1/4" to the left of the center mark. As in Option A, this will be the location of the left edge of the first (off-center) picket. Measure to the right and make a mark every 5". The diagram below shows Option B to be the best choice because the pickets at either end do not interfere with the 4x4 posts and do not have a gap where a 4" sphere could pass. Next, measure to the left of the first layout mark and make a mark every 5 inches to complete the picket layout. Transfer this layout to the remaining 2x4 rail.
The layout option (A or B) you choose depends on the space between the 4x4 posts. For instance, if the rail posts are 48" apart, Option A would likely be the best choice, but it's best to try them both and pick the best one.
Lay the rails flat on the deck. Cut the pickets to length (31" in this case), square them to the upper and lower rails and attach them at the layout marks using two 2 1/2" deck screws per rail.
Attach the completed rail/picket assembly to the top inside faces of the two 4x4 posts using deck screws or 8d threaded nails. Repeat the Option A/Option B process above on all remaining rail sections. Next, nail the 2x6 Rail Cap into the top of the 4x4s and into the top 2x4 rail.
For building code information related to deck construction, check out the Prescriptive Residential Wood Deck Construction Guide by the American Wood Council.
Stair Railing - Learn how to build stair railing.
Carpentry Tools - Find tools used for building decks.
Carpentry Calculators - Calculators for Carpentry.
Building Decks - "I have built over 200 decks."
What next?
Continue to Step 7 (of 7): Stair Railing.
Return to Carpentry Projects.
Leave Deck Railing and return Home.