Wood Decking (4)
Wood Decking (phase 4 of 7) will show you how to select decking material, choose the correct fasteners, and one easy method of installing wood decking using our 10x10 deck example.
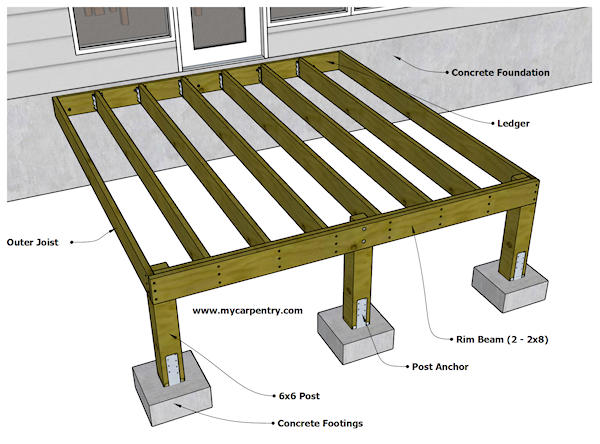
Before attaching any decking to the deck frame, the deck frame should be square and supported by posts and concrete footings.
Wood Decking Materials
Always use #1 pressure-treated lumber for all the structural parts of a deck. You can also use this same material for surface decking, especially in regions where high rainfall and persistent moisture are factors. Western red cedar or redwood are also excellent choices for wood decking material. They are both naturally resistant to insects and decay and have endured the test of time as durable decking materials.
I have built many decks using combinations of all three decking materials (mentioned above) but typically use pressure-treated pine for the deck structure and western red cedar or redwood for the decking, handrail, pickets, and trim. Redwood and cedar have many of the same qualities, but in Central Texas, cedar is much easier to find. Many lumber yards carry a wide range of sizes of cedar posts, beams, and decking material. The availability of the material that you choose is important. It will likely be less expensive than a material that is hard to come by, and when one lumber yard is out of a particular size, you will most likely find it somewhere nearby.
Screws vs. Nails
Wood decking can be attached using 16d galvanized spiral nails, but I think deck screws are a far better way to secure the decking to the deck frame. There are different types of screw heads to consider. Phillips head screws have been around for a long time, but Phillips's head screws tend to strip out easily. You might even have to change Phillips drivers a few times before you finish the decking. Robertson, or square-headed screws, are better than Phillips, but I prefer the Torx or Star drive screws. I believe they are superior to both Phillips and Robertson's screws.
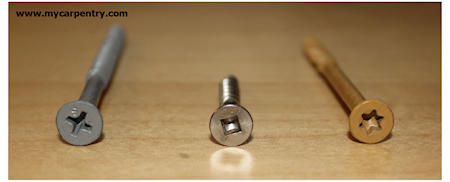
An 18-volt cordless drill with a star drive attached will drive many 3" screws into 2" (nominal) thick decking without stripping out the heads. Of course, you will have to recharge the battery a few times.
Installing Wood Decking
Before you attach your first piece of decking, ensure that the outer 2x8 joists are straight so that when you trim off your decking material, the overhang (1 1/2") will be the same from front to back (see below).
The following instructions assume that the actual width of your 2x6 (nominal) decking is 5 1/2 inches wide (140 mm). If the width of your decking is different, you can adjust these procedures to compensate.
From the left front corner of the deck framing, measure back towards the house and make a crow's foot mark at 4" (102 mm) on the top of the outer 2x8 joist. Perform this procedure again on the right front corner of the deck frame. Stretch a chalk line from the first point to the second point. Pull the chalk line tight and pop it.
You should now have a straight line extending the complete width of the deck that is 4 inches (102 mm) from the front of the framing. You are ready to attach the first deck board.
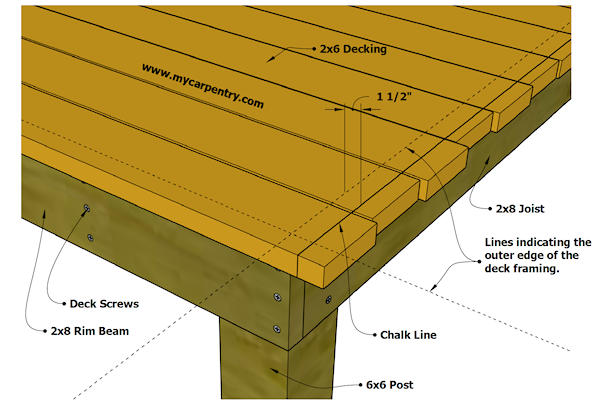
Select the straightest 10' (3048 mm) deck board from the lumber package. Starting at the front of the deck, center it between each side and line it up along the 4" (102 mm) chalk line. Once installed, the first board should overhang the front of the deck framing by approximately 1 1/2" (38 mm) and about 3" (76 mm) on each side. Screw the first deck board in place. Don't worry about the 3" overhang on each side. We will cut it to length in a later step.
Add all the remaining deck boards except the last two. Space them approximately 1/8 inch (3 mm) apart and let the ends overhang the outer joists about 3" on each side, just like the first deck board. They don't need to line up perfectly, as long as at least 2 inches (51 mm) or more is hanging over on each side of the deck (see diagrams A and B).
In my region, western red cedar usually comes very wet from the lumber yard. For this reason, I do not leave any space between the deck boards. In fact, I install them tight against each other. When the deck boards dry out, the gap between planks is often at least 1/8" (3 mm). If for some reason your decking material is already dry, leaving the 1/8" space between planks might be relevant.
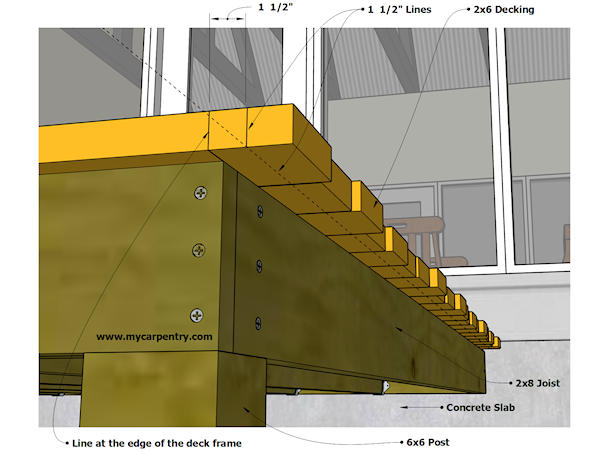
Before installing the last two deck boards, trim off the ends of the ones you have already installed. To do this, make a crow's foot mark 1 1/2" from the framing on the last 2x6 you installed, and another mark 1 1/2" from the deck framing onto the first 2x6 you installed (see diagram B). Stretch a chalk line between the two marks and pop a line across the top of your decking.
Once you have verified that your chalk line is correct, cut along the line with a circular saw to trim off the ends of the wood decking. Remember, "measure it twice, and cut it once." You can't add the wood back on after you cut it off! Perform the same steps on the other side of the deck.
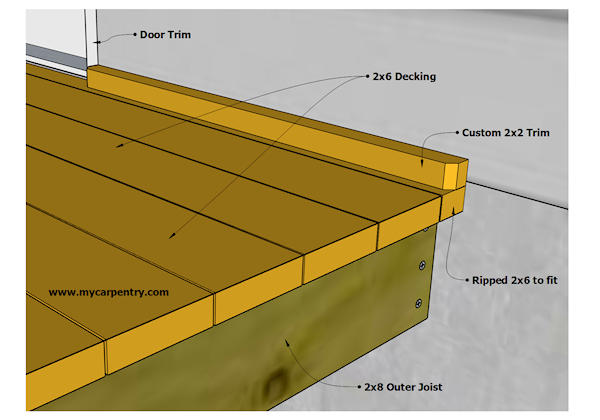
Cut the remaining deck boards the same length as the other freshly trimmed boards and nail/screw them in place. Unless you are lucky, you will likely have to rip the last deck board to make it fit between the previous deck board and your home's concrete slab or structure.
If there is any remaining gap between the last (ripped) deck board and the house, you can (optionally) trim it with a 2x2 shown in the drawing above.
For building code info related to deck building, check out the Prescriptive Residential Wood Deck Construction Guide by the American Wood Council.
Cedar Deck - Learn how I built a 500-square-foot cedar deck for myself.
Carpentry Tools - Find tools used for building decks.
Carpentry Calculators - Calculators for Carpentry.
Building Decks - "I have built over 200 decks."
What next?
Continue to Step 5 (of 7) - Building Deck Stairs
Leave Wood Decking and return to Carpentry Projects
Leave Wood Decking and Return Home