Build Your Own Deck (1)
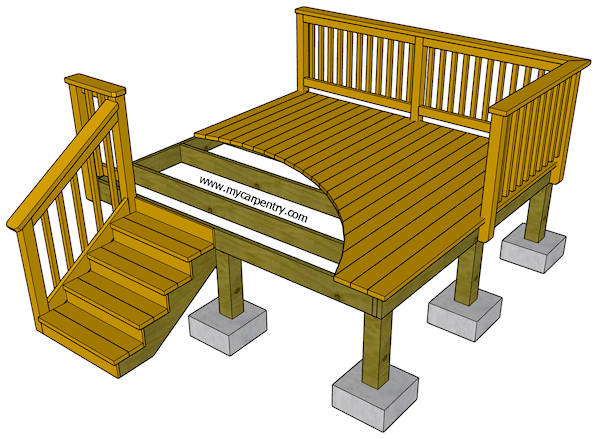
Build Your Own Deck (the design phase) is the first stage of our 7-phase example to demonstrate the process of designing and building a 10' x 10' (3048 x 3048 mm) deck.
The design phase is where you determine the location, structure, shape, style, and building code requirements that will be needed for you to build your own deck.
Preparing to Build Your Own Deck
You can apply these deck ideas and building techniques to any size or shape deck project. Of course, you would need to adjust the sizes and spacing of joists, beams, posts, etc., to meet the requirements of your custom structural design.
Location
If you plan to build a deck at the back door of an existing home, you might not have much choice in the location, but there could be other objects in your backyard that you could include in your design.
For example, you might have a nearby tree that could provide shade for your deck at certain times of the day if you were to build close enough to it. Or, if the tree is too small to provide shade, consider constructing your new deck around it. These are just a few of the many deck design considerations:
- What time of day will you spend most of your time on your new deck?
- Where will the sun be during this time?
- Where will the sun be in the middle of the summer?
- Where will it be in the middle of the winter?
- Is there a particular view to see as you drink your morning tea, coffee, or evening cocktail?
If you live in the northern hemisphere, build your own deck on the south side of your home, if possible. Your house will block the north wind in the winter, allowing more warm days on your sunny deck.
You can build your own deck in any shape or size you want. That is one of the great things about building a deck. If an object in your yard is in the way, you can build around it (or even over it). You can construct a multi-level deck with connecting stairs. You can make it hexagonal, octagonal, or even circular-shaped. You can build it around an above-ground pool. You can build it to accommodate a hot tub. You can design a gazebo with a wood deck floor. Or you can construct a deck with a free-standing patio cover over it. The list of options goes on and on.
Style
The 10' x 10' (3048 x 3048 mm) deck example will be square, with 6x6 posts. The posts will provide vertical support for the outer beam and deck. The other end of the deck, the inside part, will attach to the house's concrete foundation.
There are several methods for attaching a deck to a house, depending on the design of the house's foundation. For this example, we'll assume the house has a concrete foundation, and the deck will be attached using concrete anchors.
The deck frame will be 2x pressure-treated lumber. The deck surface will be 2x6 (51 x 152 mm) lumber.
The deck surface material can be the same pressure-treated lumber used for framing. Pressure-treated lumber is typically less expensive than other species and is a perfectly acceptable choice. In rainy or damp regions, pressure-treated material is perhaps the best choice for decking.
You can also use Western Cedars or Redwood for decking material. They both are naturally resistant to decay and are easy to work with. There are several types of wood sealers available for preserving cedar and redwood. I recommend lots of research before selecting a particular sealant. If you have already made the decision, test it out on a scrap piece of material to see if it lives up to your expectations before you seal your whole deck.
When designing a deck or any structure, consider the dimensions of the purchased material. In the USA, lumber sizes are in lengths of two-foot increments. Design your projects to maximize the sizes of lumber and minimize waste.
Our 10' x 10' deck is a perfect example of relaying this point. For instance, if you were to build this same deck only 9 feet wide, you would still have to buy the same 10-foot lengths of decking material to cover it, but after you cut off the excess materials, 10 square feet of valuable deck space would end up in the landfill!
Structure
Generally, a Building Permit is required even if you build your own deck. The permitting authorities will require a drawing that shows all structural specifications. Several of them are listed below:
- A detail of how the ledger board will be attached to the existing structure.
- The sizes, lengths, and spacing of joists.
- The size and length of any required beams.
- Post size, length and spacing.
- Fasteners (screws, nails, lag bolts, joist hangers, etc.)
- Footing sizes and depths.
- Stair specifications (see Building Deck Stairs (Phase 5))
- Deck and Stair Railing specifications (see Phases 6 and 7)
While designing your deck, you must consider wood structure. To determine the size, length, and spacing of joists, refer to the Maximum Joist Spans and Overhangs section of the Prescriptive Residential Wood Deck Construction Guide by the American Wood Council (AWC).
From the table of maximum joist spans, you will notice that a Southern Pine 2x8 (51 x 203 mm) spaced 16 inches (406 mm) apart can span about the same distance (11'-10") as a Southern Pine 2x10 (51 x 254 mm) spaced 24 inches (610 mm) apart (11'-5"). If you don't have the space for 2x10s, or they are not available in the size you need, you can optionally use 2x8 joists spaced 16 inches apart and still meet the structural design requirements.
The thickness of the decking is another consideration for joist spacing. If you use 2x6 decking (where the actual size is - 1 1/2" x 5 1/2"), you can space your joists 24 inches apart.
Thinner 5/4-inch decking (pronounced "five-quarter") requires that joist spacing should not be more than 16". Since the 5/4-inch decking is only 1 1/4" thick, the joists have to be closer together to support the thinner material.
For building codes related to decks, check out the Prescriptive Residential Wood Deck Construction Guide by the American Wood Council.
Cedar Deck - Learn how I built a 500-square-foot cedar deck for myself.
Carpentry Tools - Find tools used for building decks.
Patio Cover Plans - How to build a patio cover.
Building Decks - Read my story about building 200 decks.
What next?
Continue to Step 2 (of 7): (Deck Framing)
Leave build your own deck and go to Carpentry Projects
Leave Build Your Own Deck and return to the mycarpentry.com home page.